Connecting External AI Clients
Connect ChatGPT, Claude Desktop, Cursor, and other compatible AI clients to the Qualytics MCP server. These clients use the same Qualytics tool catalog as AgentQ, but each manages its own model, conversations, and interface. Each client authorizes through a browser using your API token.
Prerequisites
- A Qualytics Personal API Token (PAT). Navigate to Settings > Tokens and click Generate Token. See Tokens for detailed instructions.
- Your Qualytics instance URL (e.g.,
https://your-company.qualytics.io).
The MCP service endpoint is:
Tip
Configuring an AI provider in Qualytics is not required for external clients, since each client brings its own LLM. To configure AgentQ's built-in chat, see Add Integration.
Reconnect clients configured with a bearer header
A Qualytics API token in an Authorization: Bearer header does not authenticate an MCP connection. Remove that header and reconnect through OAuth. Paste the API token only into the Qualytics authorization page opened by your client. Existing MCP authorizations must also be completed again after this change.
Use the instance URL shown by your Qualytics administrator. A hostname alias can fail authorization if it does not match the instance's configured MCP URL. MCP authorizations expire after 30 days, even when the client refreshes its connection. Reconnect and enter a valid API token when prompted. Revoking the API token ends the MCP authorization sooner.
A client that requests no scopes receives read and write access. The Qualytics authorization page shows the permissions before you enter your API token. Clients may request read-only access explicitly. If your client cannot complete OAuth, use a compatible client or the CLI MCP Server.
ChatGPT
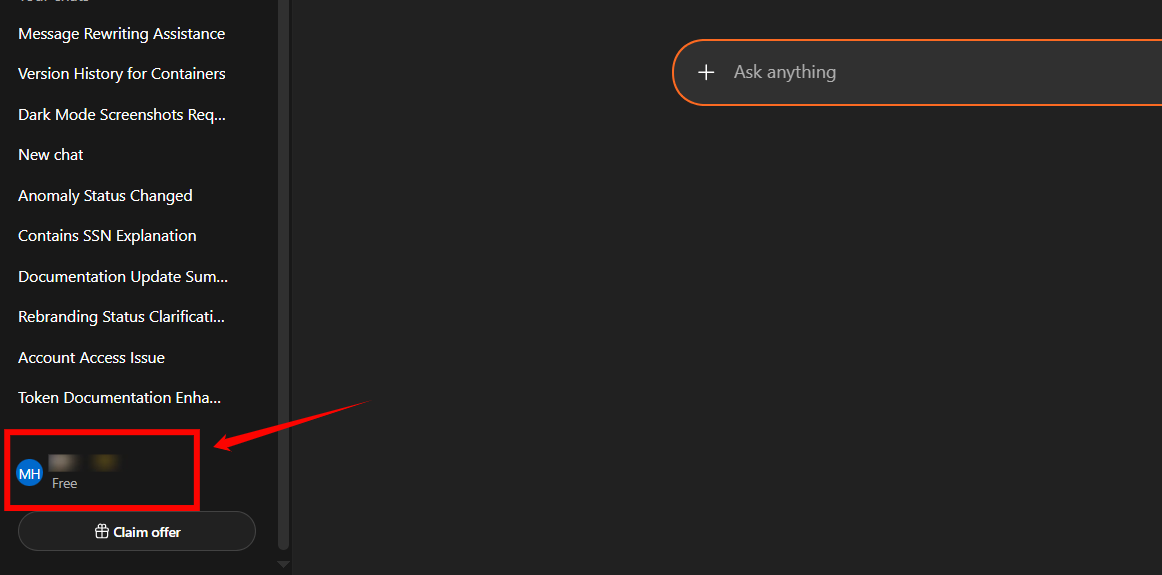
Step 1: Log in to your ChatGPT account and click on your profile icon in the bottom-left corner of the screen.
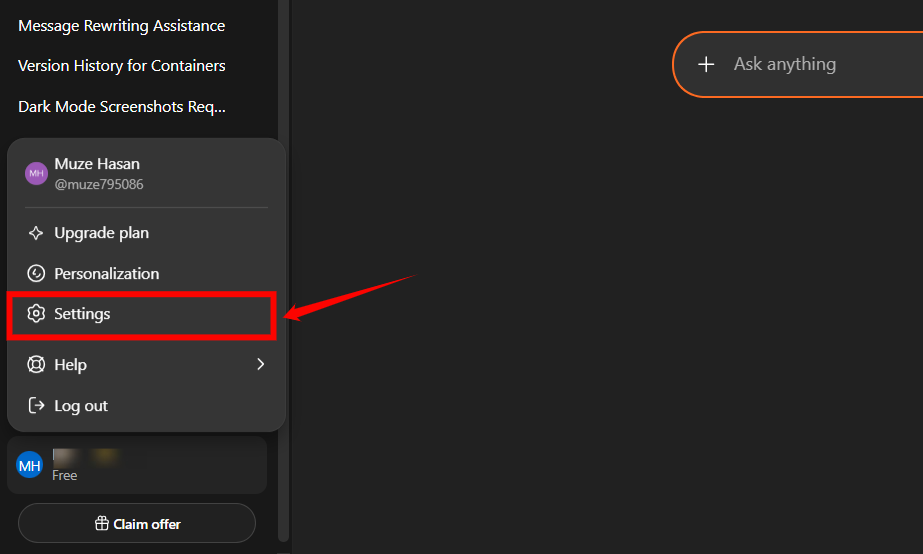
Step 2: A dropdown menu appears. Click Settings.
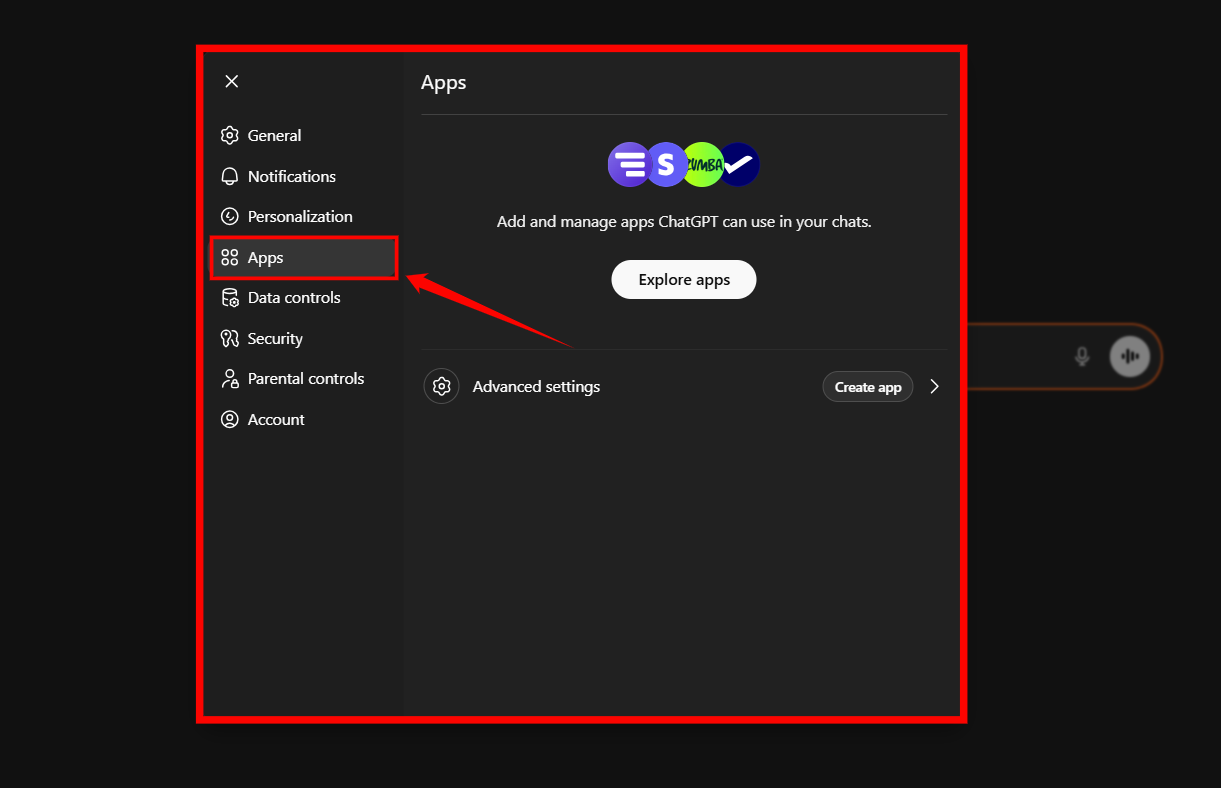
Step 3: A modal window opens. Click Apps to manage and create new app connections.
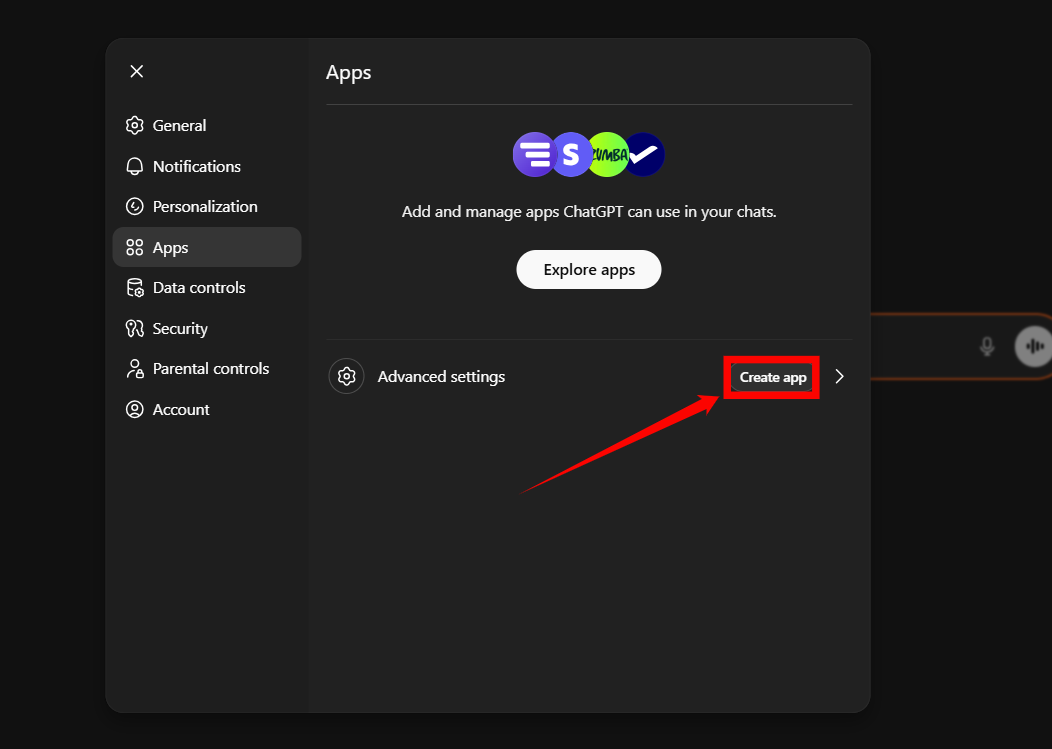
Step 4: In the Apps section, click Create app to start creating a new app connection.
Step 5: The New App modal opens. Enter the required details:
| No. | Field | Description | Example |
|---|---|---|---|
| 1 | Icon | (Optional) Upload an icon for the app (128 × 128 px, max 10 KB). | Qualytics logo |
| 2 | Name | Enter a unique name to identify this app connection. | Qualytics MCP |
| 3 | Description | Provide a short summary explaining what this integration does. | Connects ChatGPT to Qualytics MCP for data quality operations. |
| 4 | MCP Server URL | Enter your Qualytics MCP endpoint URL. | https://your-qualytics-instance.qualytics.io/api/mcp/ |
| 5 | Authentication | Select the authentication method. | OAuth |
| 6 | OAuth Client ID | Leave blank. Qualytics supports dynamic client registration, so ChatGPT registers its own OAuth client when it connects. A fixed client ID such as qualytics-client is rejected. |
(blank) |
| 7 | OAuth Client Secret | Leave blank, for the same reason. | (blank) |
| 8 | Confirmation Checkbox | Select "I understand and want to continue" to proceed. | Checked |
Step 6: Once all the details are filled in, click Create to complete the app setup.
Step 7: After the app is created, ChatGPT prompts you to authorize the connection. Paste your Qualytics API token to authorize.
Claude Desktop
Claude Desktop supports MCP servers as Custom Connectors. To add the Qualytics MCP server:
- Open Settings in Claude Desktop.
- Navigate to the Connectors section.
- Click Add Custom Connector.
- Configure the connector with the following details:
- Name:
Qualytics - URL:
https://your-qualytics-instance.qualytics.io/api/mcp/ - Authentication: Choose OAuth, then enter your Qualytics API token on the Qualytics authorization page.
- Name:
- Click Save to enable the connector.
Replace your-qualytics-instance with your Qualytics hostname.
Once configured, Qualytics tools will be available in your Claude Desktop conversations.
Claude Code
Use the claude mcp add command to register the Qualytics MCP server:
Replace your-qualytics-instance with your Qualytics hostname. Complete OAuth in your browser when Claude prompts you.
To share the configuration with your team, add the --scope project flag, which stores the configuration in a .mcp.json file in your project directory.
Cursor
Add the following to your Cursor MCP configuration:
{
  "mcpServers": {
    "qualytics": {
      "url": "https://your-qualytics-instance.qualytics.io/api/mcp/"
    }
  }
}
Replace your-qualytics-instance with your Qualytics hostname. Complete the browser authorization when Cursor prompts you.
VS Code (GitHub Copilot)
Add the Qualytics MCP server to your VS Code workspace or user settings. Create or edit the .vscode/mcp.json file in your workspace:
{
  "servers": {
    "qualytics": {
      "type": "http",
      "url": "https://your-qualytics-instance.qualytics.io/api/mcp/"
    }
  }
}
Replace your-qualytics-instance with your Qualytics hostname. VS Code opens a browser for OAuth authorization when you connect.
Once configured, Qualytics tools and resources will be available in GitHub Copilot Chat.
Codex Desktop
Add a streamable HTTP server to ~/.codex/config.toml:
[mcp_servers.qualytics]
url = "https://your-qualytics-instance.qualytics.io/api/mcp/"
auth = "oauth"
Run codex mcp login qualytics in a terminal, then enter your API token on the Qualytics authorization page. Codex Desktop and the Codex CLI share this MCP configuration. Leave bearer_token_env_var unset: a Qualytics API token is not accepted as the MCP bearer, and an MCP access token expires quickly. See the Codex MCP setup guide for more configuration options.
Windsurf
Edit your Windsurf MCP configuration file at ~/.codeium/windsurf/mcp_config.json:
{
  "mcpServers": {
    "qualytics": {
      "serverUrl": "https://your-qualytics-instance.qualytics.io/api/mcp/"
    }
  }
}
Replace your-qualytics-instance with your Qualytics hostname. Complete browser authorization when Windsurf prompts you.
You can also add MCP servers through the Windsurf Settings > Cascade > MCP Servers panel.
Amazon Q Developer
Add the Qualytics MCP server to your Amazon Q Developer configuration. Edit ~/.aws/amazonq/mcp.json for global configuration:
{
  "mcpServers": {
    "qualytics": {
      "type": "http",
      "url": "https://your-qualytics-instance.qualytics.io/api/mcp/"
    }
  }
}
Replace your-qualytics-instance with your Qualytics hostname. Open the OAuth link from Amazon Q and complete authorization in your browser.
For workspace-scoped configuration, place the file at .amazonq/mcp.json in your project directory.
Other MCP-Compatible Clients
Any client that supports the Model Context Protocol can connect to Qualytics using these details:
| Setting | Value |
|---|---|
| Server URL | https://your-qualytics-instance.qualytics.io/api/mcp/ |
| Authentication | OAuth browser authorization with your Qualytics API token |
| Protocol | MCP (Model Context Protocol) |
For a full list of available tools and capabilities, see the MCP Overview.