Chat Interface Tips
Quick reference for the controls available in the AgentQ interface.
Full-Page Chat
The full-page chat opens when you click AgentQ in the left sidebar. It has a collapsible Chats sidebar on the left and the main chat area on the right.
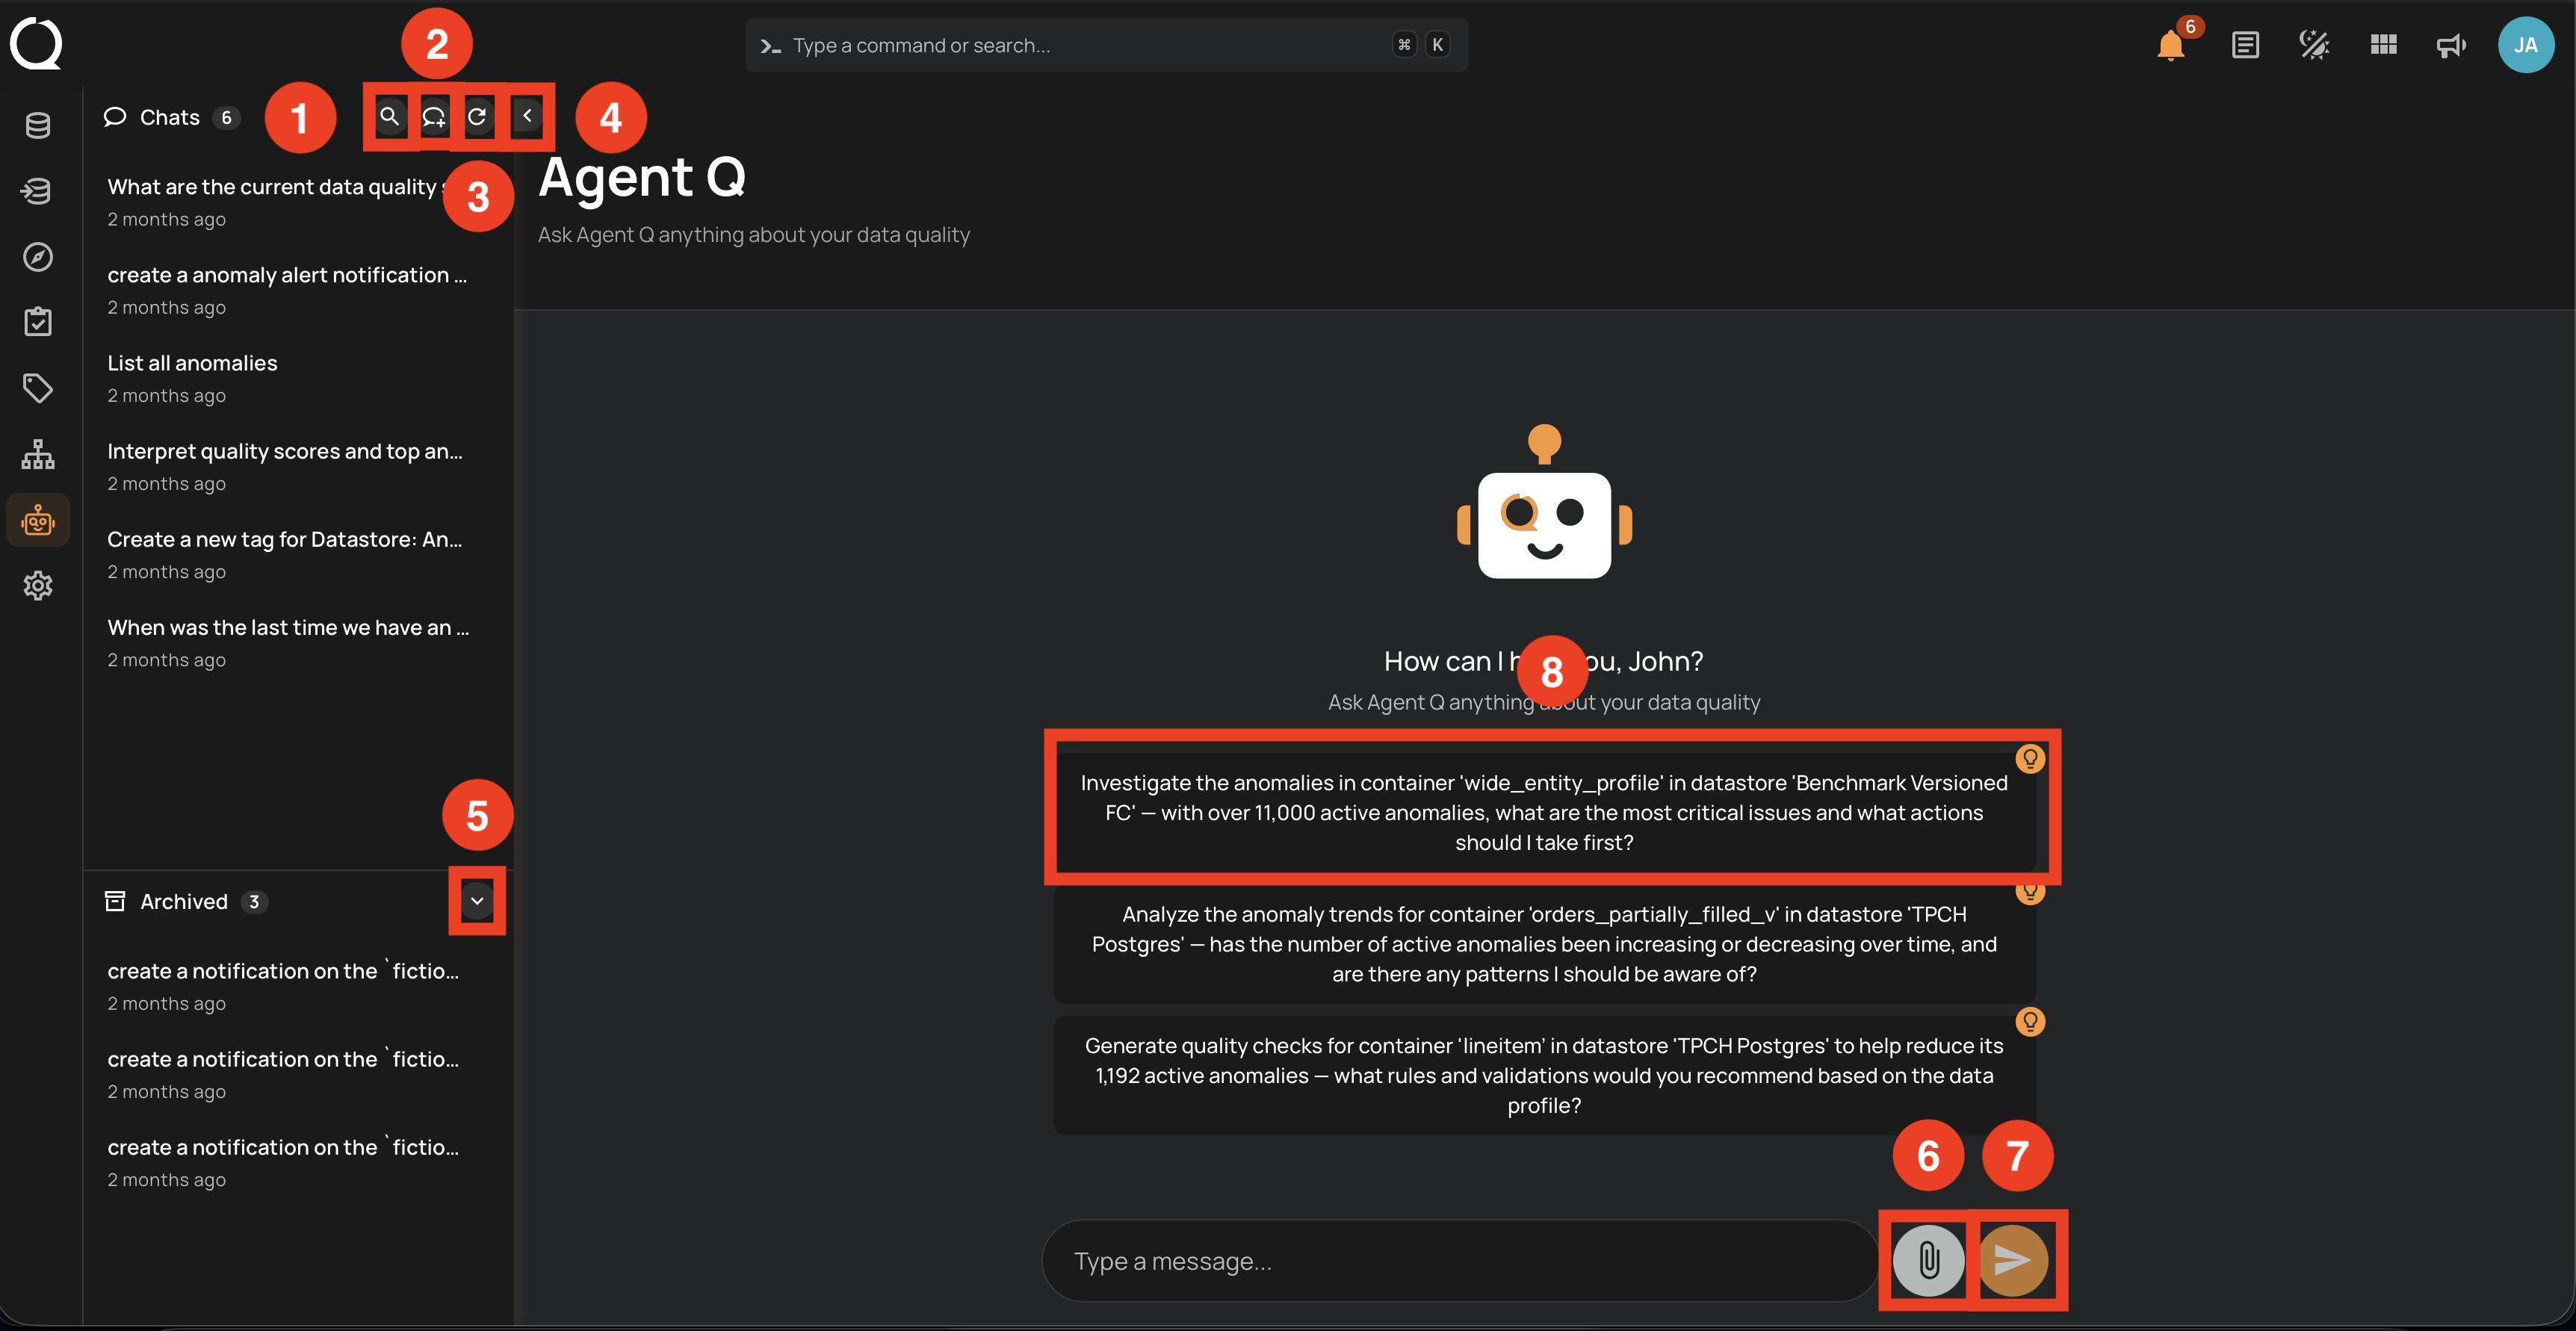
| # | Button | Icon | Description |
|---|---|---|---|
| 1 | Search | Filter the Chats list by title or message content. See Search Conversations. | |
| 2 | New Chat | Start a new conversation. See Start a New Conversation. | |
| 3 | Refresh | Reload the Chats list to surface recently created conversations. | |
| 4 | Collapse | Hide the Chats sidebar to give more room to the chat area. Click to expand it again. | |
| 5 | Archived | Toggle the Archived section to access archived conversations (Restore, Delete). | |
| 6 | Attach | Upload a document to send with your message. See Attach a File. | |
| 7 | Send | Send the message to AgentQ. | |
| 8 | Smart suggestion | Click any suggestion chip to send it as the opening message of a new conversation. |
Floating Chat
The floating chat is the persistent widget in the bottom-right corner of every page. Click the AgentQ button to open it; press Q to toggle it from anywhere on the page (except while typing in an input).
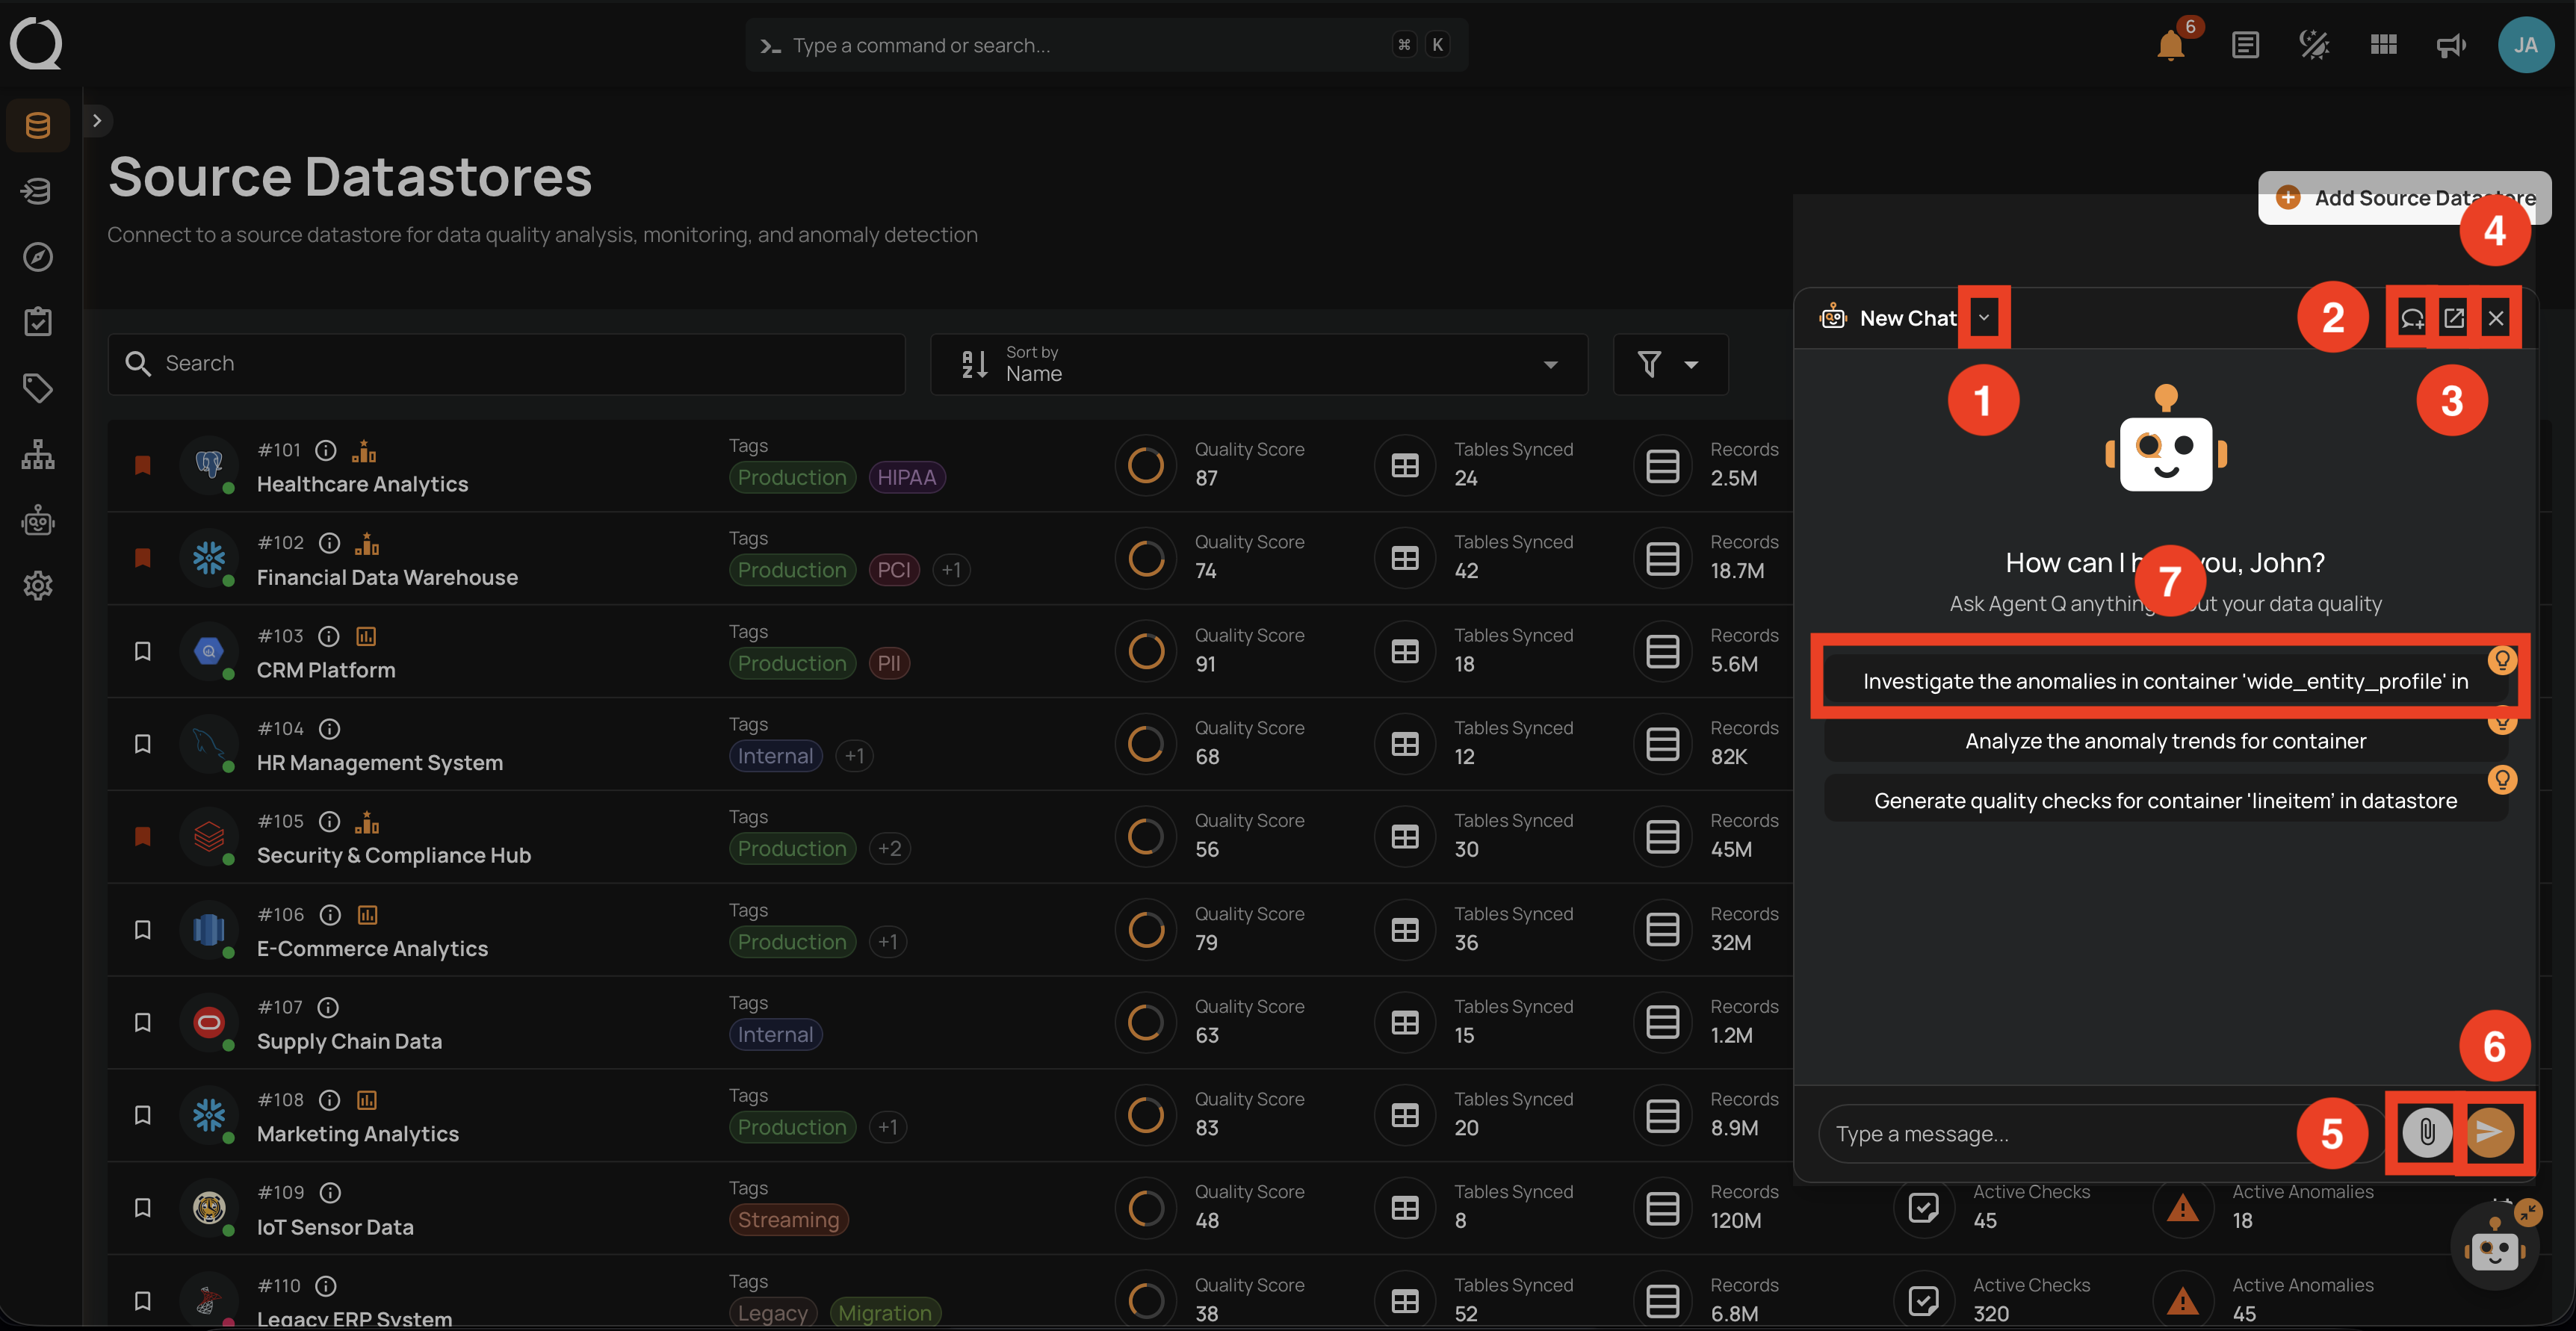
| # | Button | Icon | Description |
|---|---|---|---|
| 1 | Chat history | Open the list of previous conversations to resume one. See Resume a Conversation. | |
| 2 | New Chat | Start a new conversation. | |
| 3 | Open full chat | Open the current conversation in the full-page AgentQ view. | |
| 4 | Close | Close the floating chat. | |
| 5 | Attach | Upload a document to send with your message. See Attach a File. | |
| 6 | Send | Send the message to AgentQ. | |
| 7 | Smart suggestion | Click any suggestion chip to send it as the opening message of a new conversation. |
Resize the Panel
The floating chat has three resize handles along its top and left edges:
- The top edge drags to change only the height.
- The left edge drags to change only the width.
- The top-left corner drags to change both dimensions at once. A small square patterned with diagonal lines marks this corner.
Hover any handle to see a subtle highlight; the active handle turns primary while you drag.
The panel size persists per browser: your last-chosen width and height are restored the next time you open the floating chat. Clearing your browser storage resets it to the default.
The panel enforces size limits: it never shrinks below a minimum size, and it never grows beyond your current viewport (a small margin is kept around the edges).
Stop a Response
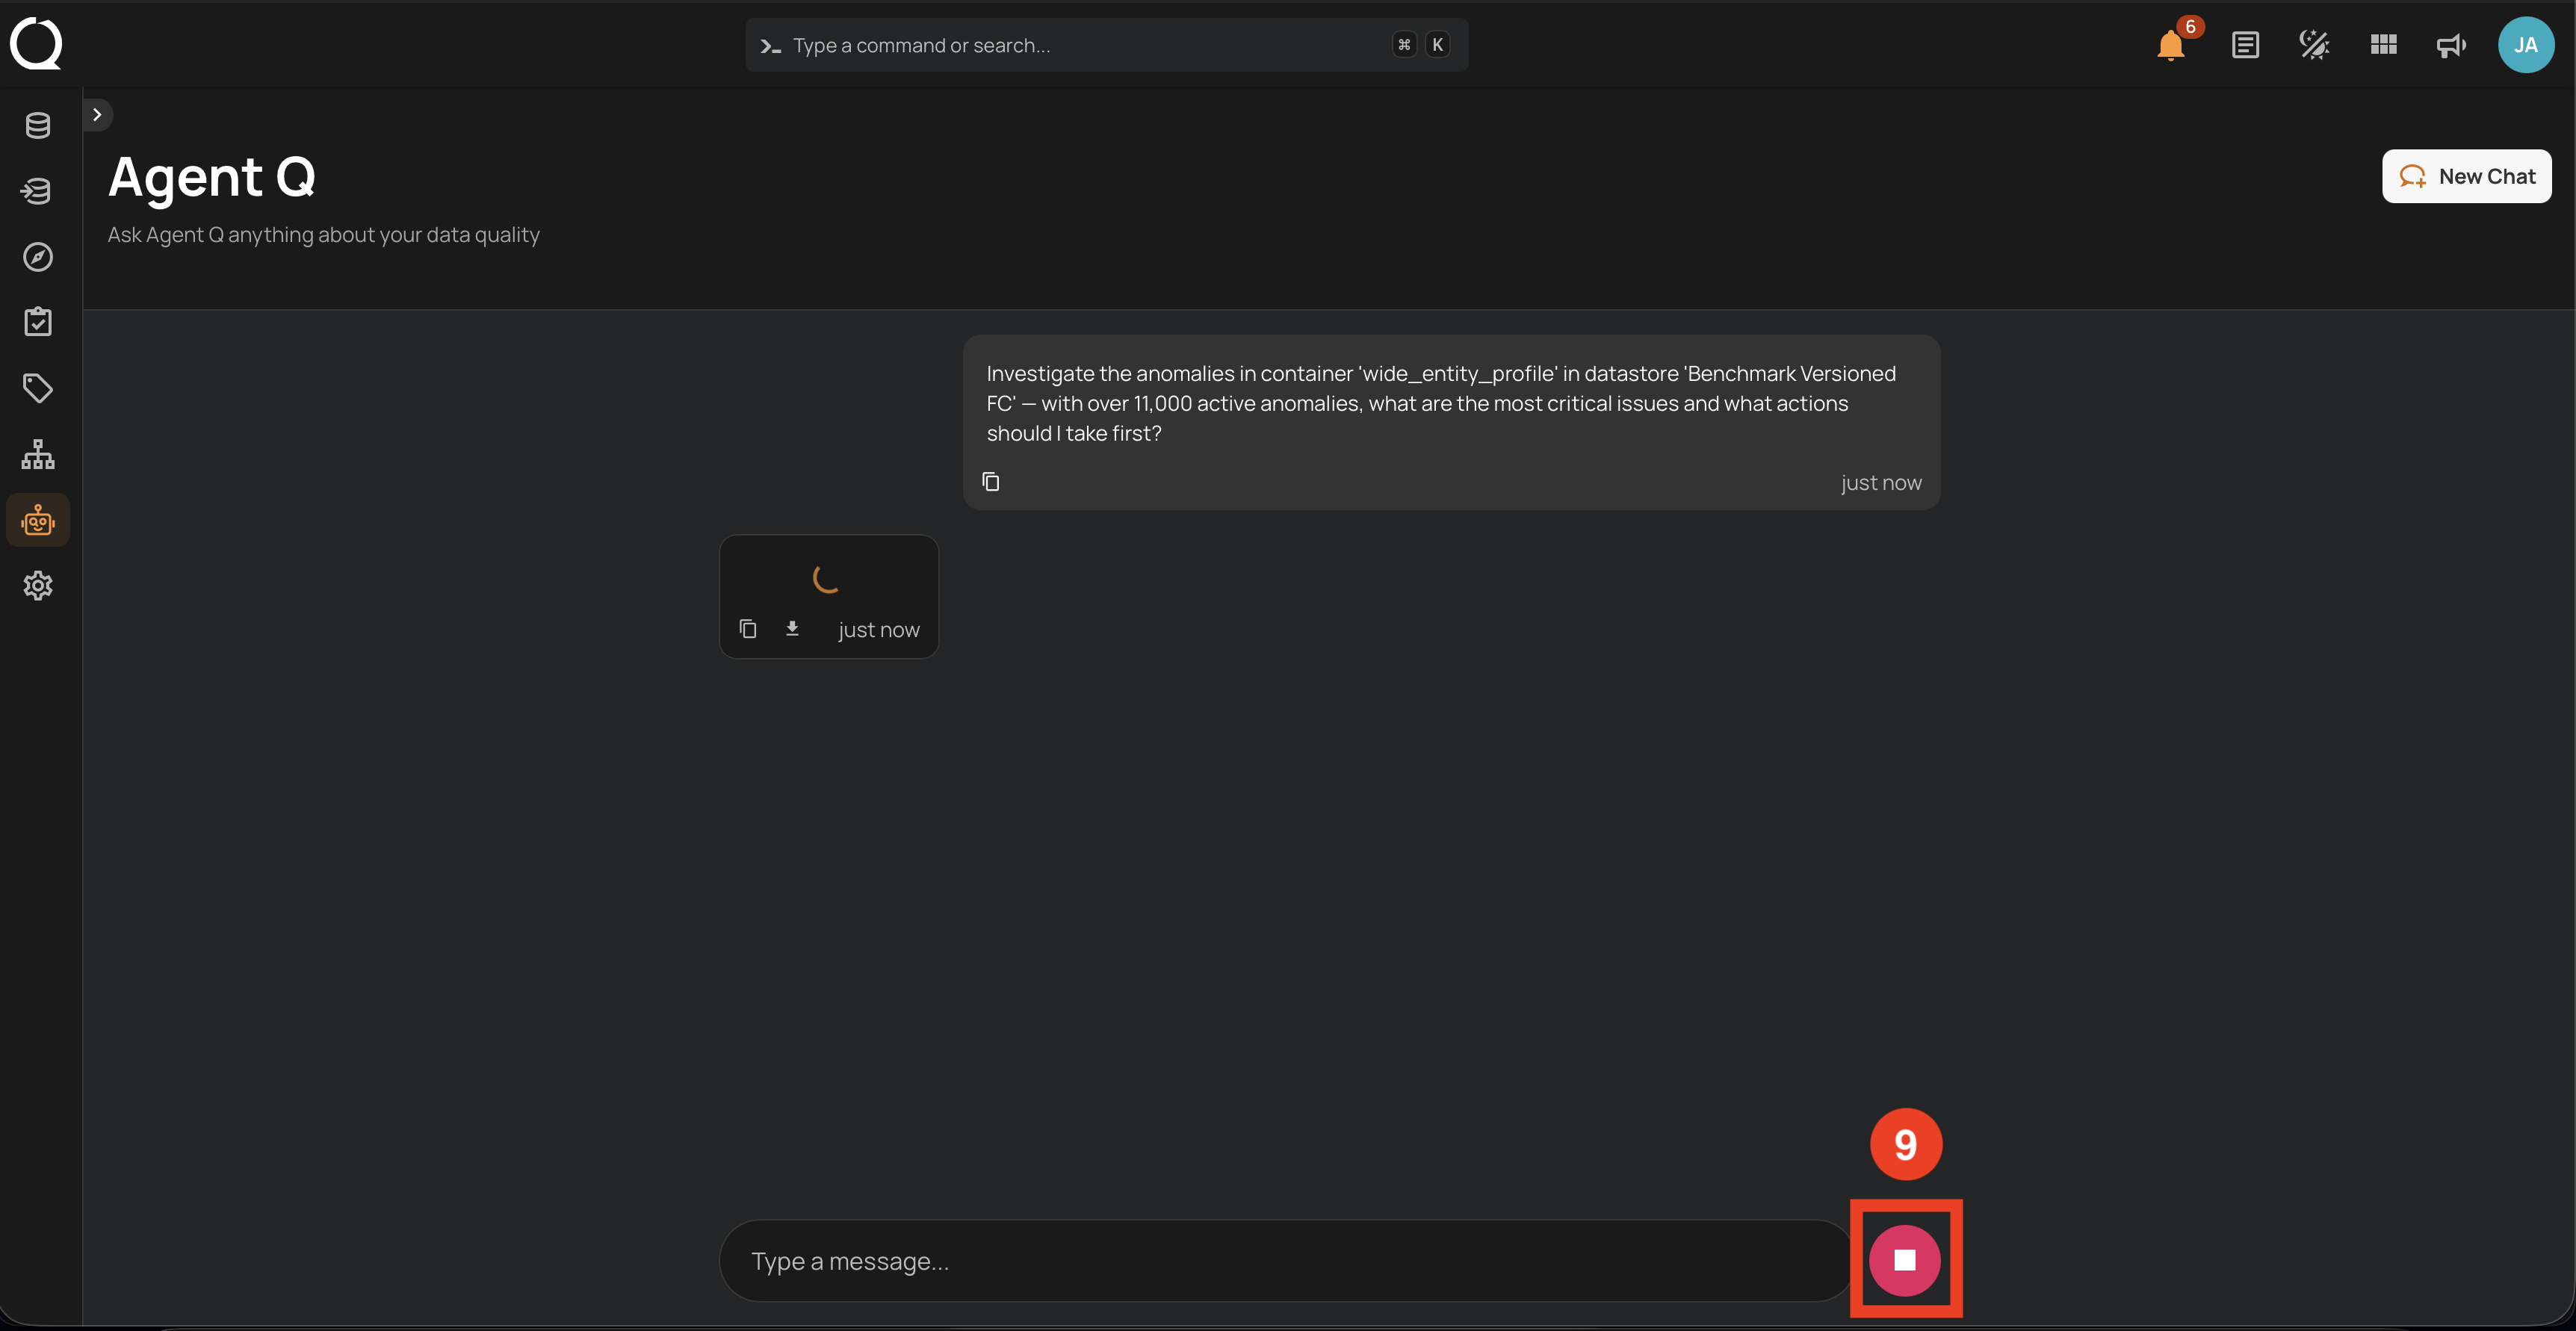
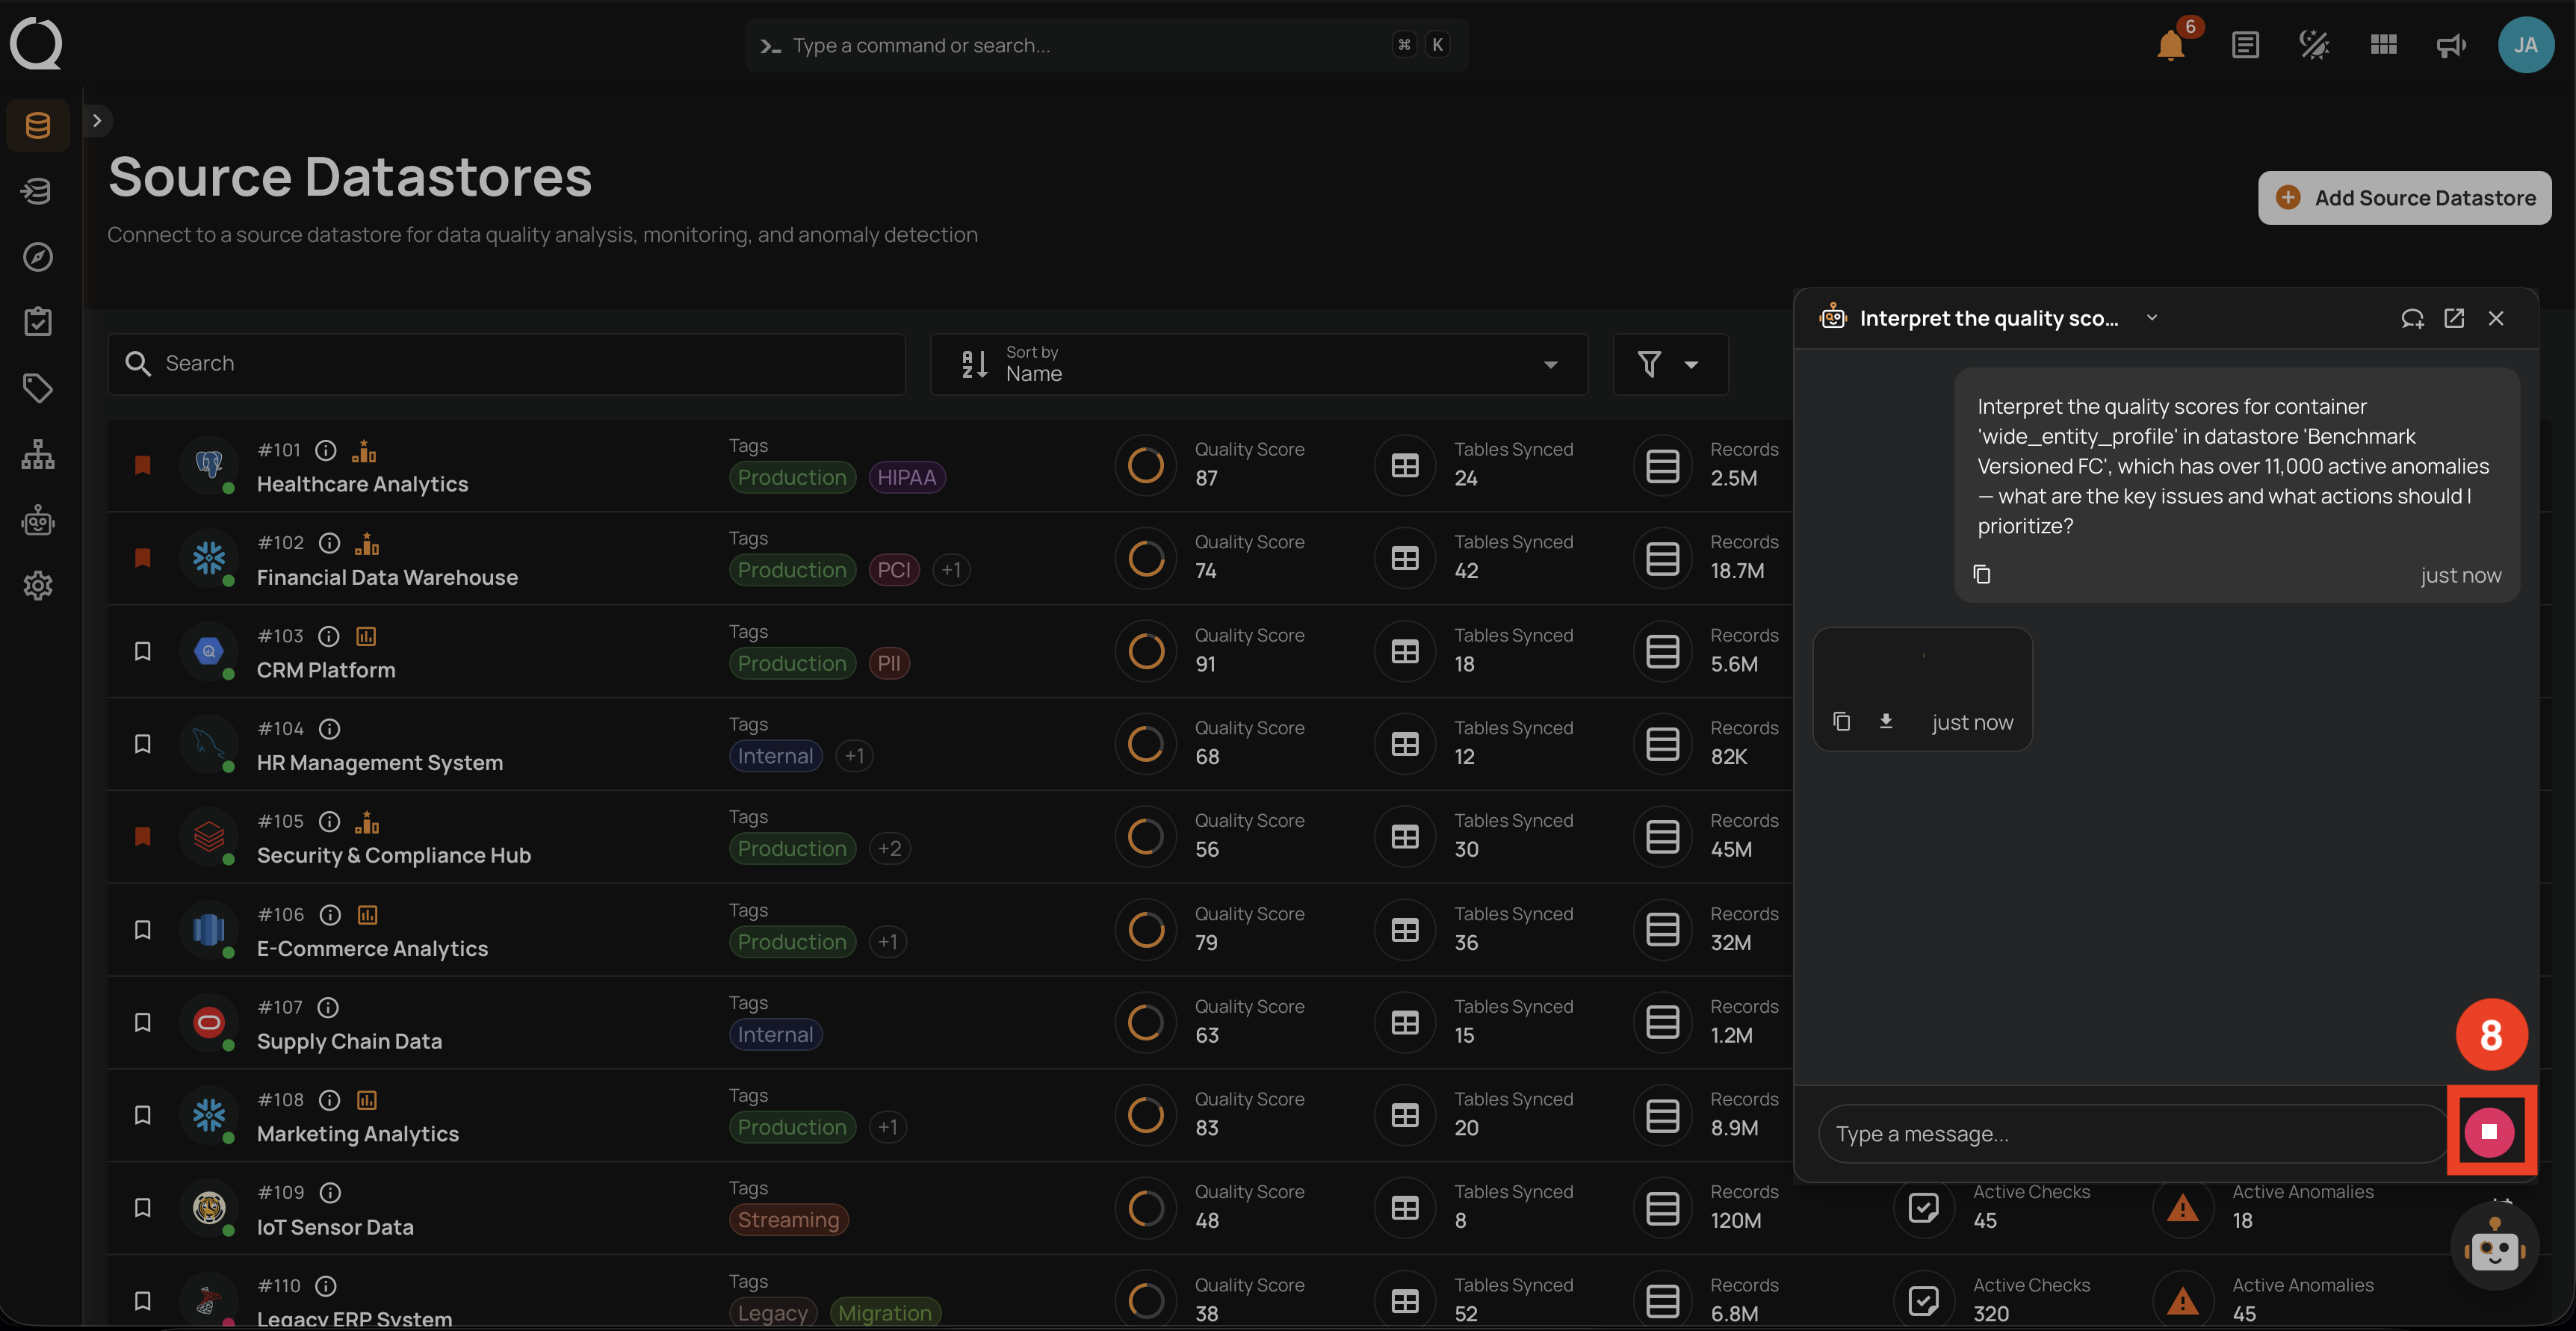
While AgentQ is generating, the Send button becomes a Stop button. Click it to interrupt the response. Whatever AgentQ produced so far is preserved as a partial response with a "Stopped" indicator.
The same control is available in the floating chat:
Paste Large Content
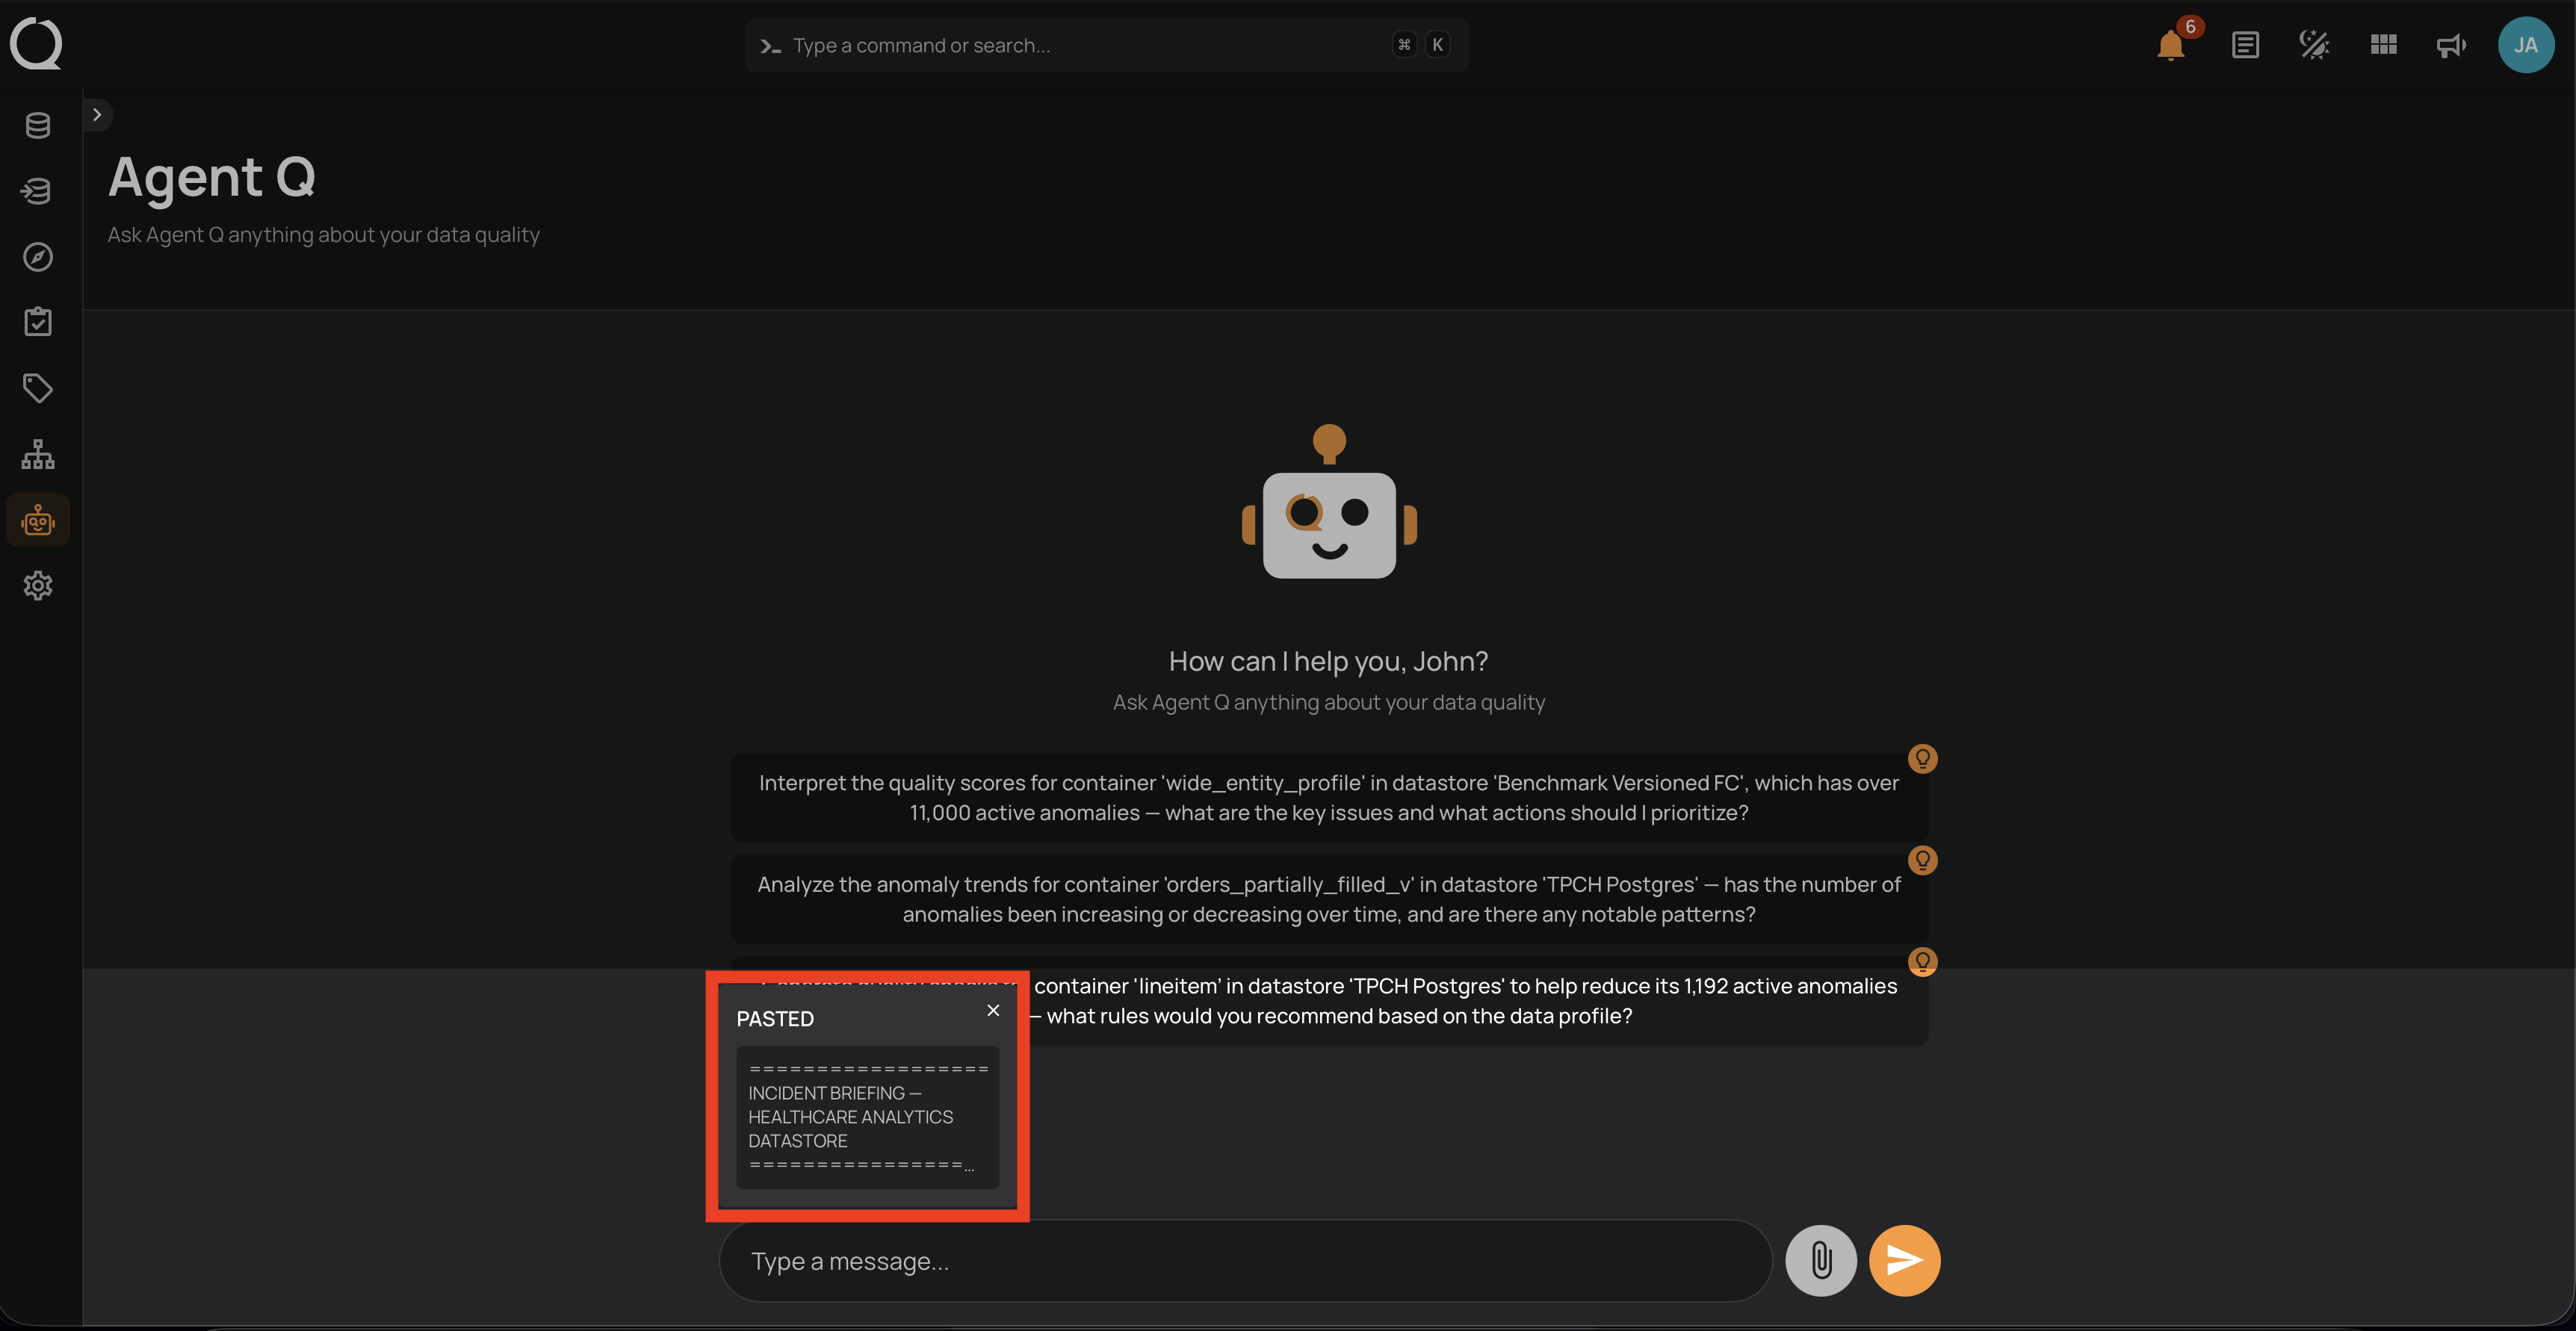
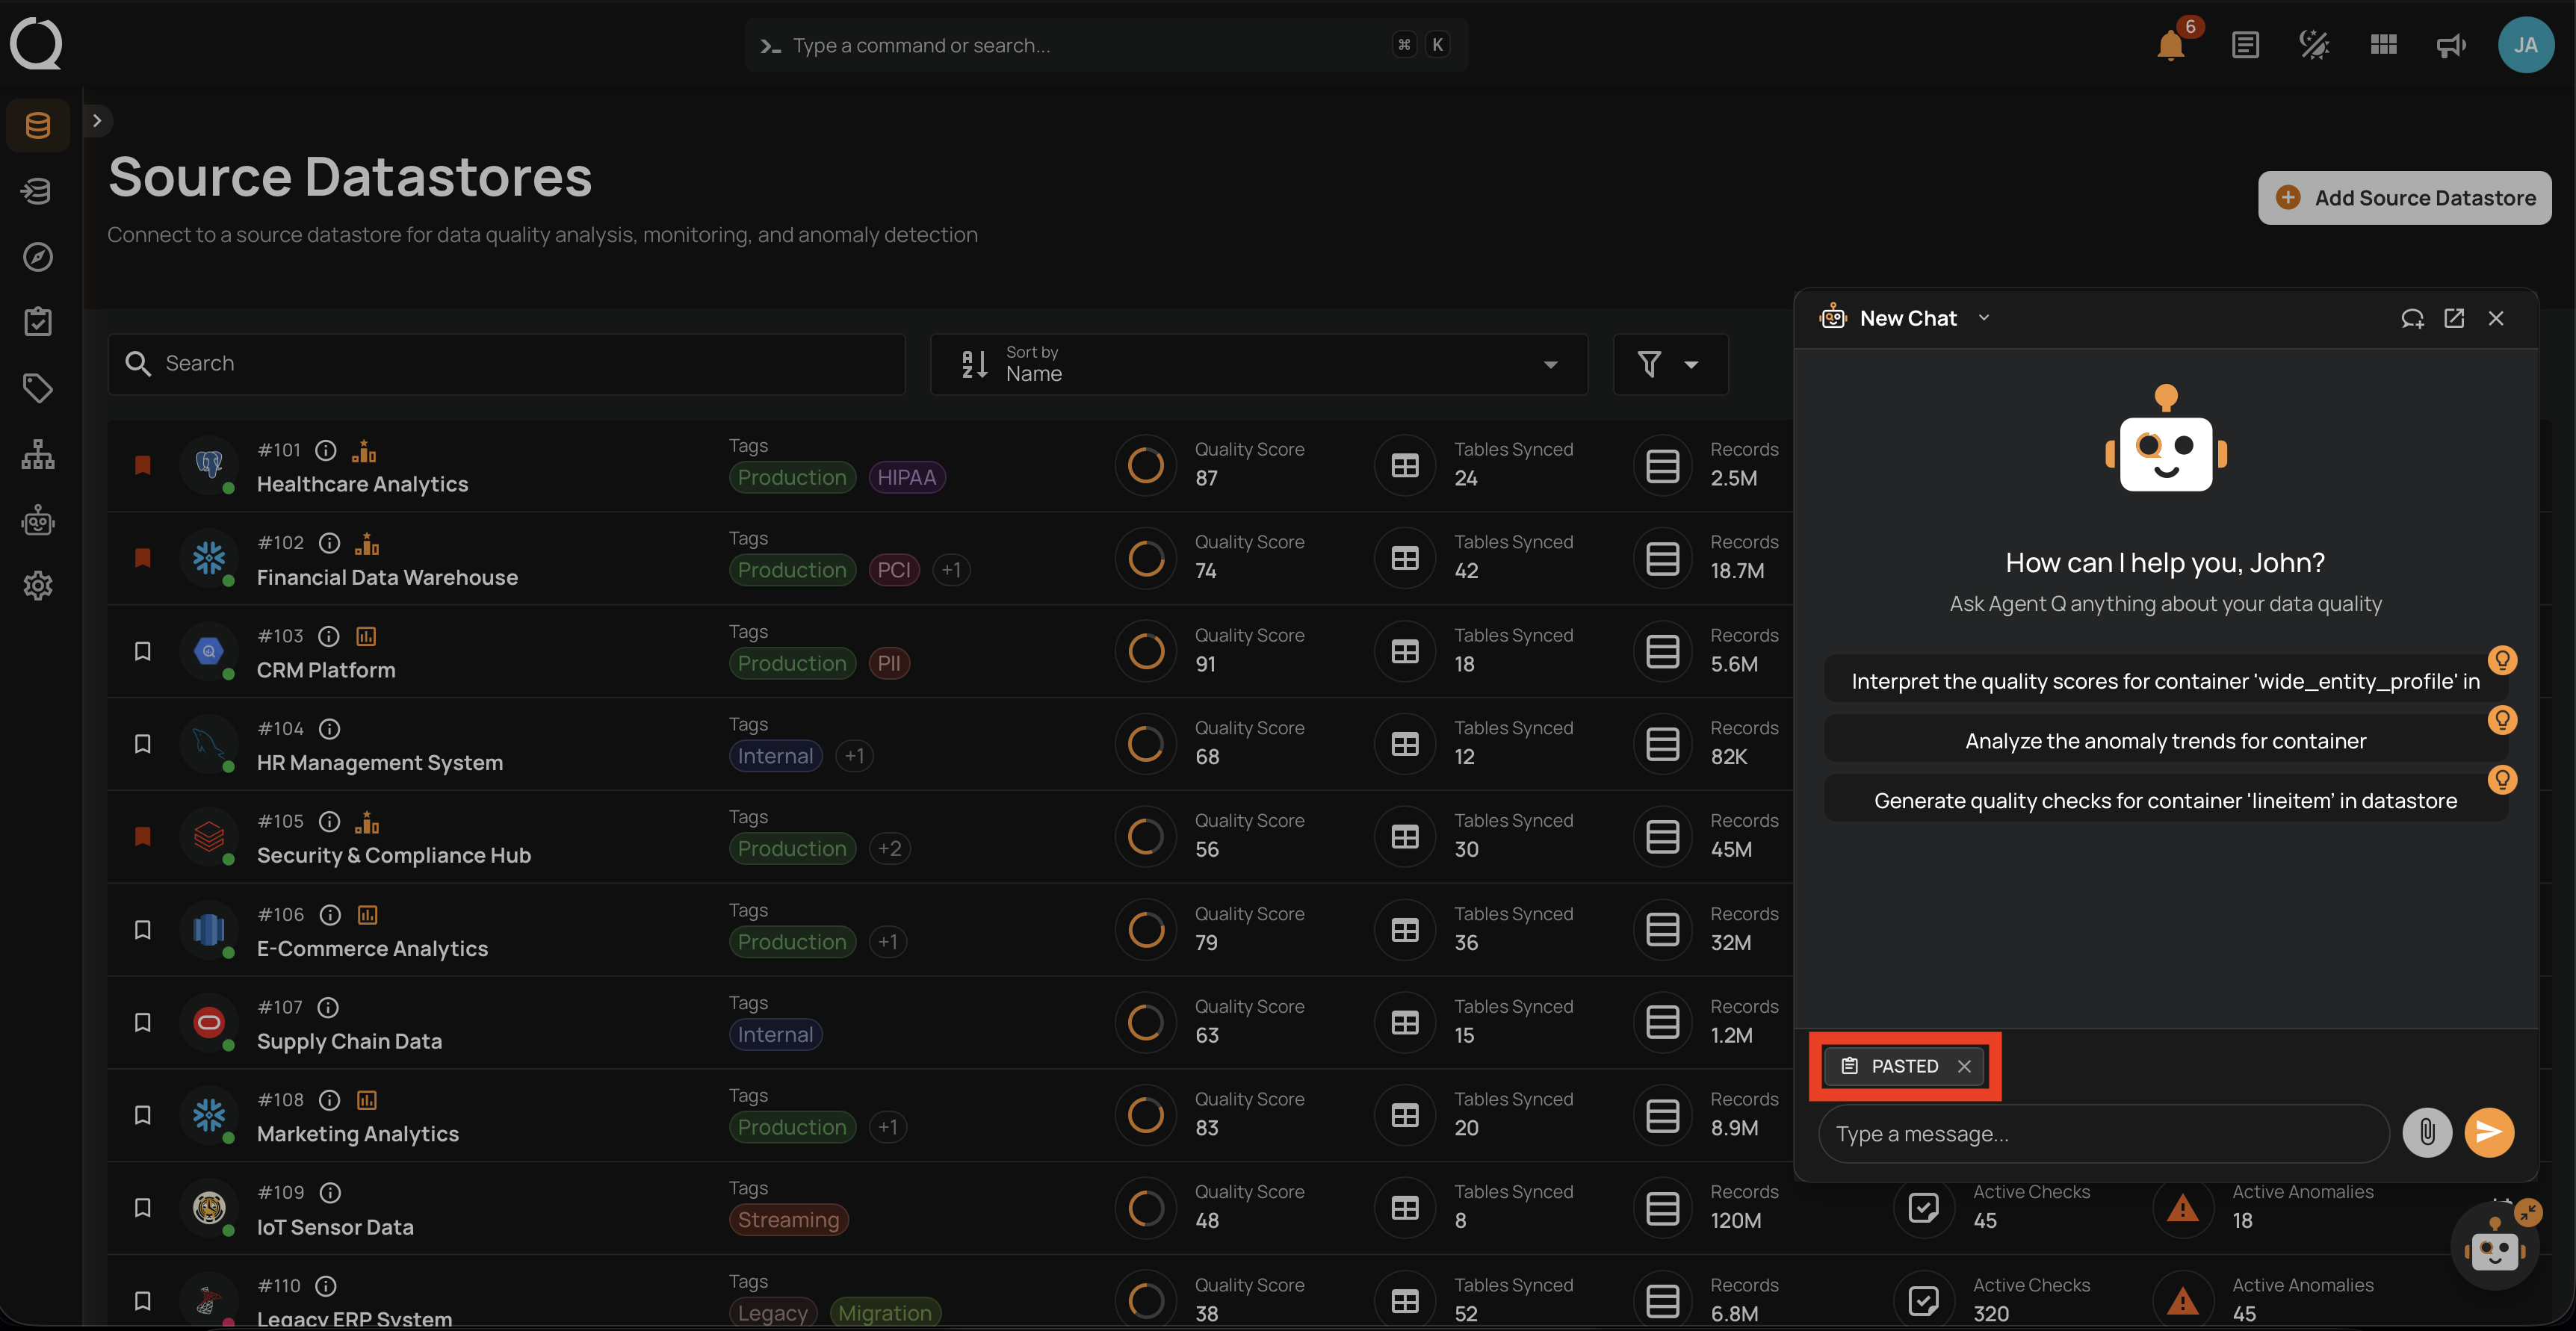
When you paste text of 1,000 characters or more into the input, AgentQ captures it as an attachment rather than inserting it into the input field. The pasted content appears as a removable panel labeled PASTED above the input. It is included with your message when you send it, giving AgentQ full context while keeping the input clean.
In the floating chat, the pasted content appears as a compact chip:
Attach a File
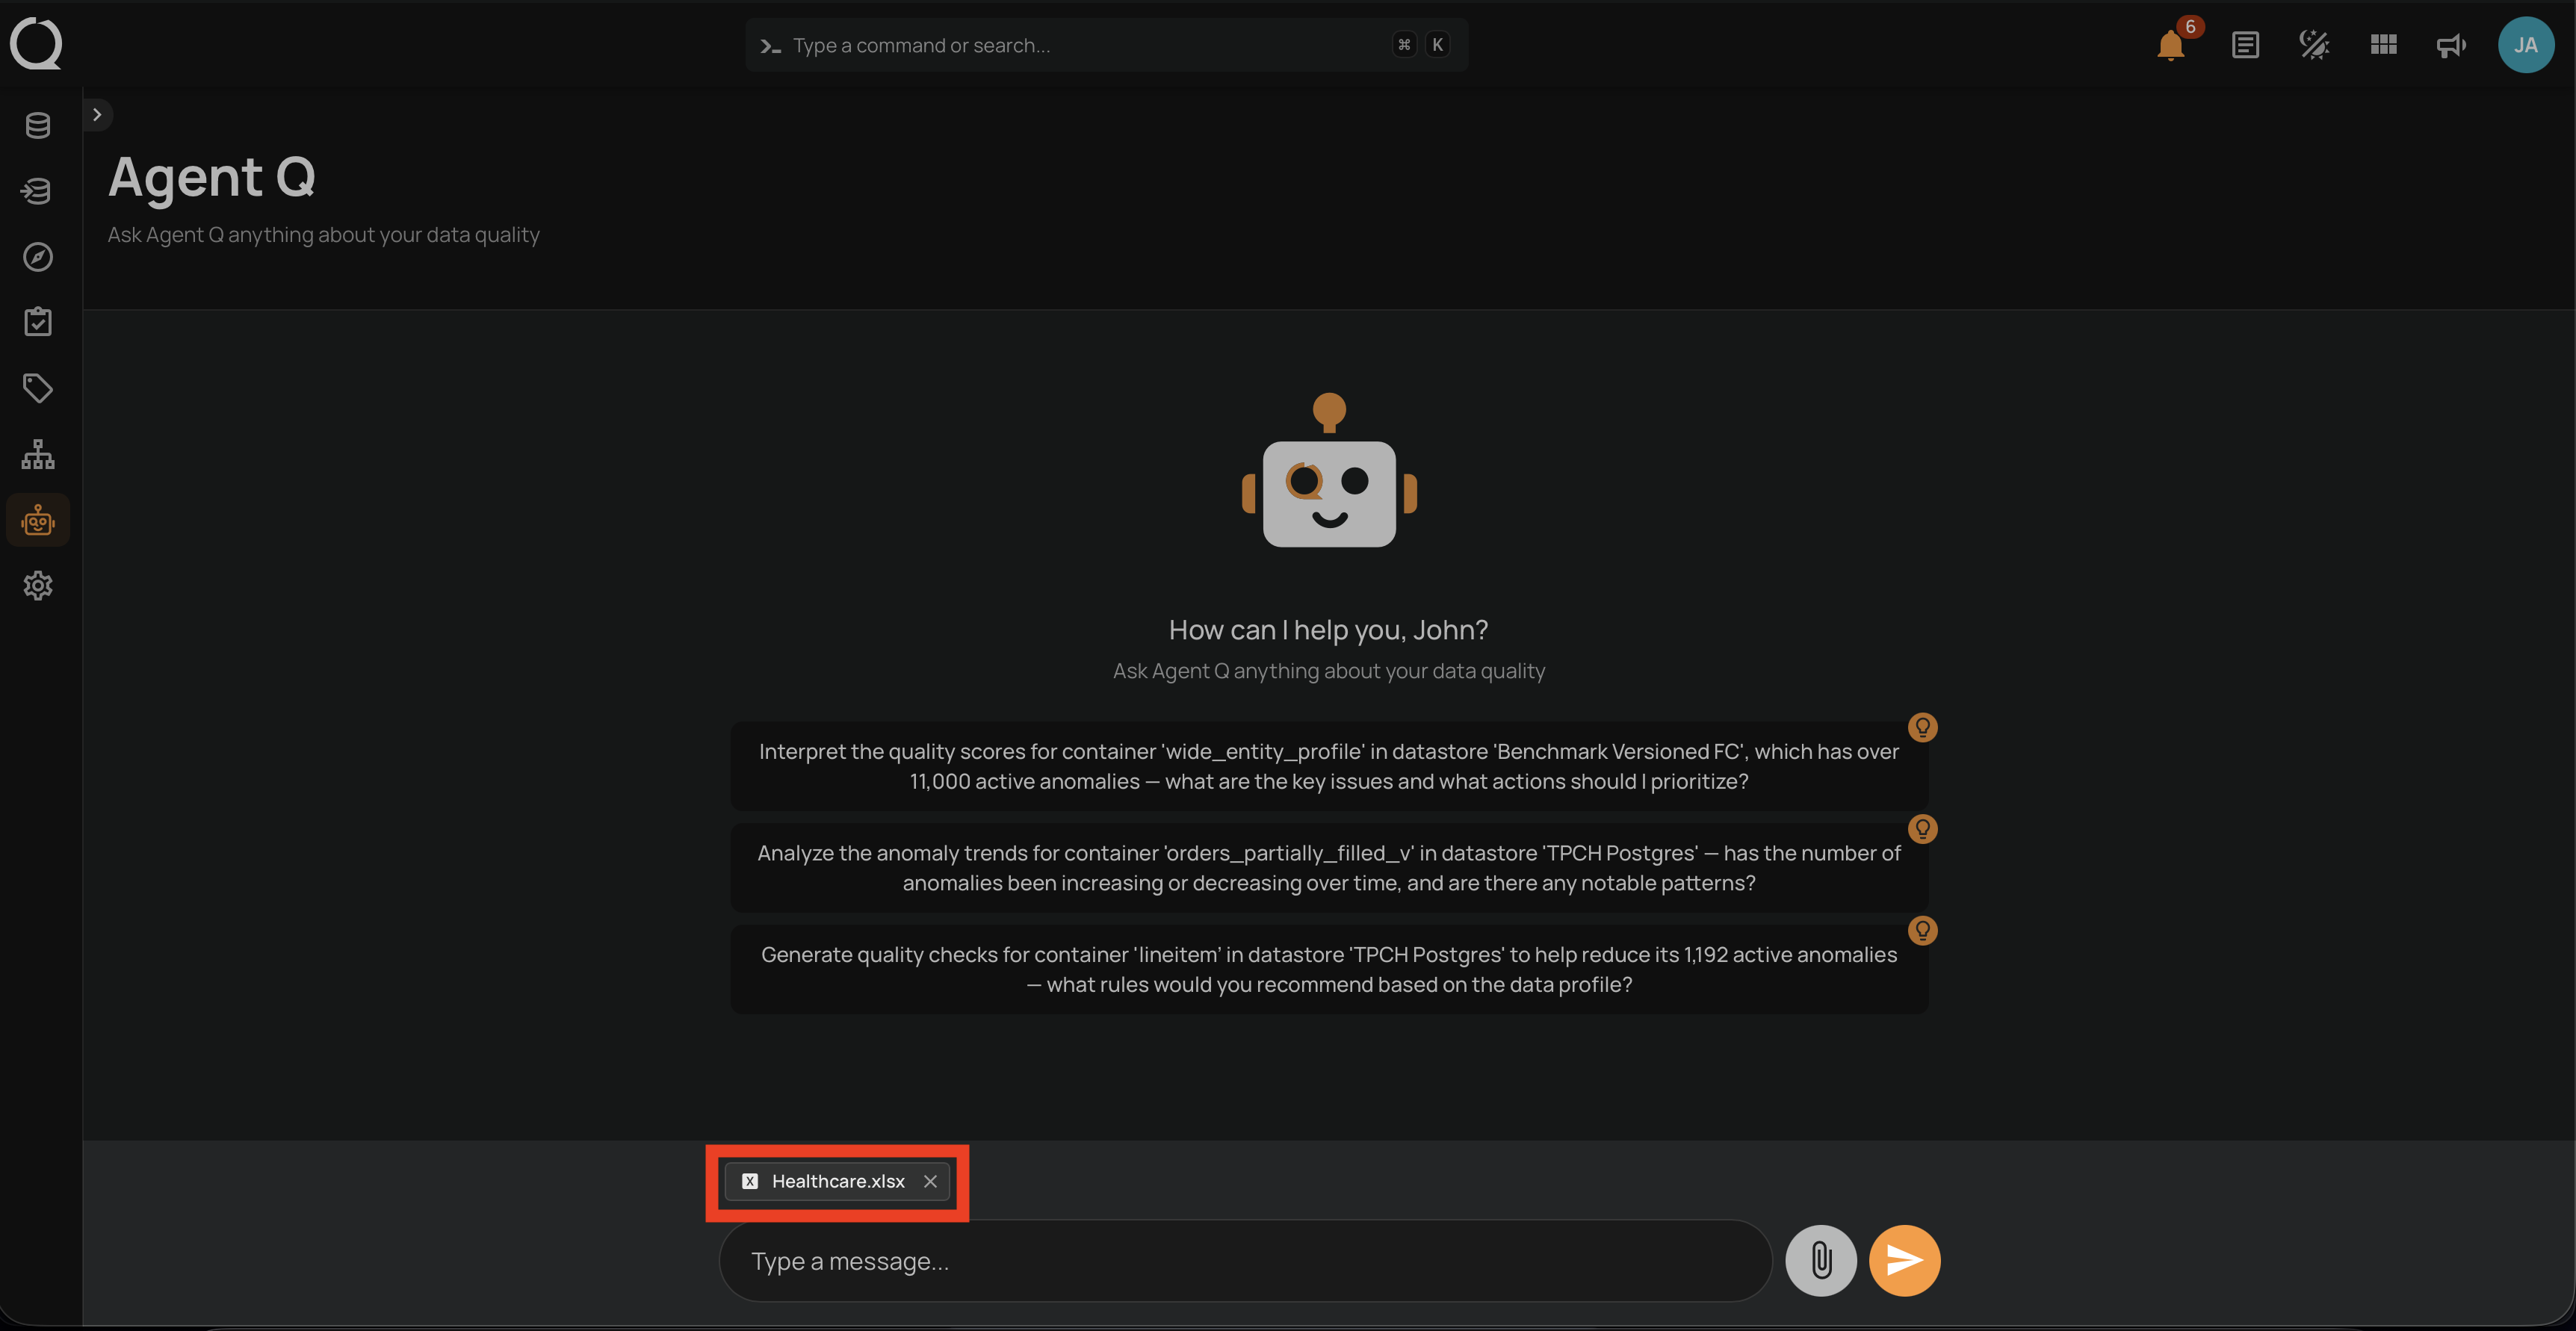
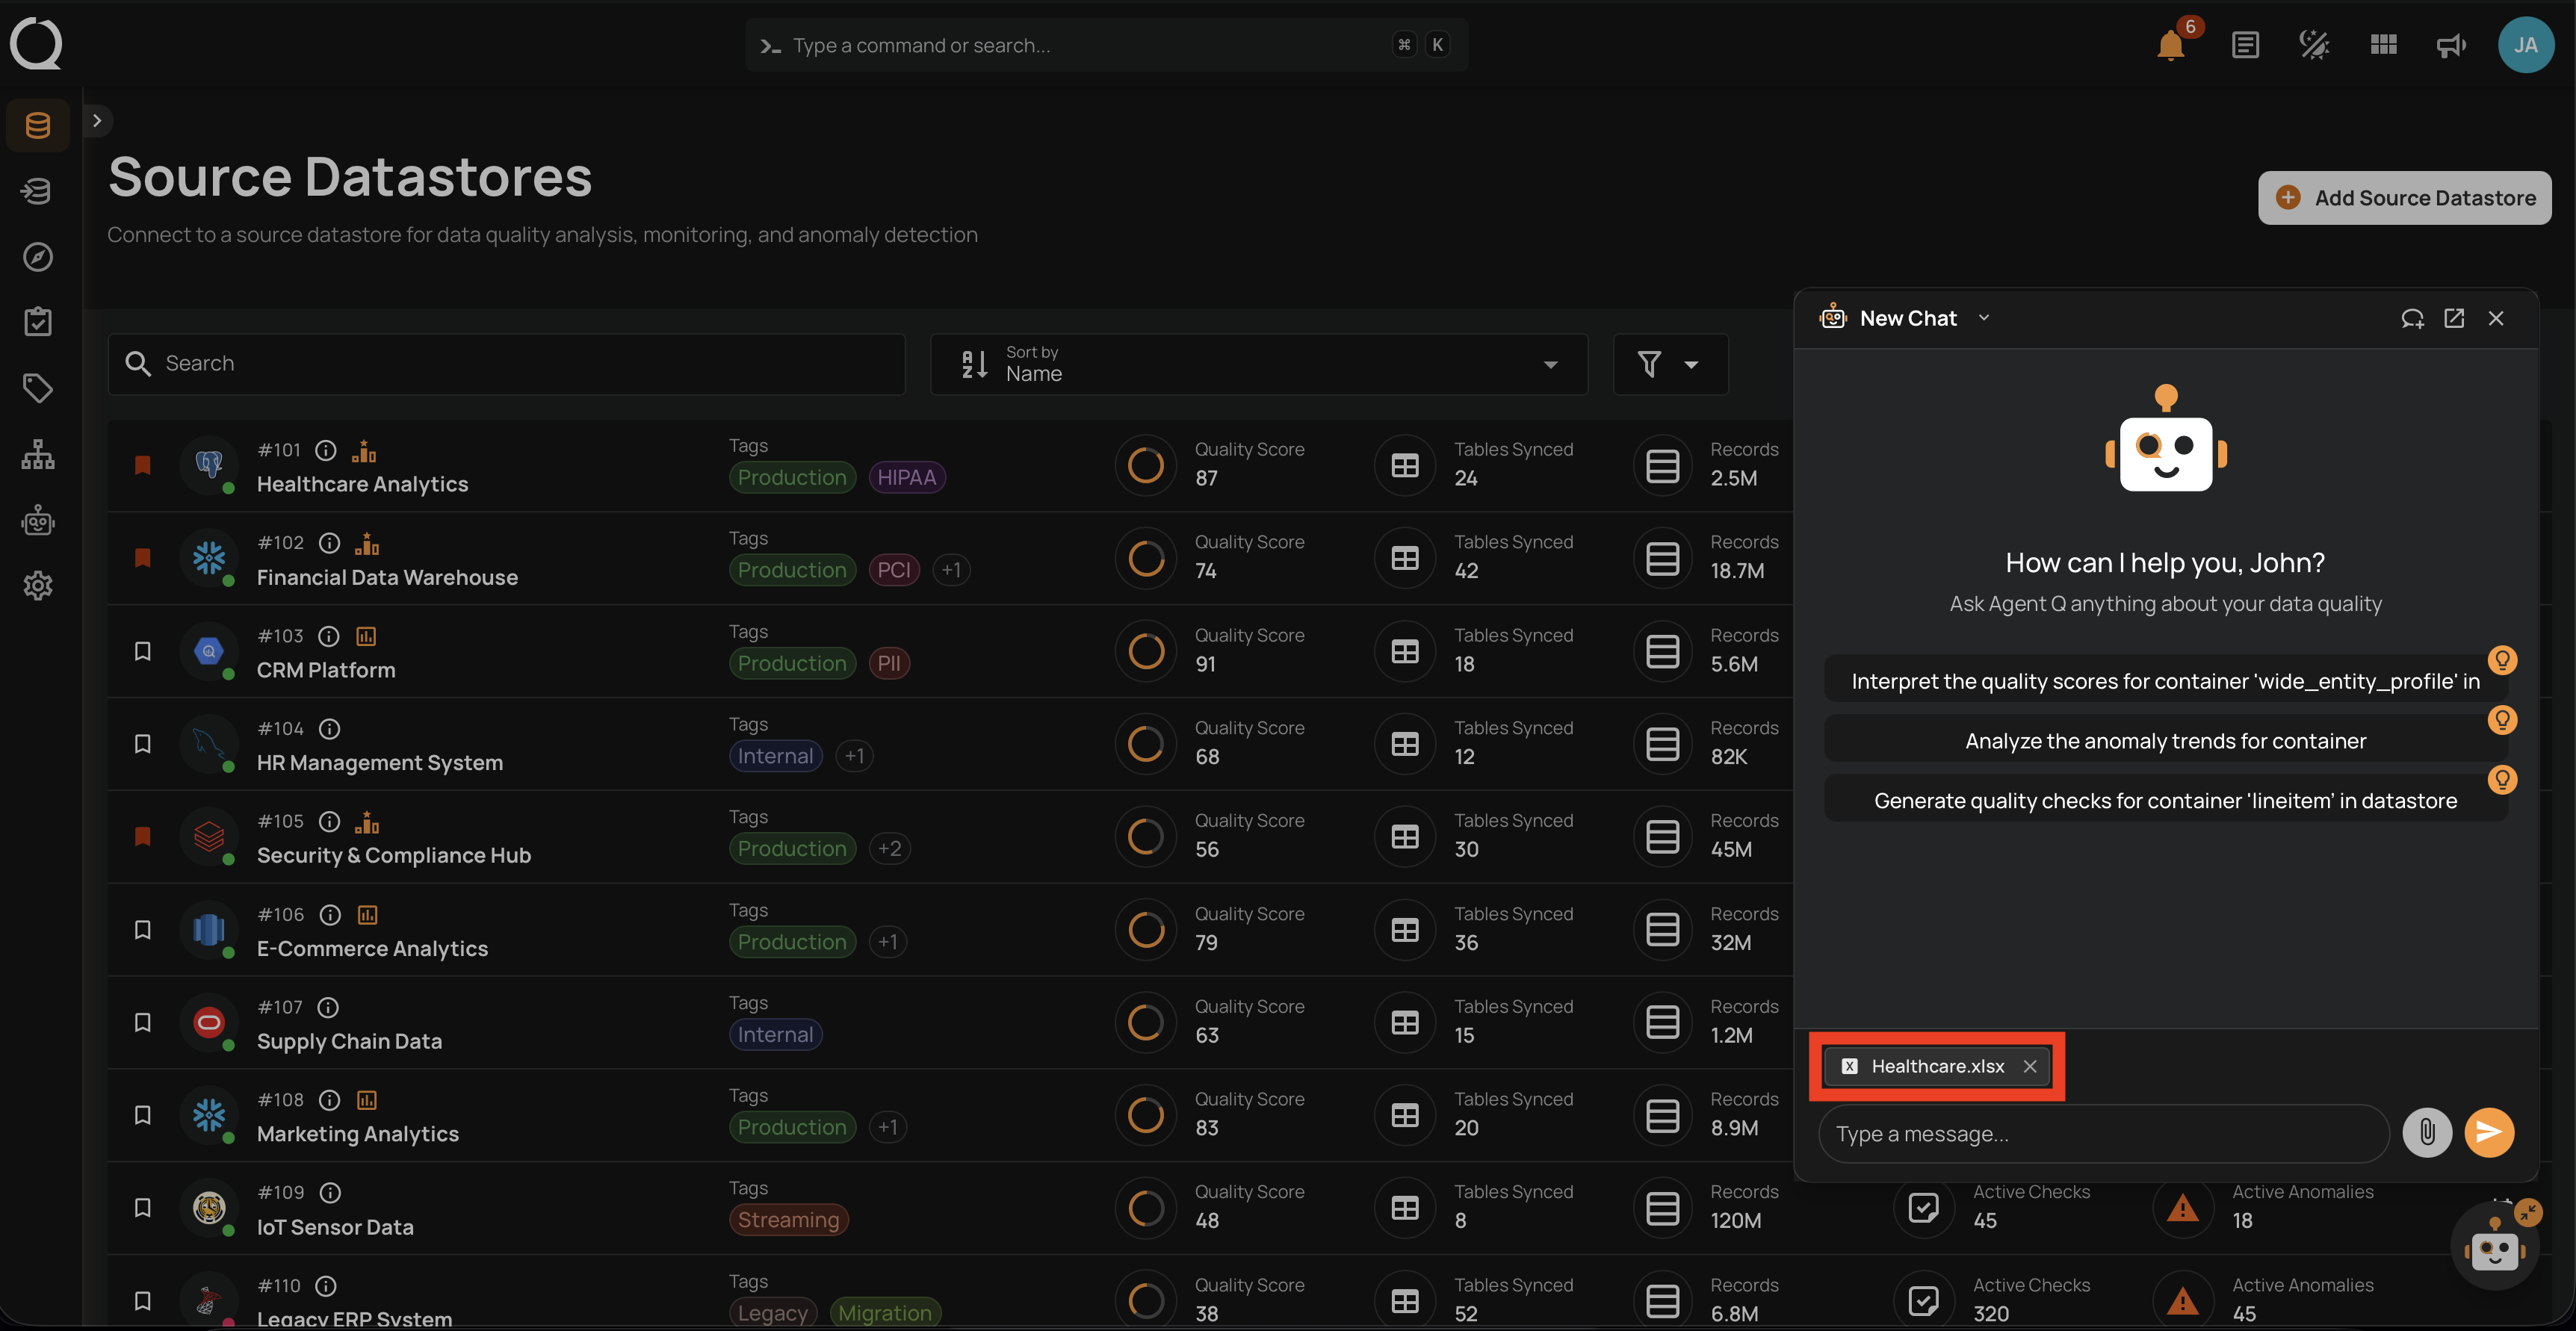
When your active LLM provider supports file uploads, click the Attach icon next to the message input, choose a document in the native file picker, and click Open. You can also drag the file straight onto the chat area. The selected file appears as a removable chip above the input. Type your prompt and send the message, and the file is sent together with your text.
In the floating chat, the attached file appears as a compact chip:
Supported file types
| Category | Formats |
|---|---|
| Documents | PDF (.pdf), Word (.doc, .docx) |
| Spreadsheets | Excel (.xls, .xlsx), CSV (.csv), TSV (.tsv) |
| Structured data | JSON (.json), XML (.xml) |
| Plain text | Text (.txt), Markdown (.md) |
Limits
- One file per message.
- Up to 20 MB per file.
Provider coverage
The Attach icon is shown only when the active LLM provider supports file uploads. The button is currently available for:
- Qualytics (a narrower set of formats, see the note below)
- Anthropic
- Google Gemini
- Google Vertex AI
- Amazon Bedrock (Claude models)
- OpenAI
- Azure OpenAI
- Heroku
If your provider is not on this list, paste your content as text instead. See Paste Large Content above.
The Qualytics provider reads a narrower set of formats
On the Qualytics provider you can attach PDF, Word .docx, Excel .xlsx, and text-based files (CSV, TSV, plain text, JSON, XML, Markdown). The legacy .doc and .xls formats, PowerPoint, and images cannot be read, so the file picker leaves them out while this provider is selected. Dragging one onto the chat is turned away with a message listing the formats that do work. Save the file as .docx or .xlsx, export it as CSV or PDF, or paste its content as text.
A PDF has to be text-searchable. A scanned or image-only PDF is still accepted, but no text can be read from it, so AgentQ answers that it found no readable content rather than returning an error. Very long documents are truncated.
Note
Files are sent to your configured LLM provider as attachments. Qualytics does not store the uploaded file; only the text of your conversation is saved to history. The provider you have configured handles file content according to its own data-processing policies. On the Qualytics-managed provider the file goes to the Qualytics gateway, which extracts the document's text and passes that to the model.