Jira
The Jira integration enables data quality teams to create and link Jira issues directly from data anomalies detected in Qualytics. This streamlines the issue resolution workflow by eliminating the need to manually create tickets in Jira and then reference them back in Qualytics.

Key Benefits
- Create Issues Directly: Create Jira issues directly from Qualytics anomalies without leaving the platform
- Automatic Linking: Automatic linking between anomalies and tickets for complete traceability
- Bidirectional Navigation: Hyperlink from Jira issue back to the source anomaly in Qualytics
- Status Synchronization: Anomaly status changes (acknowledge, archive) sync to Jira
- Comment Syncing: Comments added in Qualytics are pushed to Jira issue comments
Integration Type
The current release supports one-way synchronization (Qualytics → Jira). Changes made directly in Jira (e.g., issue status changes, comments) are not reflected back in Qualytics at this time.
Prerequisites
Before configuring the Jira integration, ensure the following requirements are met.
Jira Requirements
| Requirement | Details |
|---|---|
| Jira Instance | Active Jira Cloud or Jira Data Center instance |
| Instance URL Format | https://your-domain.atlassian.net (Cloud) or your Jira Data Center URL |
| API Access | REST API must be enabled for the instance |
| Project Access | User must have access to the target project(s) |
Account Requirements
A Jira account with appropriate permissions is required for the integration. This account will be used by Qualytics to authenticate and create/update issues.
| Setting | Recommendation |
|---|---|
| The email address associated with your Jira account | |
| API Token | A personal API token generated from Atlassian account settings |
| Project Access | Permission to create and edit issues in the target project(s) |
Required Jira Permissions
Ensure your account has the following permissions in the target project(s):
| Permission | Purpose |
|---|---|
| Browse Projects | View project and its issues |
| Create Issues | Create new issues in the project |
| Edit Issues | Update issue fields and add comments |
| Add Comments | Add comments to issues |
Jira Configuration
Complete the following steps in your Jira account before configuring the integration in Qualytics.
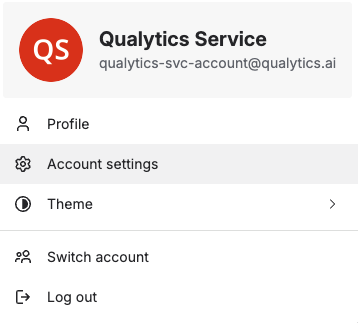
Step 1: Access Account Settings
- Log in to your Jira account
- Click on your profile icon in the top-right corner
- Select Account settings (or Manage account)
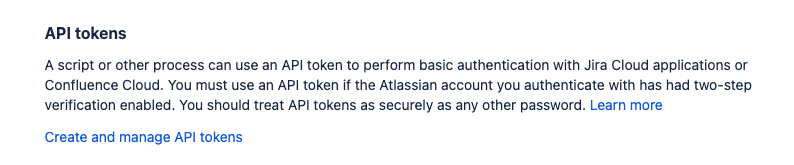
Step 2: Navigate to Security Settings
- In your account settings, click on the Security tab

Step 3: Create an API Token
- Scroll down to find API token section
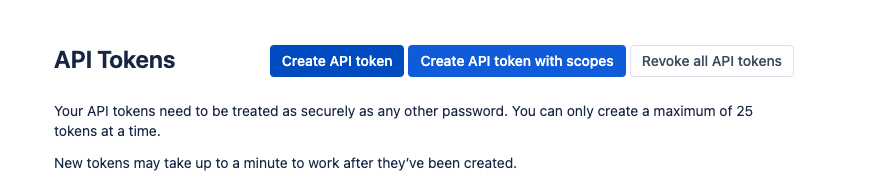
- Click on Create and manage API tokens
- Click on Create API token
- Enter a label for your token (e.g.,
Qualytics Integration) - Click Create
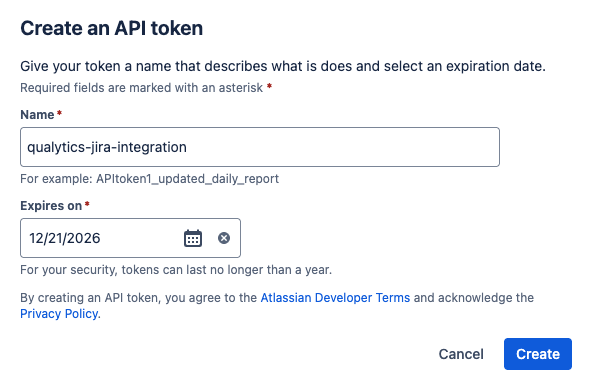
- Important: Copy the generated API token immediately and store it securely. You won't be able to see it again.
Step 4: Gather Configuration Values
Collect the following values needed for Qualytics configuration:
| Value | How to Find | Example |
|---|---|---|
| Host URL | Your Jira instance URL | https://your-domain.atlassian.net |
| Credentials | Email and API token combined with a colon | user@company.com:your_api_token |
Qualytics Configuration
Navigation to Integration
Step 1: Log in to your Qualytics account and click the "Settings" button on the left side panel of the interface.
Step 2: Click on the Integrations tab.
Connect Jira Integration
Step 1: Click on the Connect button next to Jira to connect to the Jira Integration.
A modal window titled "Add Jira Integration" appears. Fill in the connection properties.
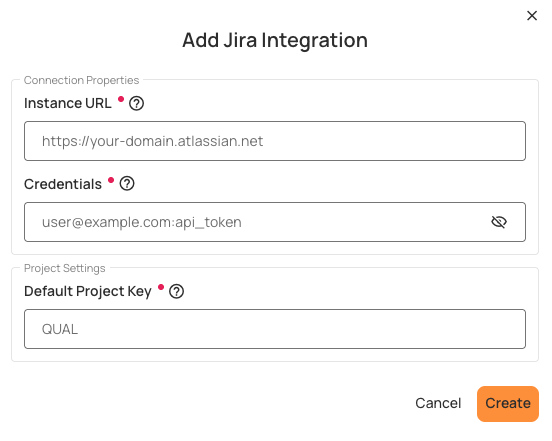
Step 2: Enter the following connection properties:
| REF. | Field | Description |
|---|---|---|
| 1 | Host (Required) | Enter the complete Jira instance URL (e.g., https://your-domain.atlassian.net). Do not include a trailing slash. |
| 2 | Credentials (Required) | Enter the credentials in the format email:api_token (email and API token separated by a colon). For example: user@company.com:your_api_token_here |
Credentials Format
The credentials must be entered as email:api_token with a colon separator. Use your Jira account email and the API token you generated.
Step 3: Click the Create button to validate and store the credentials.
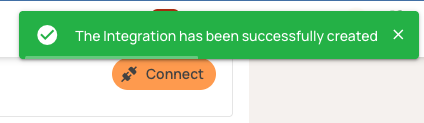
Once the integration is successfully created, a confirmation message will appear stating "The Integration has been successfully created."
Test the Connection
After saving, the connection status should show as Connected. If you encounter errors, verify:
- Host URL is correct and includes
https://(no trailing slash) - Credentials are in the correct format (
email:api_token) - API token is valid and not expired
- Account has required permissions in Jira
Integration Behavior & Data Flow
Data Flow Direction
The current release supports one-way synchronization from Qualytics to Jira:
| Action in Qualytics | Result in Jira |
|---|---|
| Create ticket from anomaly | New Issue created |
| Acknowledge anomaly | Comment added to issue with status change |
| Archive anomaly (resolve) | Comment added to issue with resolution status |
| Add comment to anomaly | Comment pushed to Jira issue |
| Link existing ticket | Association created (anomaly details added as comment) |
What Gets Synced
| Direction | What | How | Status |
|---|---|---|---|
| Qualytics → Jira | New ticket | Creates issue with anomaly details |  Active Active |
| Qualytics → Jira | Anomaly status change | Adds comment (doesn't change issue status) | Active |
| Qualytics → Jira | Anomaly comment | Adds comment | Active |
| Jira → Qualytics | Issue status | Not synced |  Not supported Not supported |
| Jira → Qualytics | Issue comments | Not synced | Not supported |
| Jira → Qualytics | Issue closure | Not synced | Not supported |
Current Limitations
The following actions in Jira are not reflected in Qualytics:
| Action in Jira | Effect in Qualytics |
|---|---|
| Change issue status (e.g., In Progress, Done) | Not reflected - anomaly status unchanged |
| Add comments | Not reflected - comments do not appear in Qualytics |
| Reassign issue | Not reflected |
| Close or resolve issue | Not reflected - anomaly remains in current state |
Field Mapping Reference
Issue Fields Supported
When creating a ticket from Qualytics, the following Jira issue fields can be populated:
| Field Name | Jira Field | Required | Notes |
|---|---|---|---|
| Summary | summary |
Yes | Brief summary of the issue (ticket title) |
| Description | description |
No | Detailed description; auto-populated with anomaly details |
| Priority | priority |
No | Issue priority level |
Auto-Populated Fields
The following information is automatically included when creating a ticket:
| Field | Auto-Populated Value |
|---|---|
| Description | Anomaly ID, type, status at detection, field/check message, failed checks, hyperlink back to Qualytics anomaly |
| Comments (on updates) | Status changes (acknowledge, archive) and comments from Qualytics with timestamps |
Ticket Creation Workflow
Creating a New Ticket from an Anomaly
Step 1: Navigate to a datastore in Qualytics
Step 2: Locate an anomaly you want to create a ticket for
Step 3: Click on the anomaly to open details
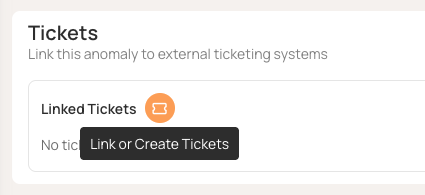
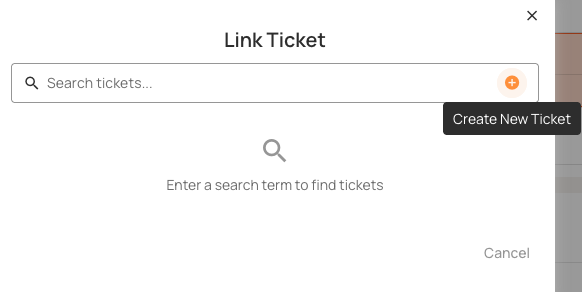
Step 4: Find the "Linked Tickets" section and click "Add" to link or create tickets
Step 5: A modal will appear with options to create a new ticket or link an existing one. Select "New Ticket"
Step 6: Fill in the required and optional fields:
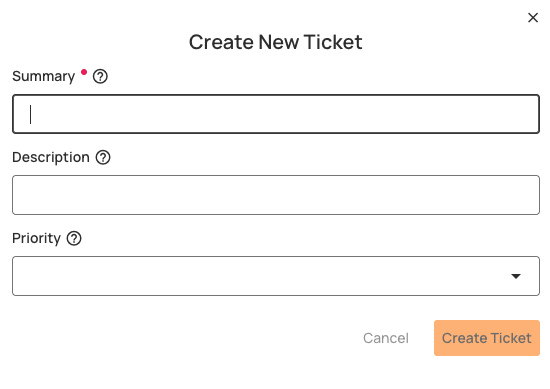
| Field | Description |
|---|---|
| Summary | Brief summary of the data quality issue (required) |
| Description | Detailed description (auto-populated with anomaly details) |
| Priority | Select the appropriate priority level |
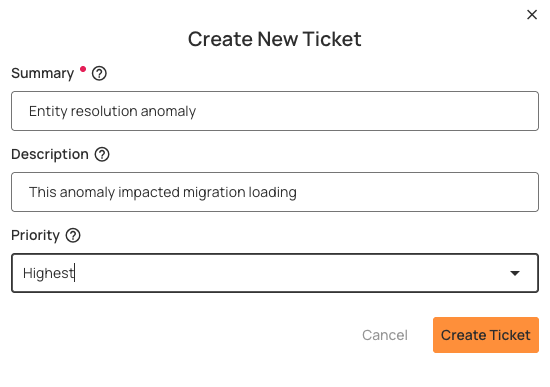
Step 7: Click Create to submit the ticket
When the ticket is created, a link is established between the anomaly and the Jira issue. The issue description will contain the anomaly details, including:
- Anomaly ID and status
- Anomaly type and detection timestamp
- Failed checks information
- Direct link back to the anomaly in Qualytics

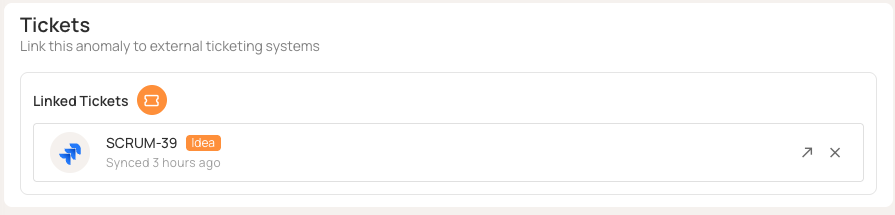
The linked ticket will appear in the anomaly's Linked Tickets section:
Linking an Existing Ticket
If a ticket already exists in Jira, you can link it to an anomaly:
Step 1: Open the anomaly in Qualytics
Step 2: Click "Add" in the Linked Tickets section
Step 3: Select "Link Existing"
Step 4: Search by issue key or summary
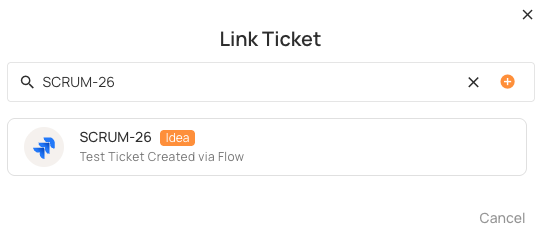
Step 5: Select the matching issue to link
When linking an existing ticket:
- Anomaly details are added as a comment to the existing issue
- A link is established between the anomaly and the issue
Tip
Multiple tickets can be linked to a single anomaly if needed.
Viewing Linked Tickets
Once linked, tickets appear in the "Linked Tickets" section of the anomaly:
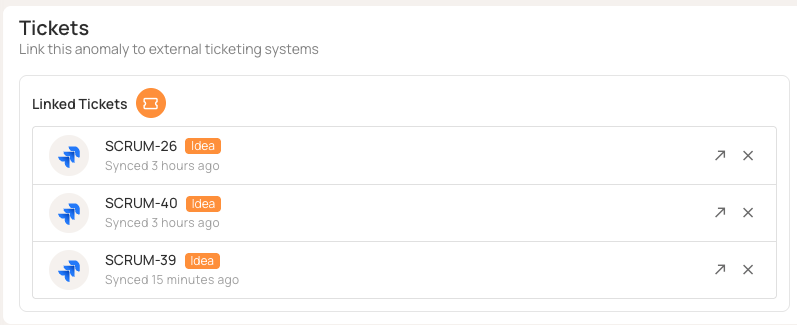
- Click "View" to open the ticket directly in Jira
- The issue key, status, and last sync timestamp are displayed
Key Integration Operations
Create Ticket
Creates a Jira issue from a Qualytics anomaly with:
- Required fields:
summary - Optional fields:
description,priority - Auto-included: Anomaly ID, status, type, failed checks, and link to Qualytics
Link Existing Ticket
Links an existing Jira issue to an anomaly:
- Adds anomaly details as a comment to the existing issue
- Creates a link between the anomaly and the issue
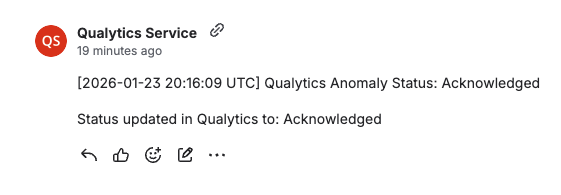
Sync Anomaly Status
When anomaly status changes in Qualytics:
- Adds a timestamped comment to the linked Jira issue
- Example:
[2024-01-15 10:30:00 UTC] Qualytics Anomaly Status: Acknowledged
Example: Acknowledging an anomaly in Qualytics:
The status change is reflected in Jira as a comment:
Note
Status changes add comments but do not change the issue's status. This preserves your Jira workflow control.
Sync Comments
When comments are added to anomalies in Qualytics:
- The comment text is synced to linked tickets as Jira comments
- Example:
Comment from Qualytics: <user's comment>
API Reference
This section provides technical details for administrators and developers who need to understand the underlying API operations.
Qualytics API Endpoints
For programmatic integration management, the following Qualytics API endpoints are available:
Ticketing Integration Endpoints
| Operation | Method | Endpoint | Description |
|---|---|---|---|
| Get Ticketing Form Specification | GET | /api/integrations/ticketing/form-specification |
Get the form specification for creating tickets |
| Search Tickets | GET | /api/integrations/ticketing/tickets/search |
Search for tickets in Jira |
| Get Ticket By Id | GET | /api/integrations/ticketing/tickets/{ticket_id} |
Get a specific ticket by its ID |
| Create Ticket For Anomaly | POST | /api/integrations/ticketing/anomalies/{anomaly_id}/tickets |
Create a new ticket linked to an anomaly |
Anomaly Ticket Link Endpoints
| Operation | Method | Endpoint | Description |
|---|---|---|---|
| Get Anomaly Ticket Links | GET | /api/anomalies/{anomaly_id}/ticket-links |
Retrieve all ticket links for an anomaly |
| Create Anomaly Ticket Link | POST | /api/anomalies/{anomaly_id}/ticket-links |
Create a new ticket link for an anomaly |
| Delete Anomaly Ticket Link | DELETE | /api/anomalies/{anomaly_id}/ticket-links/{link_id} |
Delete a specific ticket link |
Troubleshooting
Common Issues
| Issue | Resolution |
|---|---|
| Connection failed | Verify host URL format (https://your-domain.atlassian.net), check credentials format (email:api_token), confirm account is active |
| 401 Unauthorized | Incorrect credentials; verify the email:api_token format is correct and that API token is not expired |
| 403 Forbidden | Account lacks required permissions; ensure user has access to the target project |
| Project not found | Verify the project key is correct and the user has access to the project |
| Issue type not found | Verify the issue type exists in the selected project |
| Network timeout | Firewall may be blocking; ensure Qualytics IPs are allowlisted |
Getting Support
If you encounter issues not covered above, contact Qualytics support:
- Email: support@qualytics.ai
- Slack: Your dedicated customer Slack channel
Please include: Host URL (masked if needed), error messages, and steps to reproduce.
Appendix: Sample Payloads
Create Ticket Request
When creating a ticket from Qualytics, the following request is sent:
POST /api/integrations/ticketing/anomalies/{anomaly_id}/tickets

{
  "title": "summary of ticket",
  "description": "description of the ticket",
  "priority": "Medium"
}
Create Ticket Response
{
  "ticket": {
    "ticket_id": "10428",
    "ticket_number": "SCRUM-40",
    "title": "summary of ticket",
    "description": "description of the ticket\n ---\n Qualytics Anomaly Linked [2026-01-23 20:22:04 UTC] Anomaly ID: 1 Status: Acknowledged Type: shape Detected: 2025-12-21 01:48:42.988233+00:00\n Failed Checks: - 8 values in CUSTOMER_NAME were resolved to 7 distinct entities using similarity matching. 1 of those entities is assigned more than one value of CUSTOMER_ID\n View in Qualytics: https://your-qualytics-instance.qualytics.io/datastores/1/anomalies?id=1\n",
    "status": "Idea",
    "priority": "Medium",
    "urgency": null,
    "impact": null,
    "category": "Task",
    "subcategory": null,
    "created_at": "2026-01-23T15:22:05",
    "updated_at": "2026-01-23T15:22:05",
    "resolved_at": null,
    "closed_at": null,
    "assigned_to": null,
    "assigned_group": null,
    "requester": "User Name",
    "url": "https://your-domain.atlassian.net/browse/SCRUM-40",
    "comments_count": null,
    "metadata": {
      "project_key": "SCRUM",
      "issue_type": "Task"
    }
  },
  "anomaly_id": 1,
  "integration_id": 2,
  "message": "Ticket SCRUM-40 created and linked to anomaly 1"
}
Search Tickets Response
GET /api/integrations/ticketing/tickets/search?query=task

{
  "items": [
    {
      "ticket_id": "10002",
      "ticket_number": "SCRUM-3",
      "title": "Task 3",
      "description": null,
      "status": "To Do",
      "priority": null,
      "created_at": "2025-12-02T12:34:20",
      "updated_at": "2025-12-02T12:34:21",
      "assigned_to": null,
      "url": "https://your-domain.atlassian.net/browse/SCRUM-3"
    }
  ],
  "total": 1,
  "page": 1,
  "size": 50,
  "pages": 1
}