Service Accounts
Service Accounts provide a secure and centralized way to authenticate automated systems and integrations with the Qualytics API. Unlike Personal Access Tokens (PATs) that are tied to individual users, Service Accounts are synthetic users designed specifically for data pipeline automation, Qualytics API/CLI access, data catalog integrations, and shared automation workflows. They eliminate the security risk of sharing personal tokens, remain active independent of individual user lifecycles, role changes, or access status, and provide clear audit trails for automated system activities.
Let's get started 🚀
Understanding Service Accounts and Tokens
What Are Service Accounts?
Service accounts are synthetic user accounts created specifically for automation and integrations. They have the following characteristics:
- No interactive login: Service accounts cannot log into the Qualytics web interface
- Administrator-managed: Only administrators can create and manage service accounts
- Independent lifecycle: Service accounts are not tied to individual users
- Role-based permissions: Can be assigned Admin, Manager, Editor, or Member roles
- Team membership: Can be assigned to specific teams for scoped access
Service Account vs Personal Access Token
Understanding when to use service accounts versus personal access tokens is crucial for maintaining secure and reliable integrations:
| Feature | Service Account | Personal Access Token (PAT) |
|---|---|---|
| Created by | Administrators only | Individual users (self-service) |
| Tied to | Synthetic service user | Human user account |
| Best for | Production integrations, data pipelines, shared automation | Personal development, testing, ad-hoc API exploration |
| Lifecycle | Independent of individual user lifecycles | Tied to individual user's access status |
| Management | Centrally managed by admins | Self-managed by the user |
| Audit trail | Clear purpose-based identification | Linked to individual user |
When to Use Service Accounts
✅ Use Service Accounts For:
- Data Pipeline Automation: Integrating Qualytics operations within your data pipeline workflows
- Qualytics API Access: Programmatic access to perform any API operations, manage resources, or retrieve data
- Qualytics CLI Operations: Automated scripts using the Qualytics CLI for data quality workflows
- Data Catalog Integrations: Metadata synchronization with Alation, Atlan, or other catalog platforms
- Shared Automation: Any automation used by multiple team members or systems
❌ Avoid Personal Access Tokens For:
- Shared data pipelines (security risk - tokens shouldn't be shared)
- Production integrations (breaks when users are deactivated or change roles)
- Team-wide API or CLI automation (difficult to manage and audit)
- Long-running integrations (tied to individual user lifecycle)
Creating Service Accounts
Service accounts must be created by administrators and can be managed through both the Qualytics UI and API.
Note
You must have the Administrator role to create and manage service accounts.
Creating a Service Account via UI
Step 1: Log in to your Qualytics account and click the Settings button on the left side panel.

Step 2: Navigate to the Users tab to view all existing users and service accounts.

Step 3: Click on the Add Service Account button in the top right corner.

A modal window will appear with a two-step wizard to create the service account and generate its token.
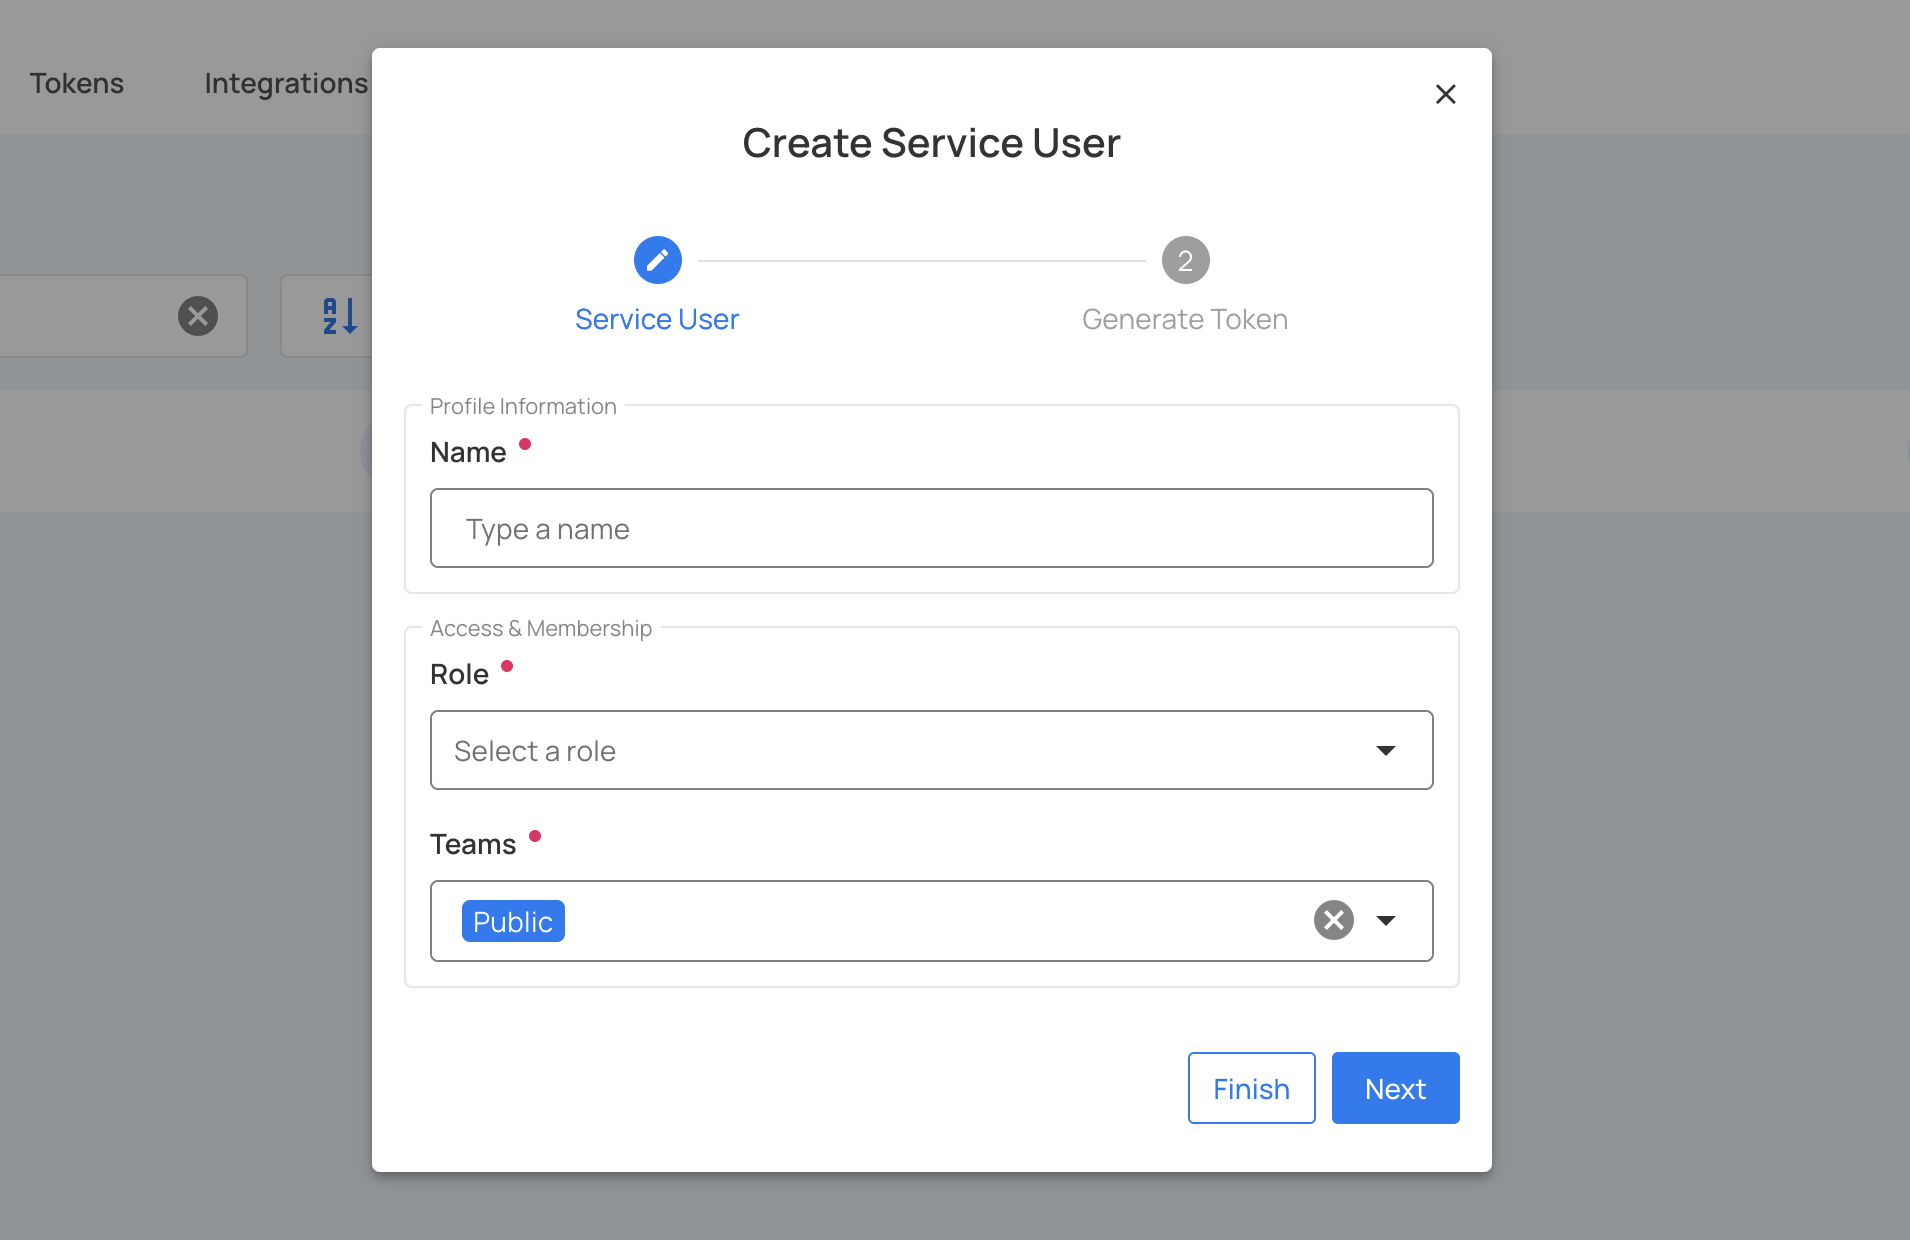
Step 4: In the first step, complete the service user form with the following details:
| Field | Description | Required |
|---|---|---|
| Name | Descriptive name for the service account (e.g., "Pipeline Automation", "Alation Sync", "API Access"). This will be converted to a service account ID. | Yes |
| Role | Select the appropriate role (Admin, Manager, Editor, or Member) based on the required permissions. Start with the least privileged role. | Yes |
| Teams | Select the teams this service account should belong to. The "Public" team is always included automatically. | Optional |
Step 5: After entering the service user information, click on the Next button.
Step 6: In the second step, complete the token generation form:
| Field | Description | Required |
|---|---|---|
| Name | Descriptive name for the token (e.g., "pipeline-production", "api-access-prod"). Token names must be unique per service account. | Yes |
| Expiration | Select the expiration period from the dropdown: 30 days, 60 days, 90 days, 1 year, or Never. For production tokens, 1 year with a rotation plan is recommended. | Yes |
| Type | Automatically set to "Service" (pre-filled and non-editable). | N/A |
| Service User | Automatically populated with the service user created in Step 4 (pre-filled and non-editable). | N/A |
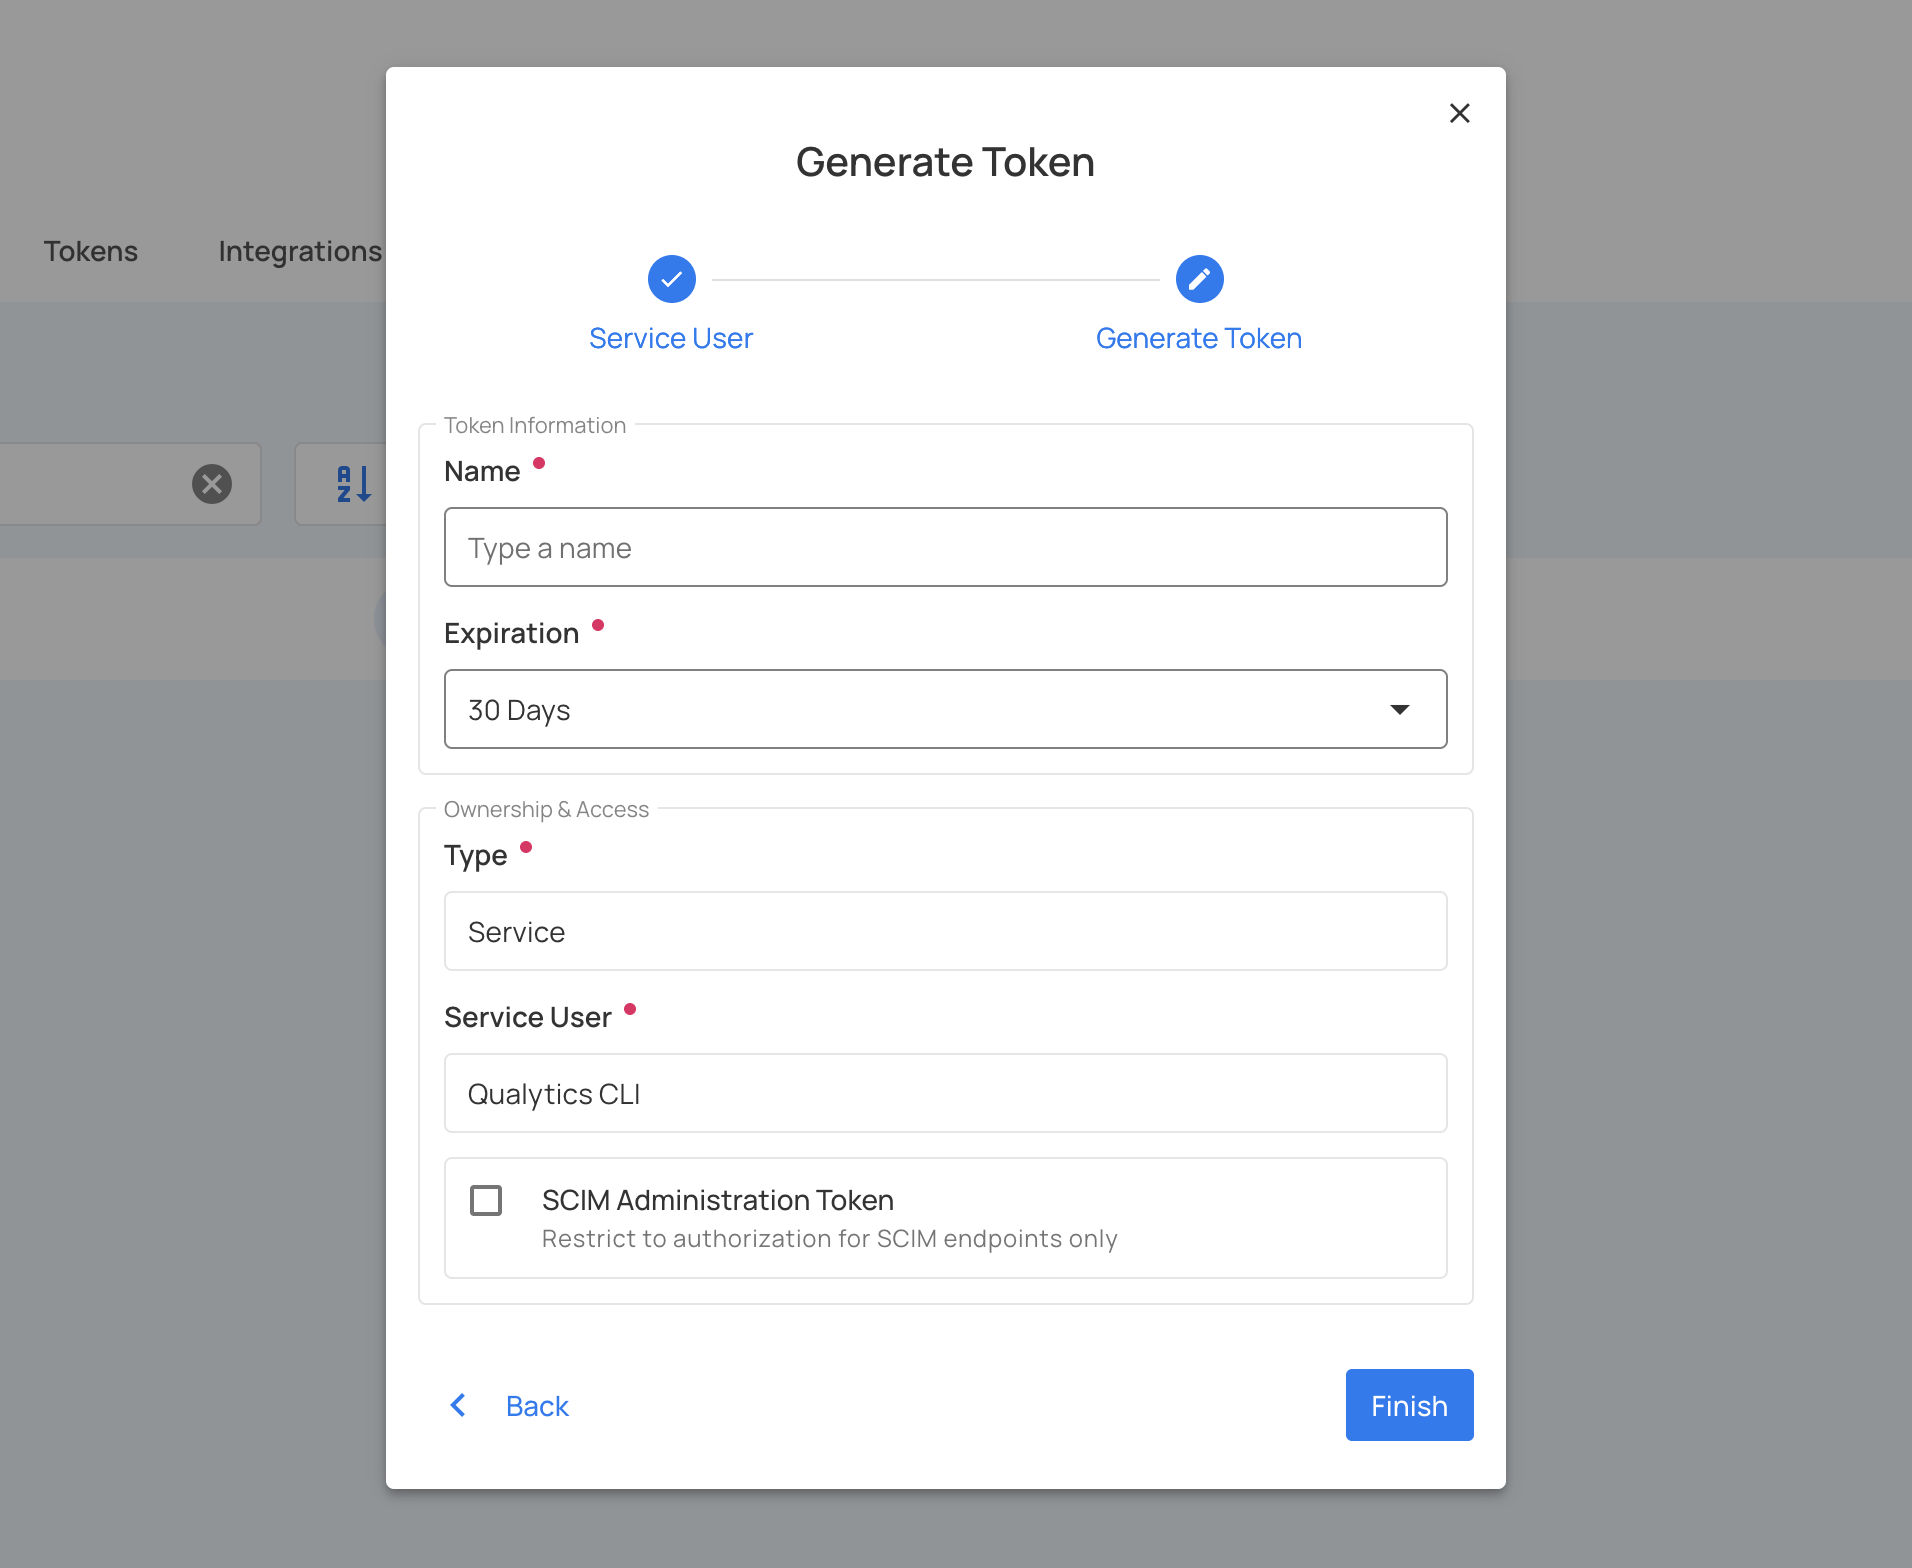
Step 7: After entering the token details, click on the Finish button.
Step 8: The service account and token have been created successfully. The token will be displayed on the screen.
Warning
Make sure to download or copy this token. You won't be able to see it again!
Copy the bearer token immediately and store it securely in a password manager or secrets management system.
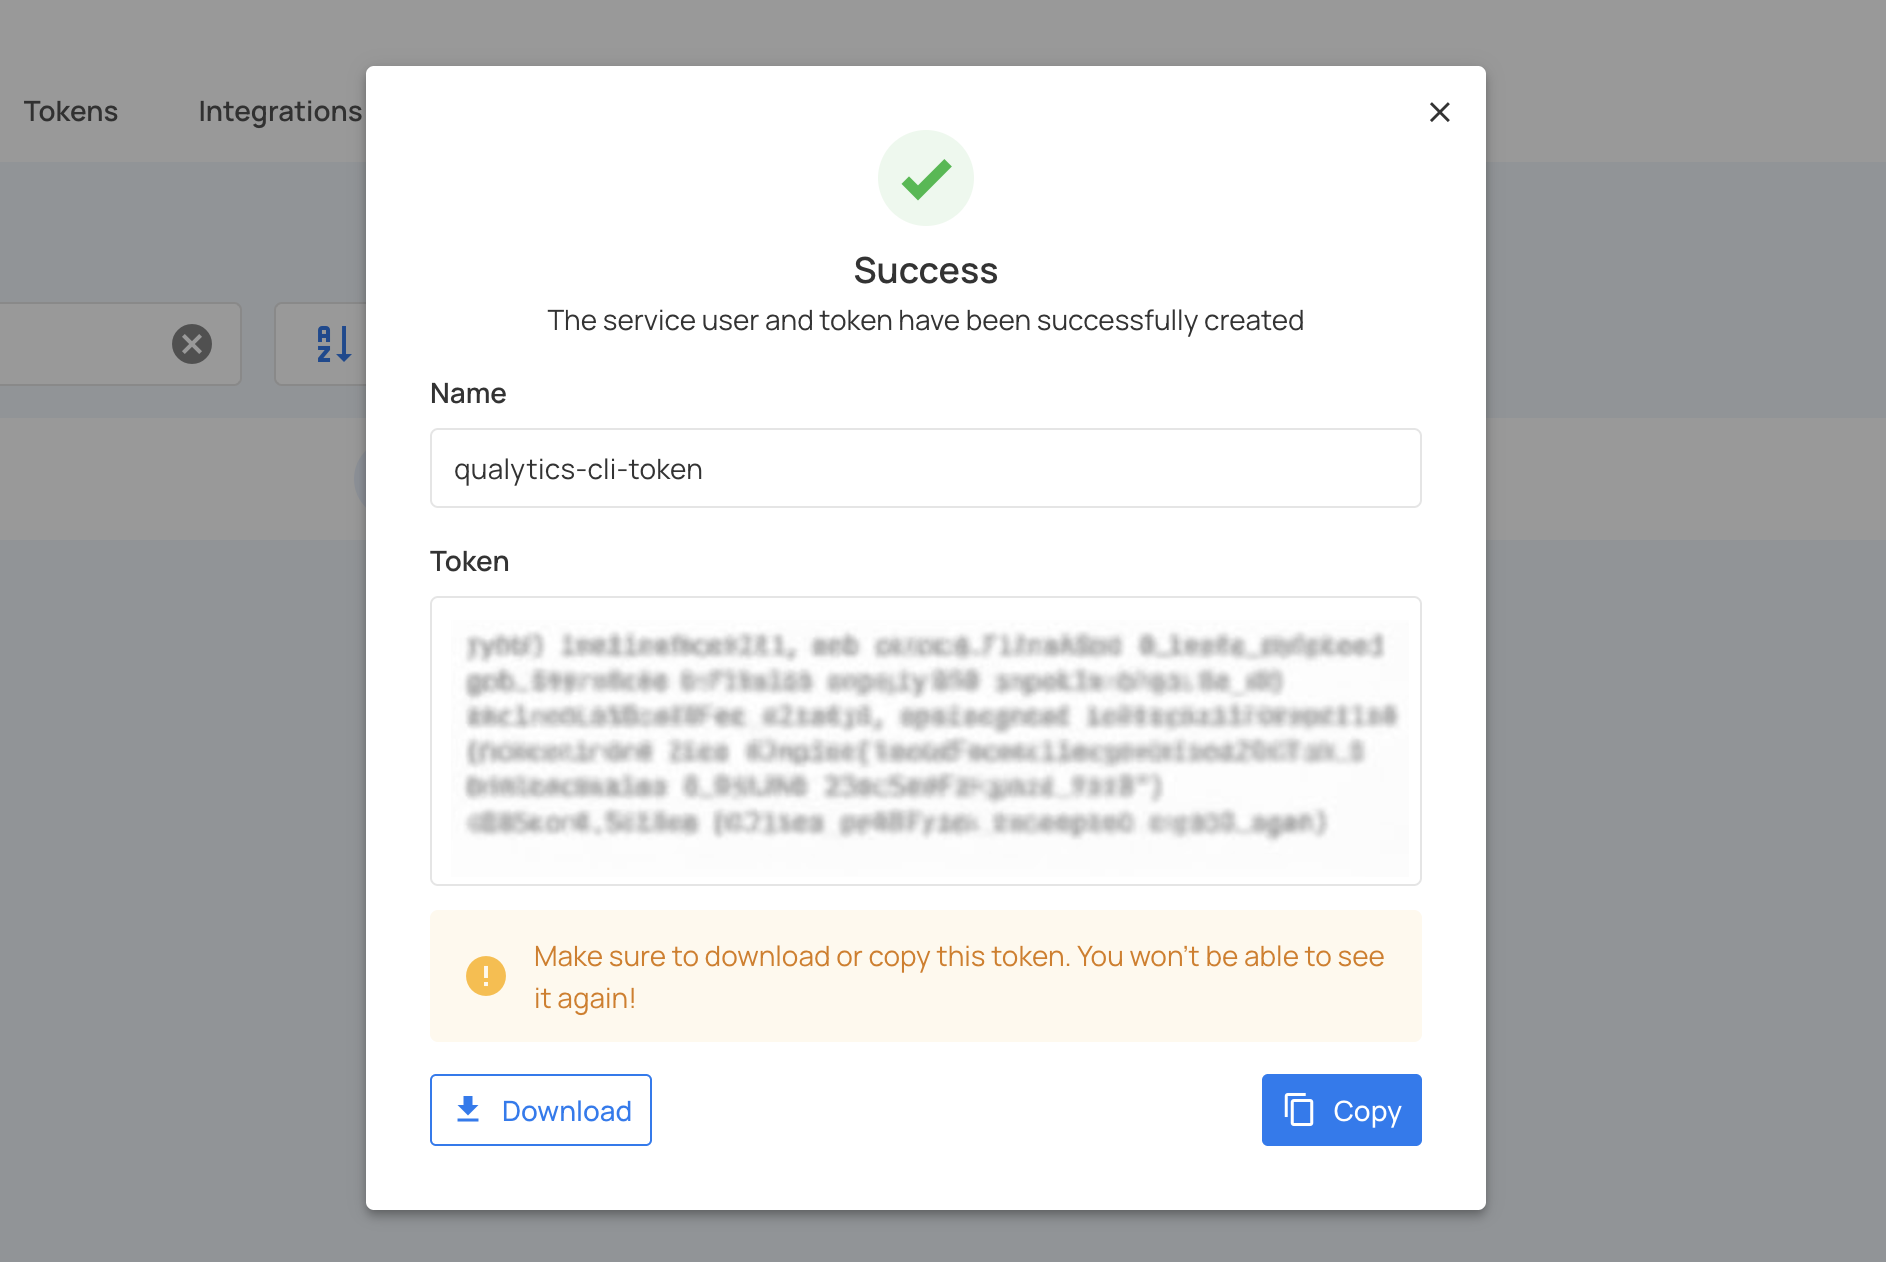
Step 9: You will see the newly created service account in the users list with a "Service" badge.

Service Account Naming Convention
When you create a service account, the system automatically generates a service account ID based on the name you provide:
- Original name: "Pipeline Automation"
- Generated ID:
pipeline_automation@service - Sanitization: Lowercase, spaces converted to underscores, special characters removed
Best Practices for Naming:
- ✅
pipeline_automation@service- Clear purpose - ✅
alation_sync@service- Integration name - ✅
api_access@service- Indicates purpose - ❌
service1@service- Not descriptive - ❌
temp@service- Unclear purpose
Creating Additional Service Tokens
When you create a service account using the two-step wizard, the first token is automatically generated. However, you may need to create additional tokens for the same service account (for example, separate tokens for different environments or purposes).
Warning
Service tokens are shown only once during creation. Make sure to copy and store them securely in a secrets manager. They cannot be retrieved later.
Creating Additional Tokens via UI
Step 1: Navigate to Settings > Tokens tab.

Step 2: Click on the Generate Token button in the top right corner.
A modal window will appear with the token generation form.
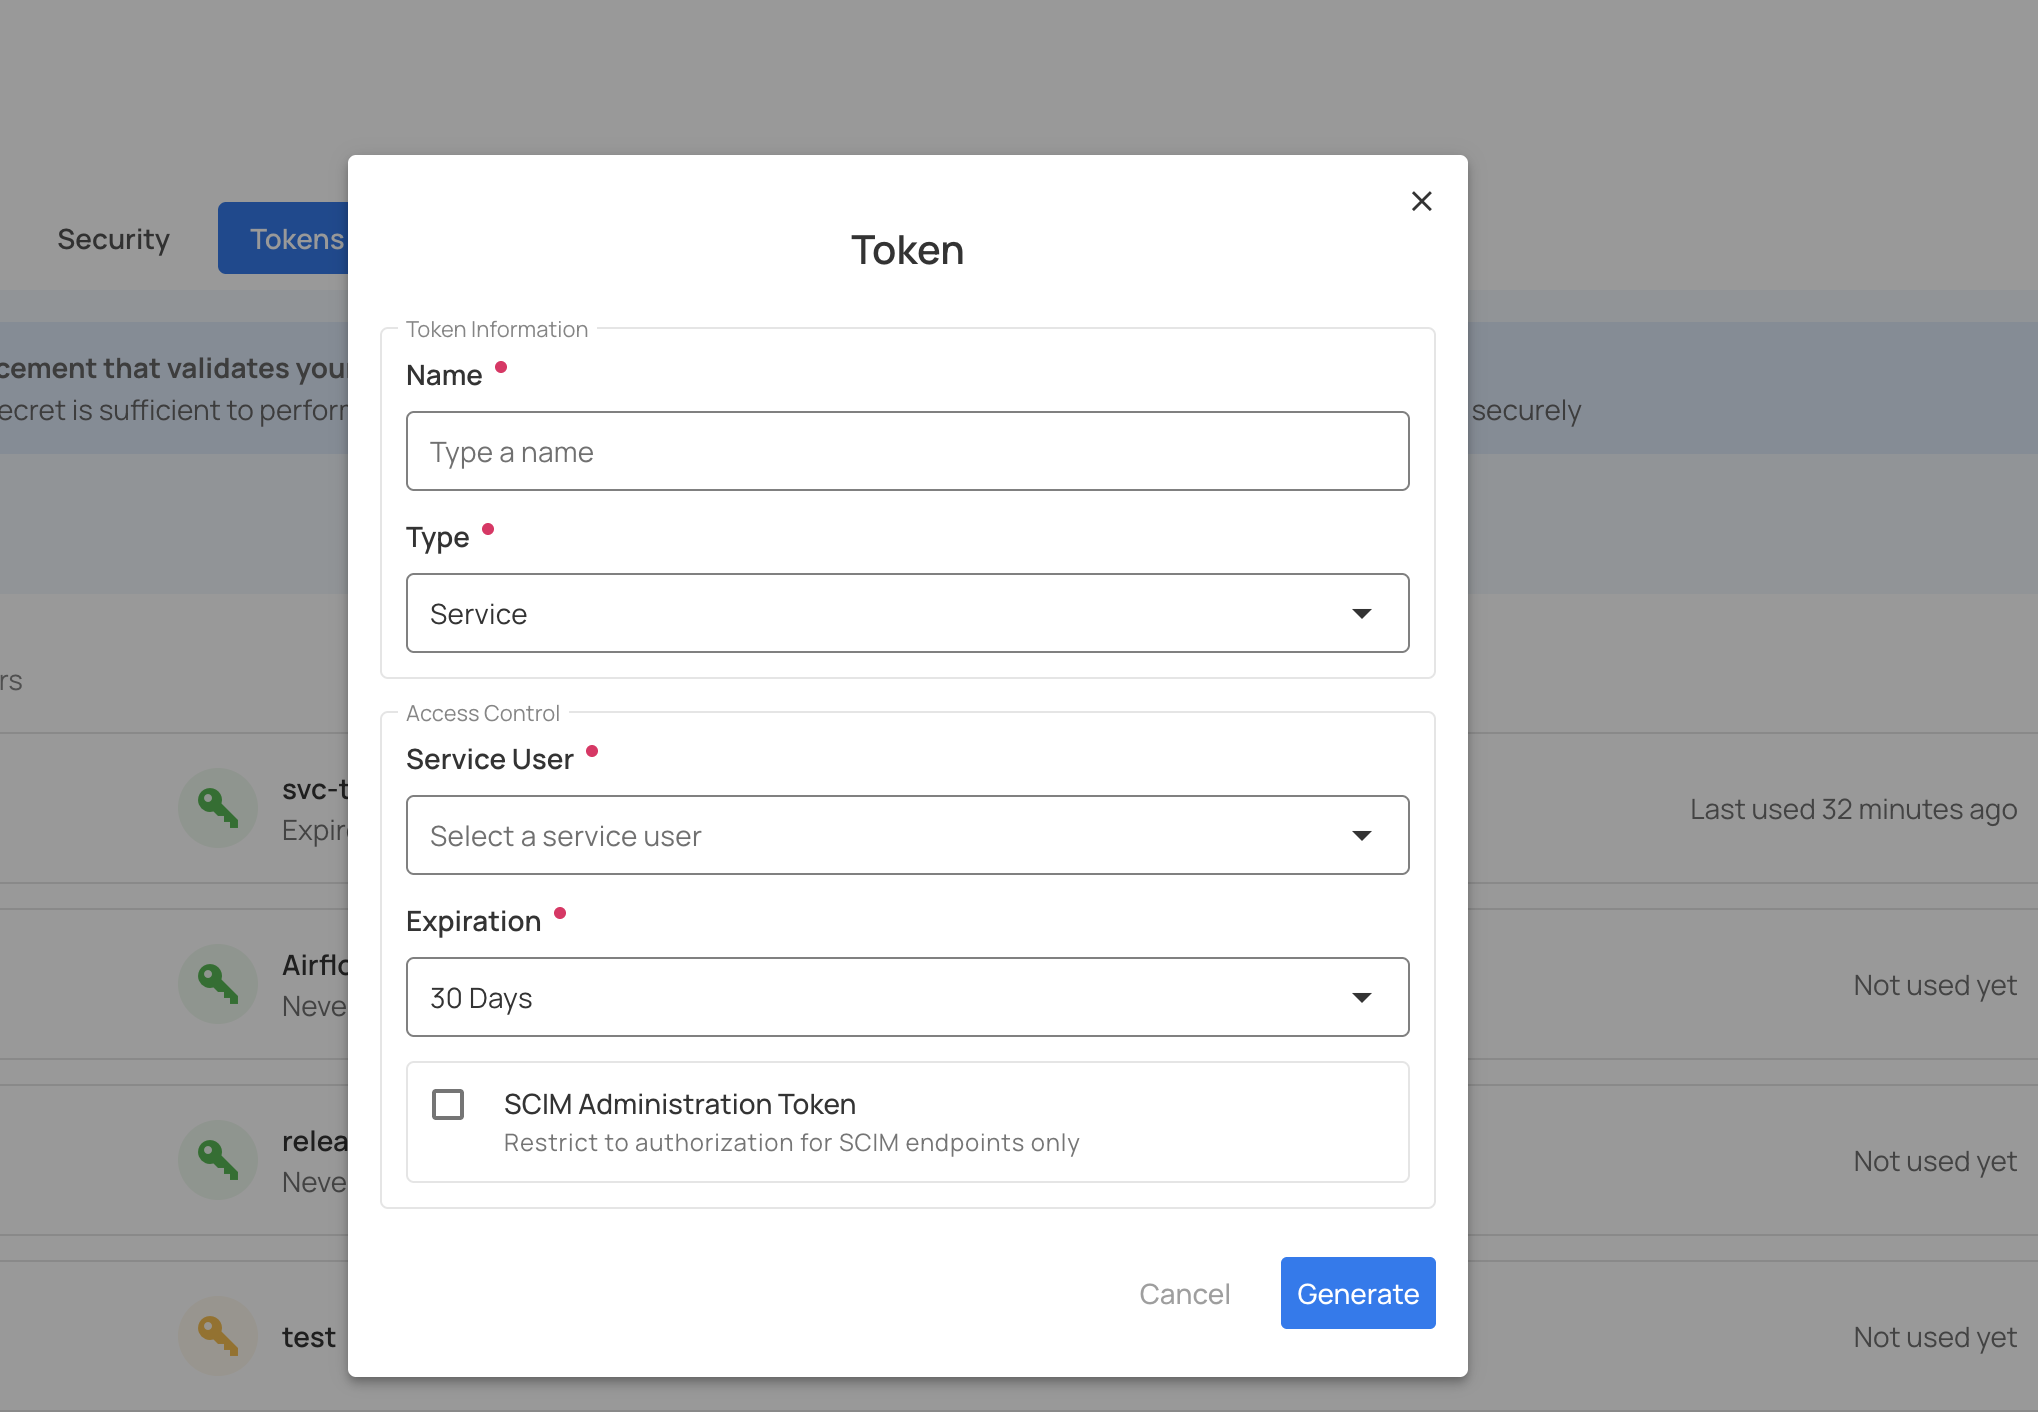
Step 3: Complete the token generation form:
| Field | Description | Required |
|---|---|---|
| Name | Descriptive name for the token (e.g., "pipeline-production", "api-access-prod"). | Yes |
| Expiration | Select the expiration period from the dropdown: 30 days, 60 days, 90 days, 1 year, or Never. For production tokens, 1 year with a rotation plan is recommended. | Yes |
| Type | Select Service from the dropdown (or Personal for your own token). | Yes |
| Service User | When Type is "Service", a dropdown will appear showing all available service accounts. Select the service user for which you want to create the token. | Yes (when Type is Service) |
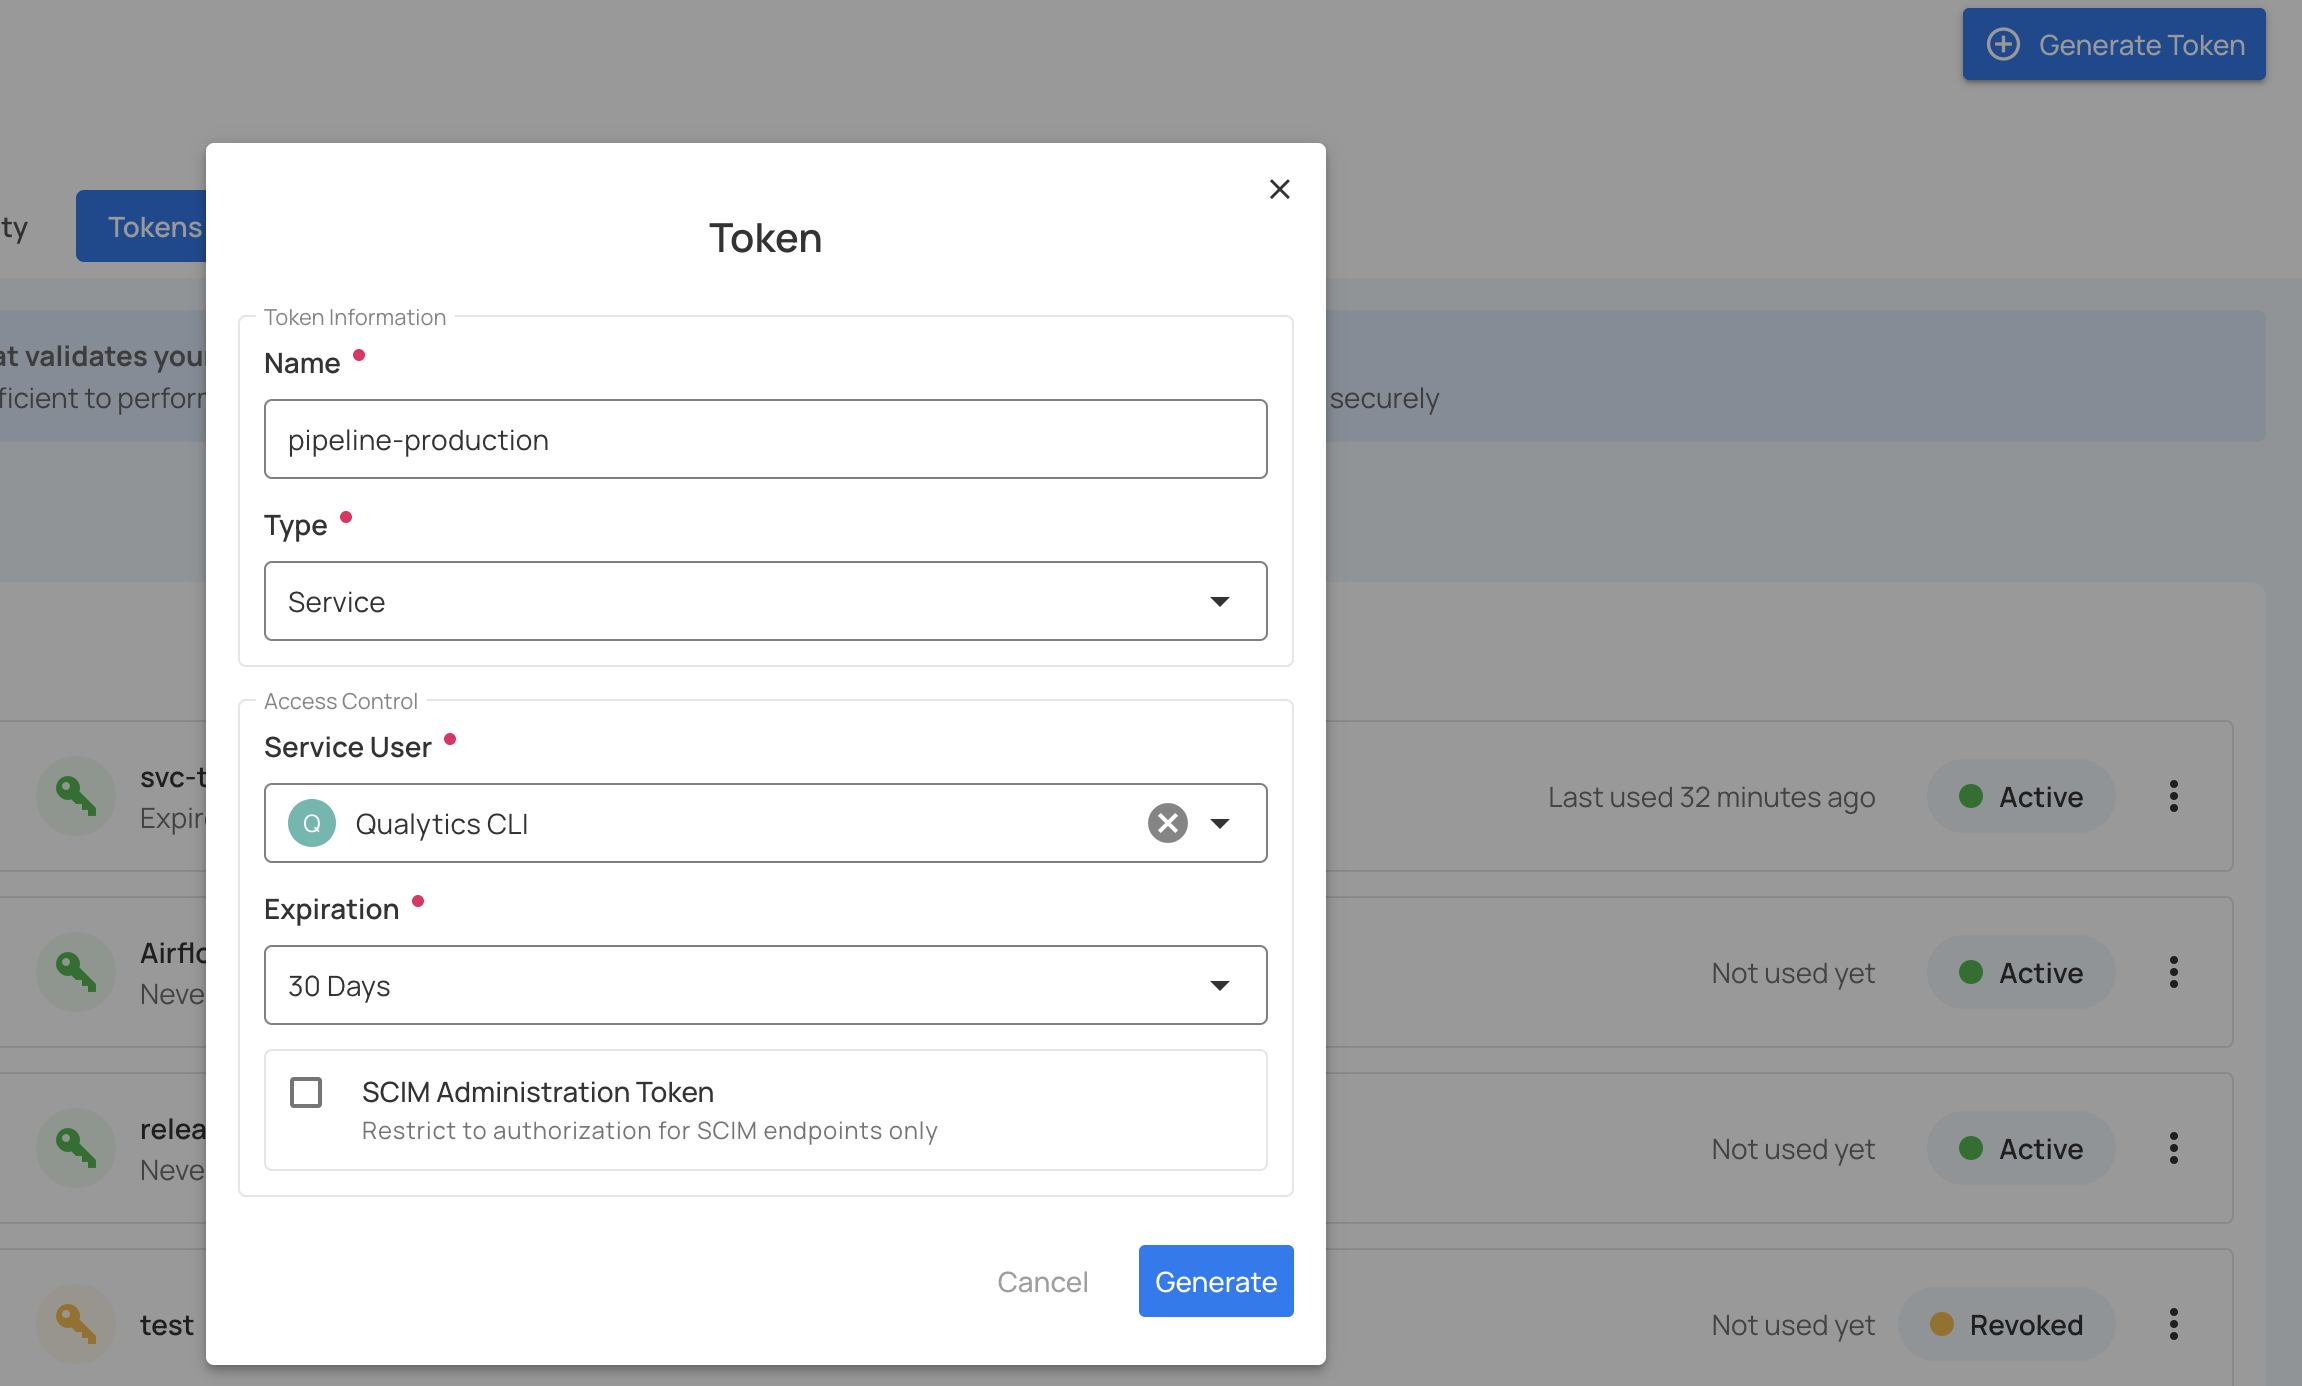
Step 4: After entering all details, click on the Generate button.
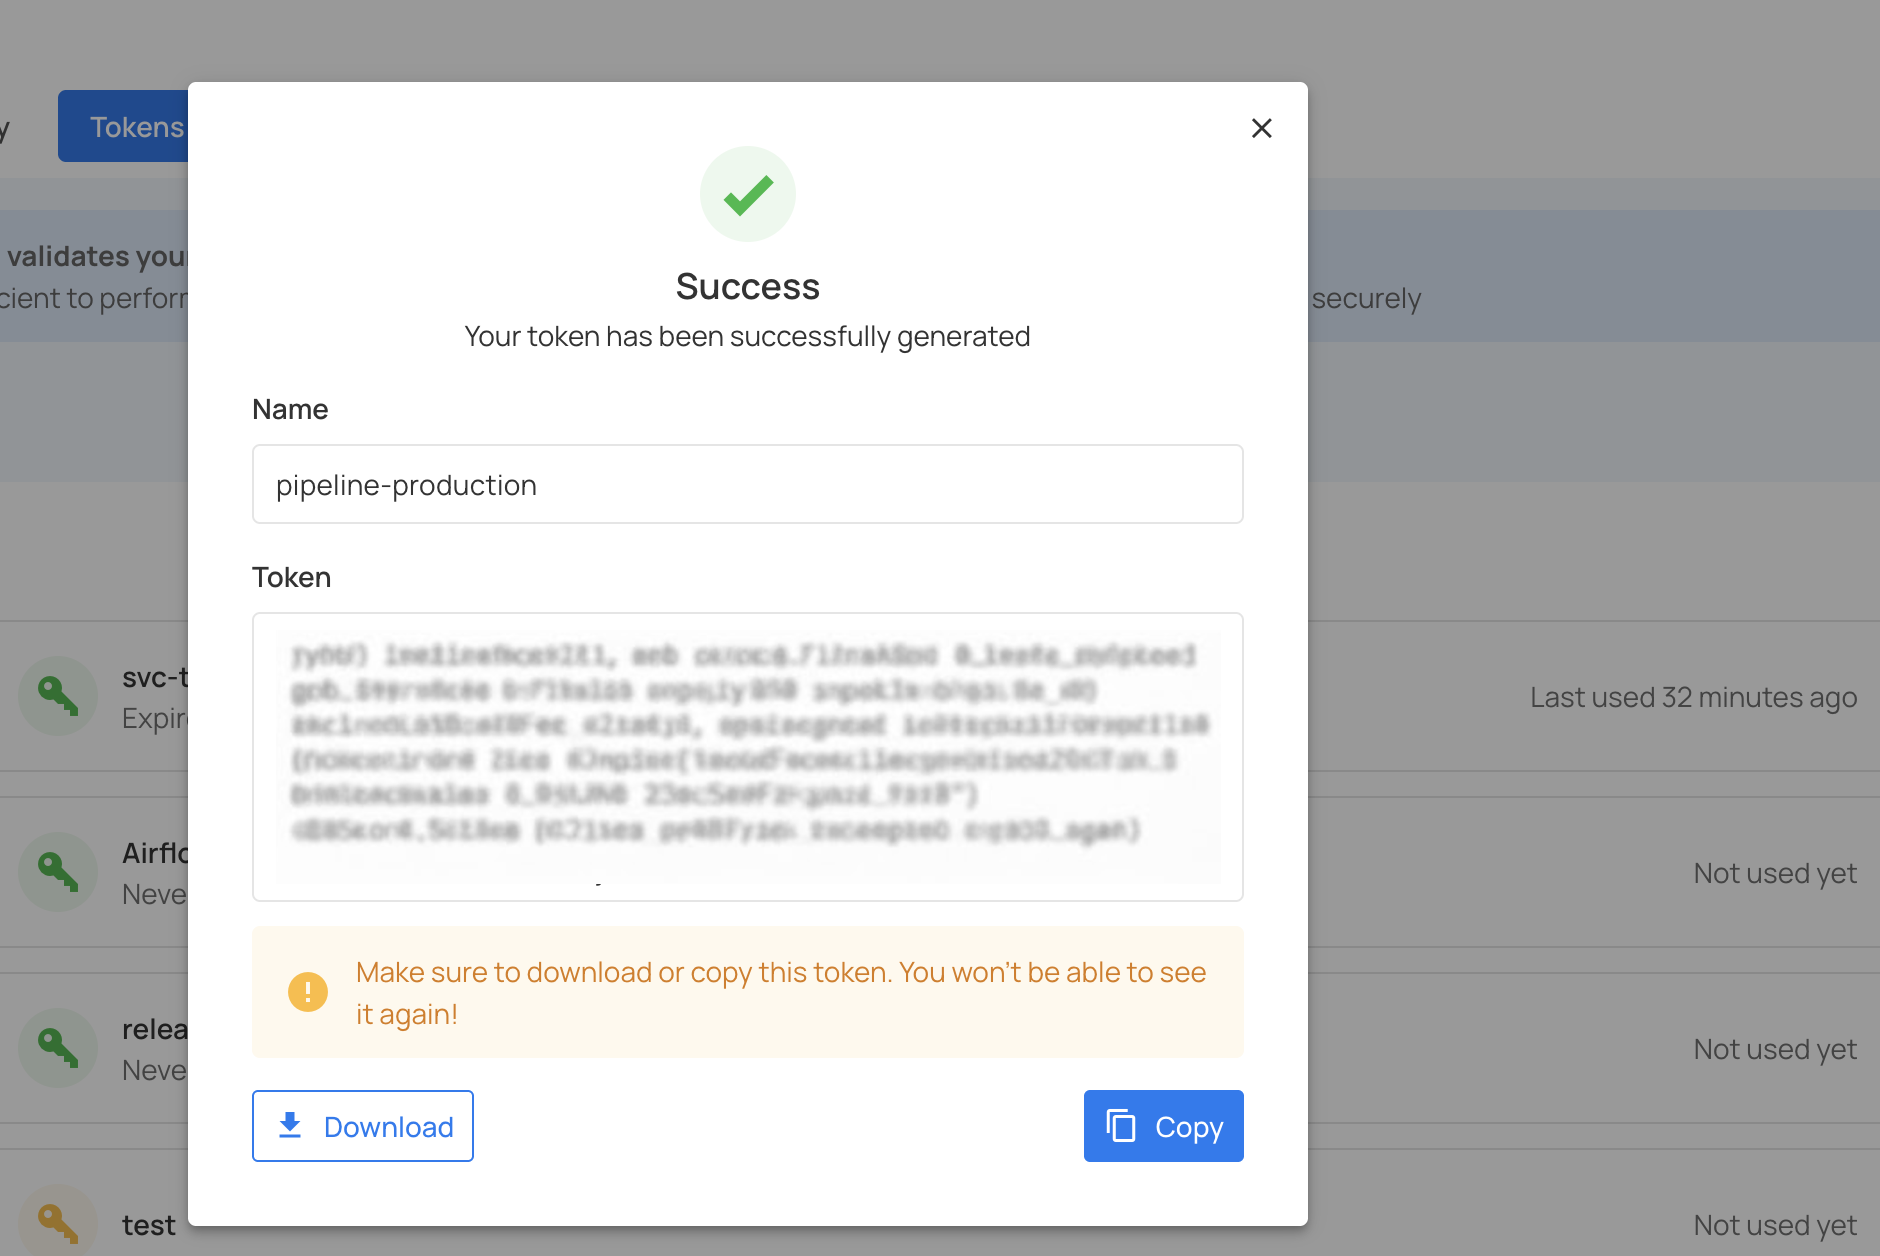
Step 5: Your service token has been successfully generated. The token will be displayed on the screen.
Warning
Make sure to download or copy this token. You won't be able to see it again!
Copy the bearer token immediately and store it securely in a password manager or secrets management system.
Step 6: After copying the token, you can close the modal. The token will now appear in the service tokens list.
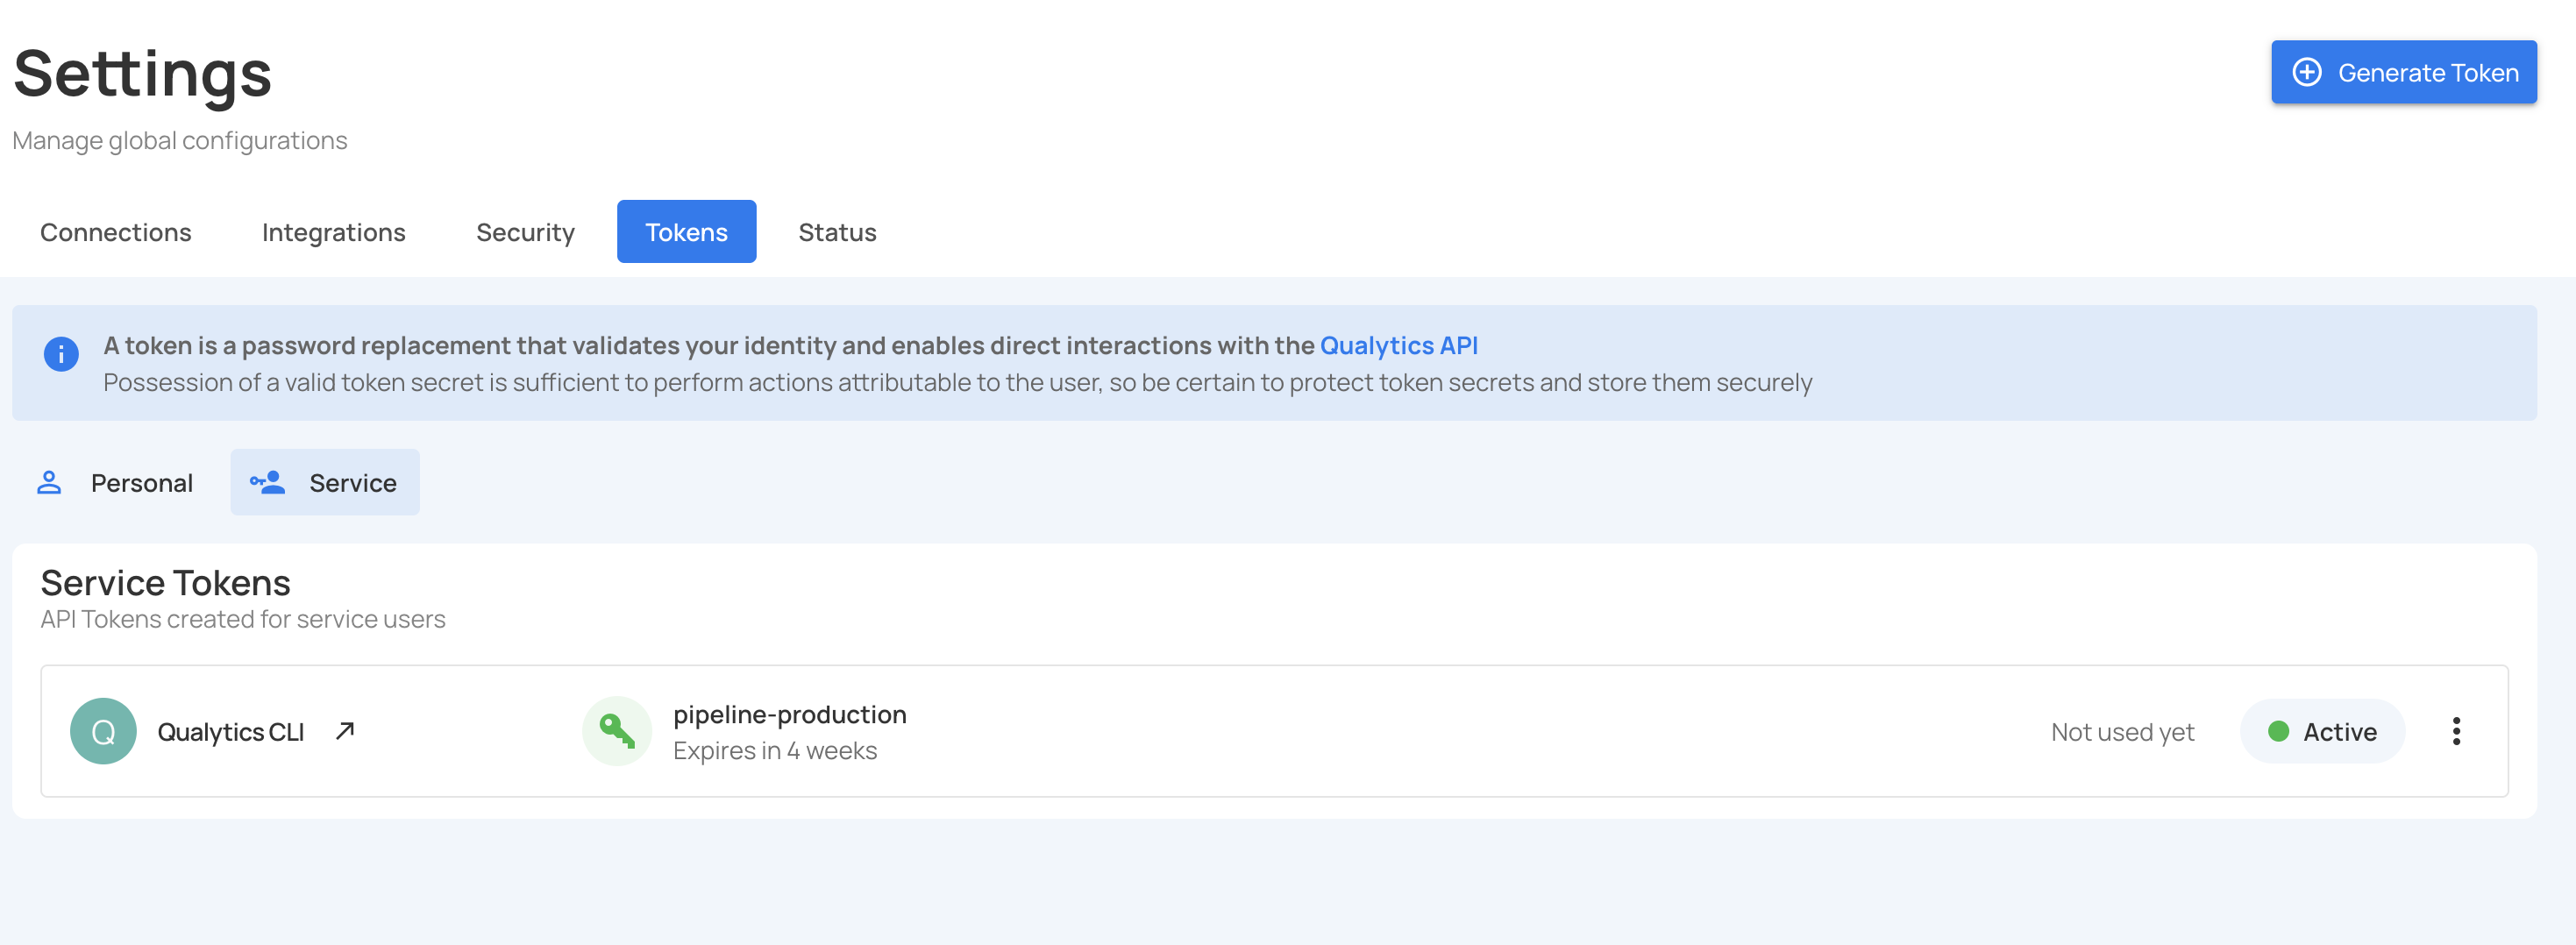
Token Naming Strategy
Token names must be unique per service account (but not globally unique). Use a consistent naming convention:
Best Practices:
- Include environment:
Production,Staging,Development - Include purpose:
Pipeline,Integration,Sync,API,CLI - Include system name if applicable:
Alation,Atlan
Examples:
pipeline-productionapi-access-prodalation-sync-stagingcli-automation-dev
Using Service Tokens
Once generated, include the service token in the Authorization header of all API requests:
curl -H "Authorization: Bearer eyJhbGciOiJIUzI1NiIsInR5cCI6IkpXVCJ9..." \
  https://acme.qualytics.io/api/datastores
Example Python Usage:
import requests

QUALYTICS_TOKEN = "eyJhbGciOiJIUzI1NiIsInR5cCI6IkpXVCJ9..."
QUALYTICS_API = "https://acme.qualytics.io/api"

headers = {
    "Authorization": f"Bearer {QUALYTICS_TOKEN}",
    "Content-Type": "application/json"
}

response = requests.get(f"{QUALYTICS_API}/datastores", headers=headers)
print(response.json())
Managing Service Tokens
Service tokens can be monitored, revoked, restored, and deleted as needed for security and lifecycle management.
Token Usage Status
Each service token displays a usage status to help you track active and inactive tokens:
Last Used: Shows the timestamp when the token was last used for API authentication.

Not Used: The token has been generated but has not been used for any API requests since creation.

Viewing Service Tokens
Step 1: Navigate to Settings > Tokens tab.

Step 2: Click on the Service Tokens filter to view only service account tokens.

You will see a list of all service tokens with their status, expiration date, and last used timestamp.
Revoking a Service Token
Revoking a token immediately disables it without permanently deleting it. This is useful if you suspect a token has been compromised or you need to temporarily disable access.
Step 1: Locate the service token you want to revoke from the tokens list.
Step 2: Click the vertical ellipsis (⋮) next to the token, then select Revoke from the dropdown menu.

Step 3: A confirmation message will display saying Service token successfully revoked. The token's status will change to indicate it has been revoked.

Warning
Revoked tokens cannot be used for API authentication. Any systems using this token will immediately lose access.
Restoring a Service Token
If you revoked a token by mistake or need to re-enable access, you can restore it.
Step 1: Locate the revoked token in the tokens list.
Step 2: Click the vertical ellipsis (⋮) next to the revoked token, then select Restore from the dropdown menu.

Step 3: The token has been restored and a confirmation message will display saying Service token successfully restored. The token is now active again.

Deleting a Service Token
Deleting a token permanently removes it from the system. This action cannot be undone.
Note
You can only delete revoked tokens. If you want to delete an active token, you must first revoke it.
Step 1: Ensure the token is revoked (see Revoking a Service Token).
Step 2: Click the vertical ellipsis (⋮) next to the revoked token, then select Delete from the dropdown menu.
A confirmation modal window will appear.

Step 3: Click on the Delete button to permanently delete the token.
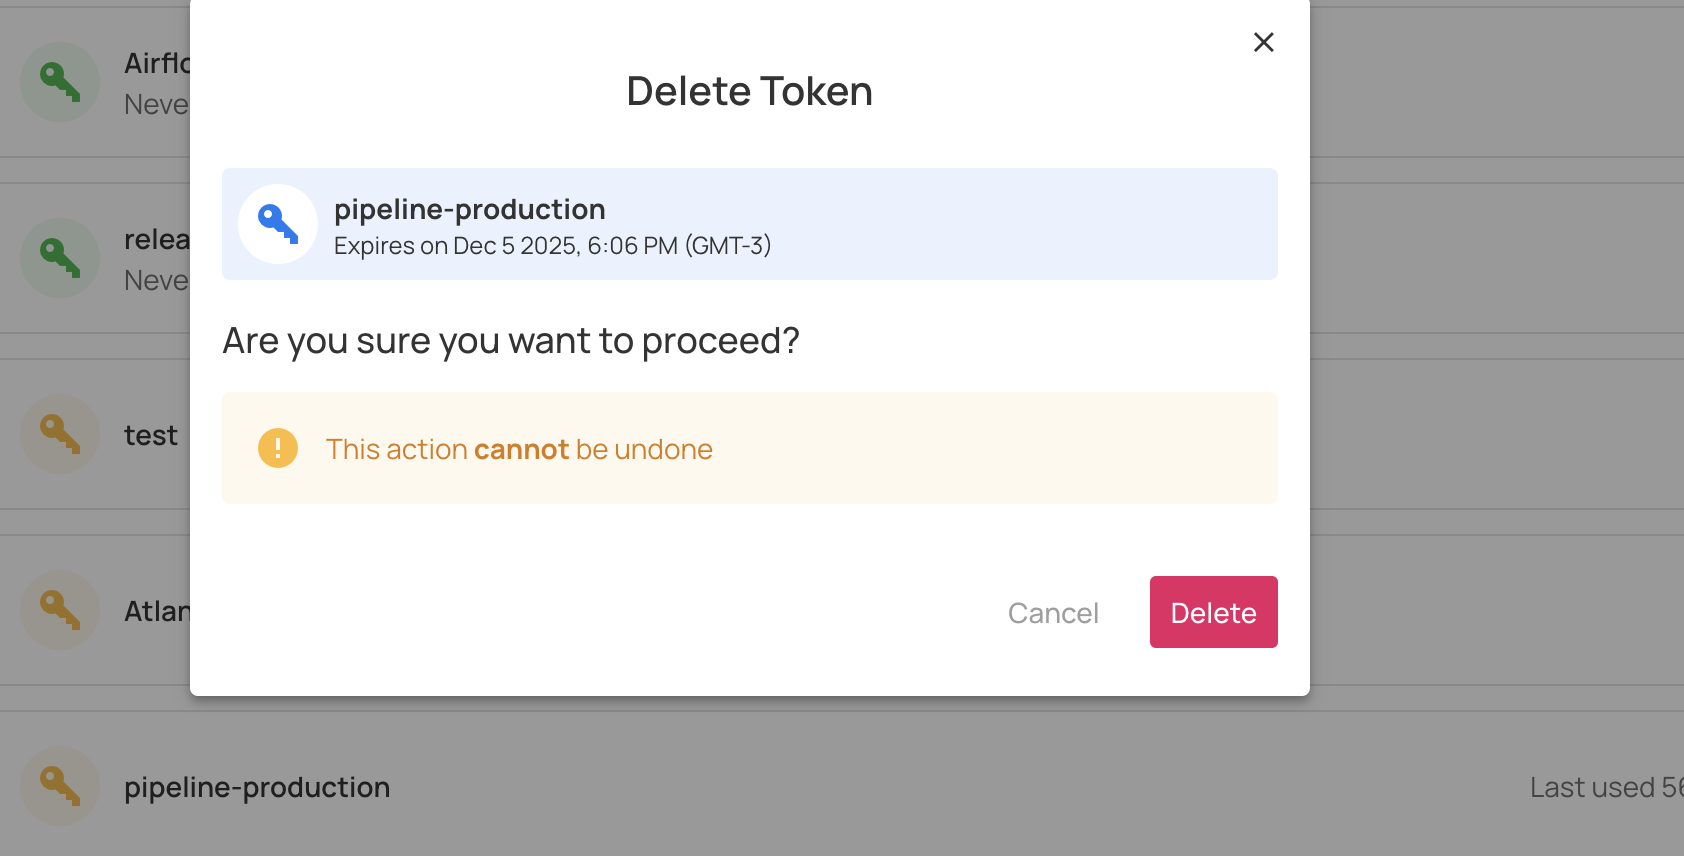
Step 4: A confirmation message will display saying Service token successfully deleted. The token is now permanently removed.

Token Rotation
For security best practices, tokens should be rotated periodically, especially before expiration.
Token Rotation Process:
- Create New Token (at least 30 days before expiration)
-
Generate a new token for the same service account with a new name (e.g.,
production-integration-2025) -
Update Integration
- Provide the new token to your integration team
- Update your secrets manager or environment variables
-
Verify the integration works with the new token
-
Monitor Usage
- Check that the new token is being used (verify "Last Used" timestamp)
-
Ensure the old token is no longer active
-
Revoke Old Token
-
Once verified, revoke the old token
-
Delete Old Token (after grace period)
- After 7 days of monitoring, delete the revoked token
API Reference
For administrators who prefer API-based management or need to automate service account creation, Qualytics provides comprehensive API endpoints.
Creating a Service Account via API
Endpoint:
Request Body:
Response:
{
  "id": 123,
  "user_id": "api_access@service",
  "user_name": "api_access@service",
  "email": "service@example.com",
  "name": "API Access",
  "user_type": "Service",
  "role": "Editor",
  "teams": ["Public", "Data Engineering", "Data Quality"]
}
Creating a Service Token via API
Endpoint:
Request Body:
Response:
{
  "id": 456,
  "name": "api-production",
  "active": true,
  "expiration": "2026-11-05T12:34:56Z",
  "bearer_token": "eyJhbGciOiJIUzI1NiIsInR5cCI6IkpXVCJ9...",
  "user": {
    "id": 123,
    "user_id": "api_access@service",
    "name": "API Access",
    "user_type": "Service"
  }
}
Danger
Save the bearer_token immediately! It cannot be retrieved later.
Listing Service Accounts
Endpoint:
Listing All Service Tokens
Endpoint:
Revoking a Token via API
Endpoint:
Request Body:
Deleting a Revoked Token via API
Endpoint:
Note
Can only delete tokens that are already revoked.
Role Assignment Best Practices
Choosing the appropriate role for a service account is crucial for maintaining security through the principle of least privilege.
Role Guidelines
| Use Case | Recommended Role | Rationale |
|---|---|---|
| Data catalog sync (Alation, Atlan) | Manager | Needs to read datastores, containers, and quality checks |
| Data pipeline automation | Editor | Needs to trigger operations and create containers |
| Qualytics CLI automation | Editor | Needs to trigger profiling and scanning operations |
| Read-only API access | Member | Only needs to read metrics, anomalies, and quality results |
| BI tool integration | Member | Only needs to read data quality results |
| Full platform automation | Admin | Needs to manage users, teams, and all resources |
Role Permissions
| Permission | Member | Editor | Manager | Admin |
|---|---|---|---|---|
| Read data quality results | ✅ | ✅ | ✅ | ✅ |
| View datastores and containers | ✅ | ✅ | ✅ | ✅ |
| Create and modify resources | ❌ | ✅ | ✅ | ✅ |
| View all users and teams | ❌ | ❌ | ✅ | ✅ |
| Manage users and service accounts | ❌ | ❌ | ❌ | ✅ |
| Configure integrations | ❌ | ❌ | ❌ | ✅ |
Recommendation: Always start with the Member role and escalate only if the integration requires additional permissions.
Team Membership Strategy
Service accounts can be assigned to teams to control access to specific datastores and containers.
How Team Membership Works
- Public team: All service accounts are automatically included in the Public team
- Additional teams: Service accounts can be added to specific teams for scoped access
- Access control: Team membership determines which datastores and containers the service account can access
Team Assignment Examples
Example 1: Data Catalog Integration
{
  "name": "Alation Data Catalog Sync",
  "role": "Manager",
  "teams": [
    "Data Engineering",
    "Analytics",
    "Finance Data"
  ]
}
This service account will have access to:
- Public team resources (automatic)
- Data Engineering team's datastores
- Analytics team's datastores
- Finance Data team's datastores
Example 2: Data Pipeline Automation
This service account can:
- Trigger profiling and scanning operations on Data Engineering team's datastores
- Create and modify containers in Data Engineering team's scope
Security Best Practices
Token Storage
✅ Do:
- Store tokens in secrets managers (HashiCorp Vault, AWS Secrets Manager, Azure Key Vault)
- Use environment variables in deployment configurations
- Encrypt tokens at rest
- Rotate tokens regularly
❌ Don't:
- Commit tokens to source control (Git repositories)
- Store tokens in plain text files
- Share tokens via email or chat applications
- Use the same token across multiple environments
Token Expiration Strategy
Set appropriate expiration periods based on the environment and usage:
| Environment | Recommended Expiration | Notes |
|---|---|---|
| Production | 365 days | Implement rotation plan 30 days before expiration |
| Staging | 180 days | Shorter lifespan for non-production |
| Development | 90 days | Frequent rotation for dev environments |
| Testing | 7-30 days | Short-lived for temporary testing |
Monitoring and Auditing
Regularly review service account and token usage:
- Monthly Reviews
- Check "Last Used" timestamps for all tokens
- Revoke tokens unused for 90+ days
-
Verify service account role assignments are still appropriate
-
Audit Trail
- All API requests log the authenticated service account
created_by_idtracks which admin created each service account-
Token usage creates audit trail through
last_usedtimestamp -
Alert on Anomalies
- Unexpected token usage patterns
- API calls from unusual IP addresses
- Failed authentication attempts
Access Reviews
Conduct quarterly reviews of all service accounts:
Review Checklist:
- ✅ All service accounts have documented purposes
- ✅ Token names clearly indicate usage
- ✅ No tokens are close to expiration without rotation plan
- ✅
last_usedtimestamps are recent - ✅ Role assignments follow least privilege
- ✅ Team memberships are appropriate
- ✅ No orphaned tokens (service deleted but tokens exist)
Security Considerations
Token Security
Bearer Tokens Are Sensitive
- Treat tokens like passwords
- Anyone with the token has full API access as that service account
- Tokens are hashed before storage (HMAC-SHA256)
- Lost tokens cannot be recovered (must create new)
Immediate Revocation
- Revoke immediately if compromised
- Two-step deletion prevents accidents (revoke → delete)
- Revoked tokens fail immediately (no grace period)
Incident Response
If Token Is Compromised
1. Immediate Actions
- Revoke the token via UI or API
- Notify your security team
- Check audit logs for suspicious activity
2. Investigation
- Review all API calls made with the compromised token
- Identify scope of unauthorized access
- Determine if data was exfiltrated or modified
3. Remediation
- Create new token for legitimate integration
- Update integration with new token
- Delete compromised token
- Document the incident
4. Prevention
- Review storage practices
- Enhance monitoring and alerting
- Update security training
If Service Account Is Compromised
- Revoke ALL tokens for the service account
- Create new service account with a different name
- Audit all actions taken by the compromised service account
- Rotate any downstream credentials the service had access to
Compliance Considerations
Separation of Duties
- Service accounts for production integrations
- Personal Access Tokens only for development
- Admin approval required for service account creation
- Clear ownership and responsibility documented
Least Privilege
- Start with Member role, escalate only if needed
- Limit team memberships to required access
- Regular permission reviews
- Document justification for elevated roles
Summary
Key Takeaways
Use Service Accounts for Production Integrations
- Remain active independent of individual user lifecycles, role changes, or access status
- Centralized management by administrators
- Clear audit trails with purpose-based identification
- Better security posture
Administrator Responsibilities
- Create and manage service accounts
- Conduct regular audits of service tokens
- Enforce token rotation policies
- Document all integrations and their purposes
Security First
- Store tokens securely in secrets managers
- Set appropriate expiration dates based on environment
- Monitor usage regularly through "Last Used" timestamps
- Revoke immediately if compromised
Least Privilege Principle
- Assign the minimum required role for each use case
- Limit team memberships to necessary access
- Conduct regular access reviews
- Document role justifications
Quick Reference
| Task | UI Location | API Endpoint | Required Role |
|---|---|---|---|
| Create service account | Settings > Users | POST /users |
Admin |
| Create service token | Users > Generate Token | POST /user-tokens |
Admin |
| List service tokens | Settings > Tokens (Service filter) | GET /user-tokens/service |
Admin |
| Revoke token | Token menu > Revoke | PUT /user-tokens/{id} |
Admin |
| Delete token | Token menu > Delete | DELETE /user-tokens/{id} |
Admin |