Microsoft Teams
Microsoft Teams integration in Qualytics enables seamless communication by connecting your Microsoft Teams workspace with data quality updates and notifications. It involves configuring Azure resources, providing necessary credentials, and establishing a direct link to your Teams workspace for alerts and communication.
Let's get started 🚀
Microsoft Teams Setup Guide
This section provides a comprehensive walkthrough to help you configure the necessary resources and retrieve the required credentials. By following this setup process, you'll have everything you need to complete the integration form.
Warning
Some steps in this guide may require administrator privileges in your Microsoft Azure environment. If you don't have the necessary permissions, you might need to coordinate with your IT department or someone with administrative access to your Azure tenant.
Creating a Microsoft Entra App Registration
The Microsoft Entra App Registration is used by Qualytics to provision Teams bot resources in your environment.
Step 1: Log in to to the Microsoft Entra App Registrations, and select New registration from the main menu to create a new application.
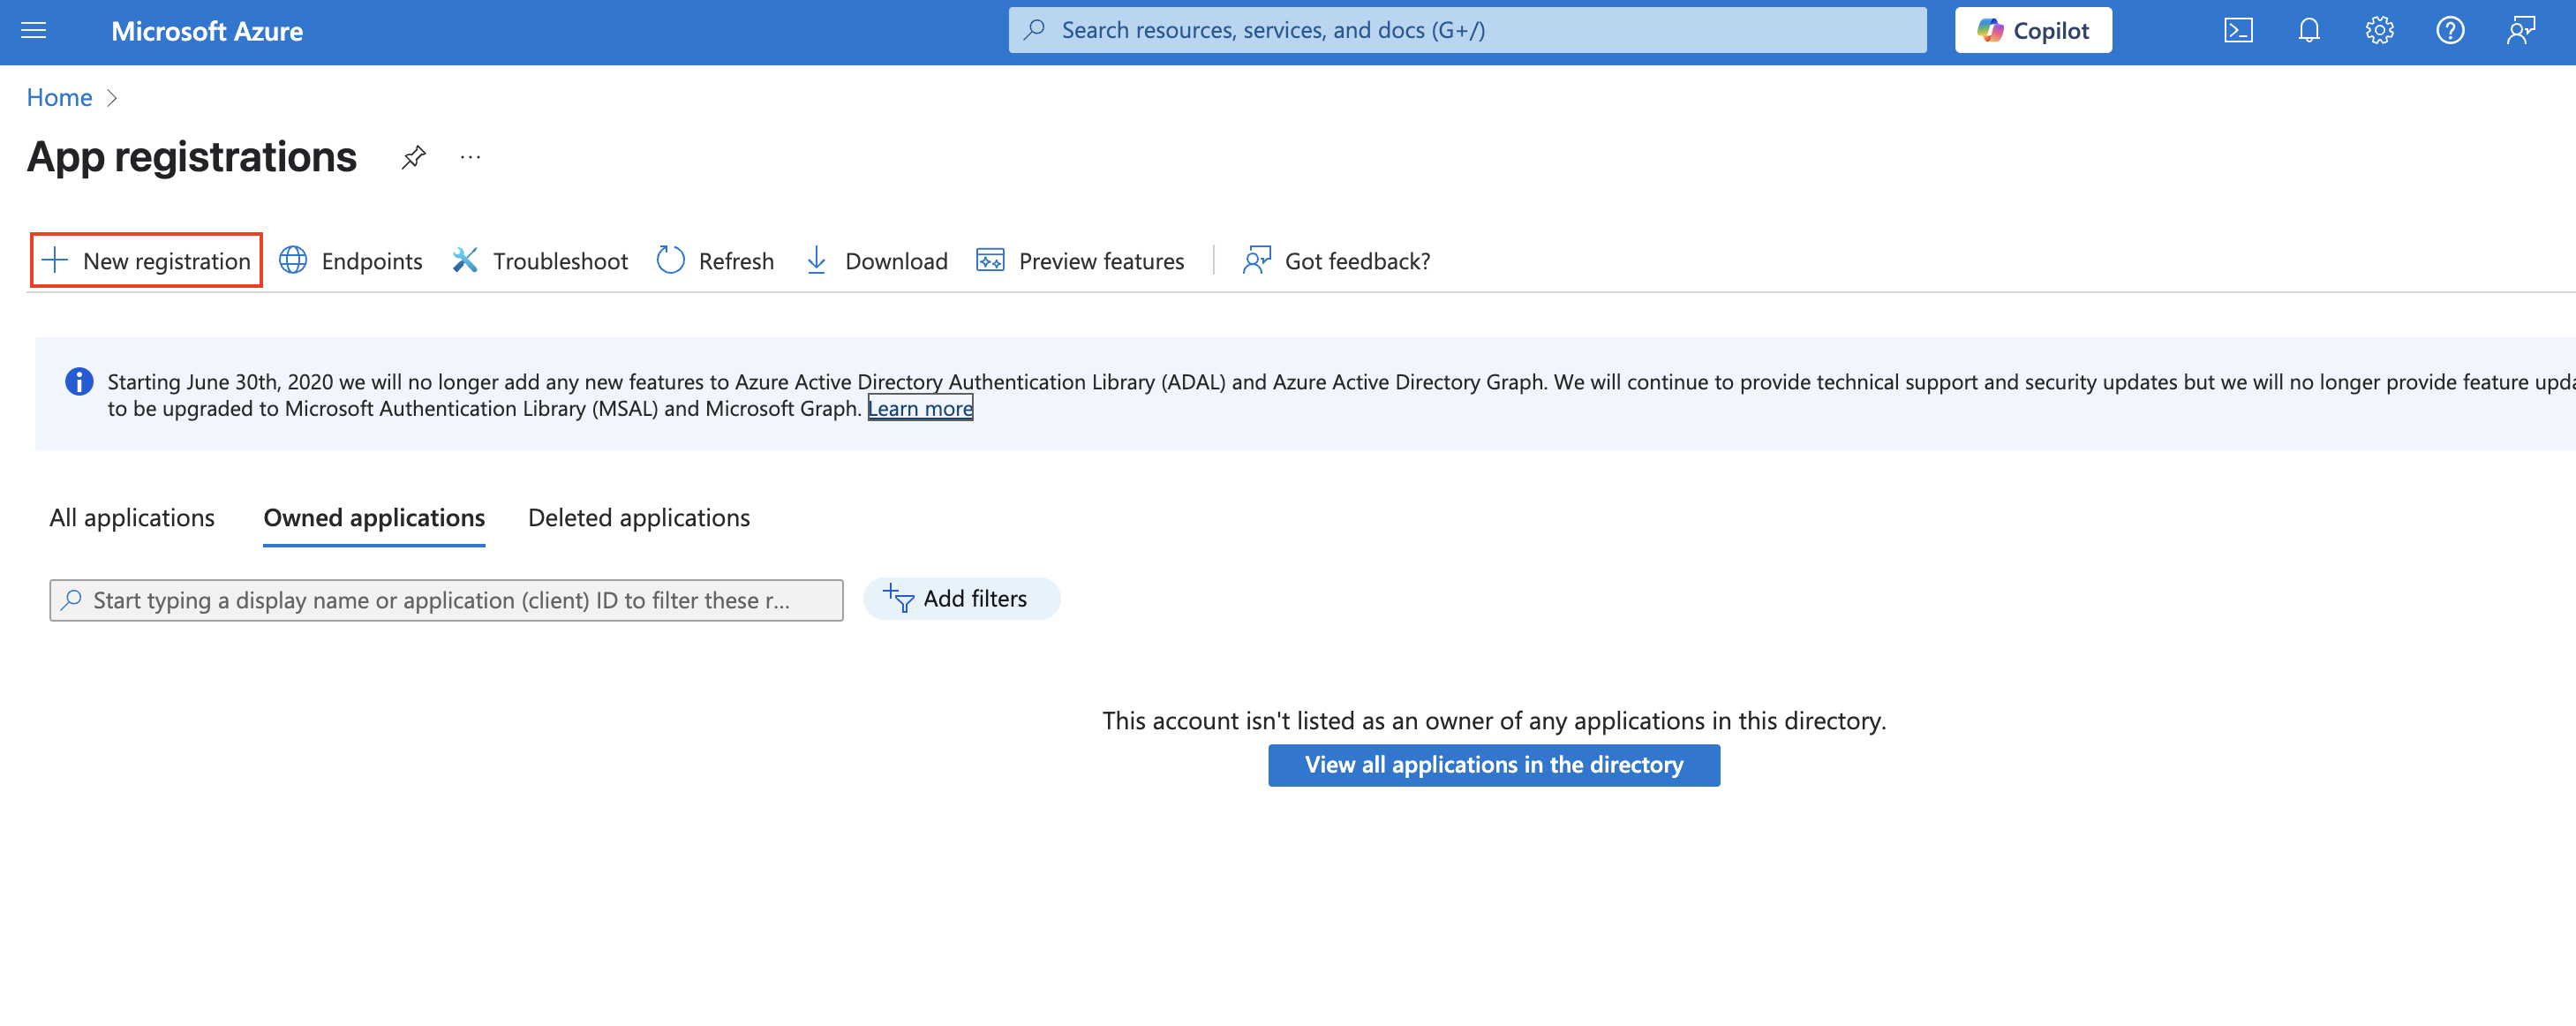
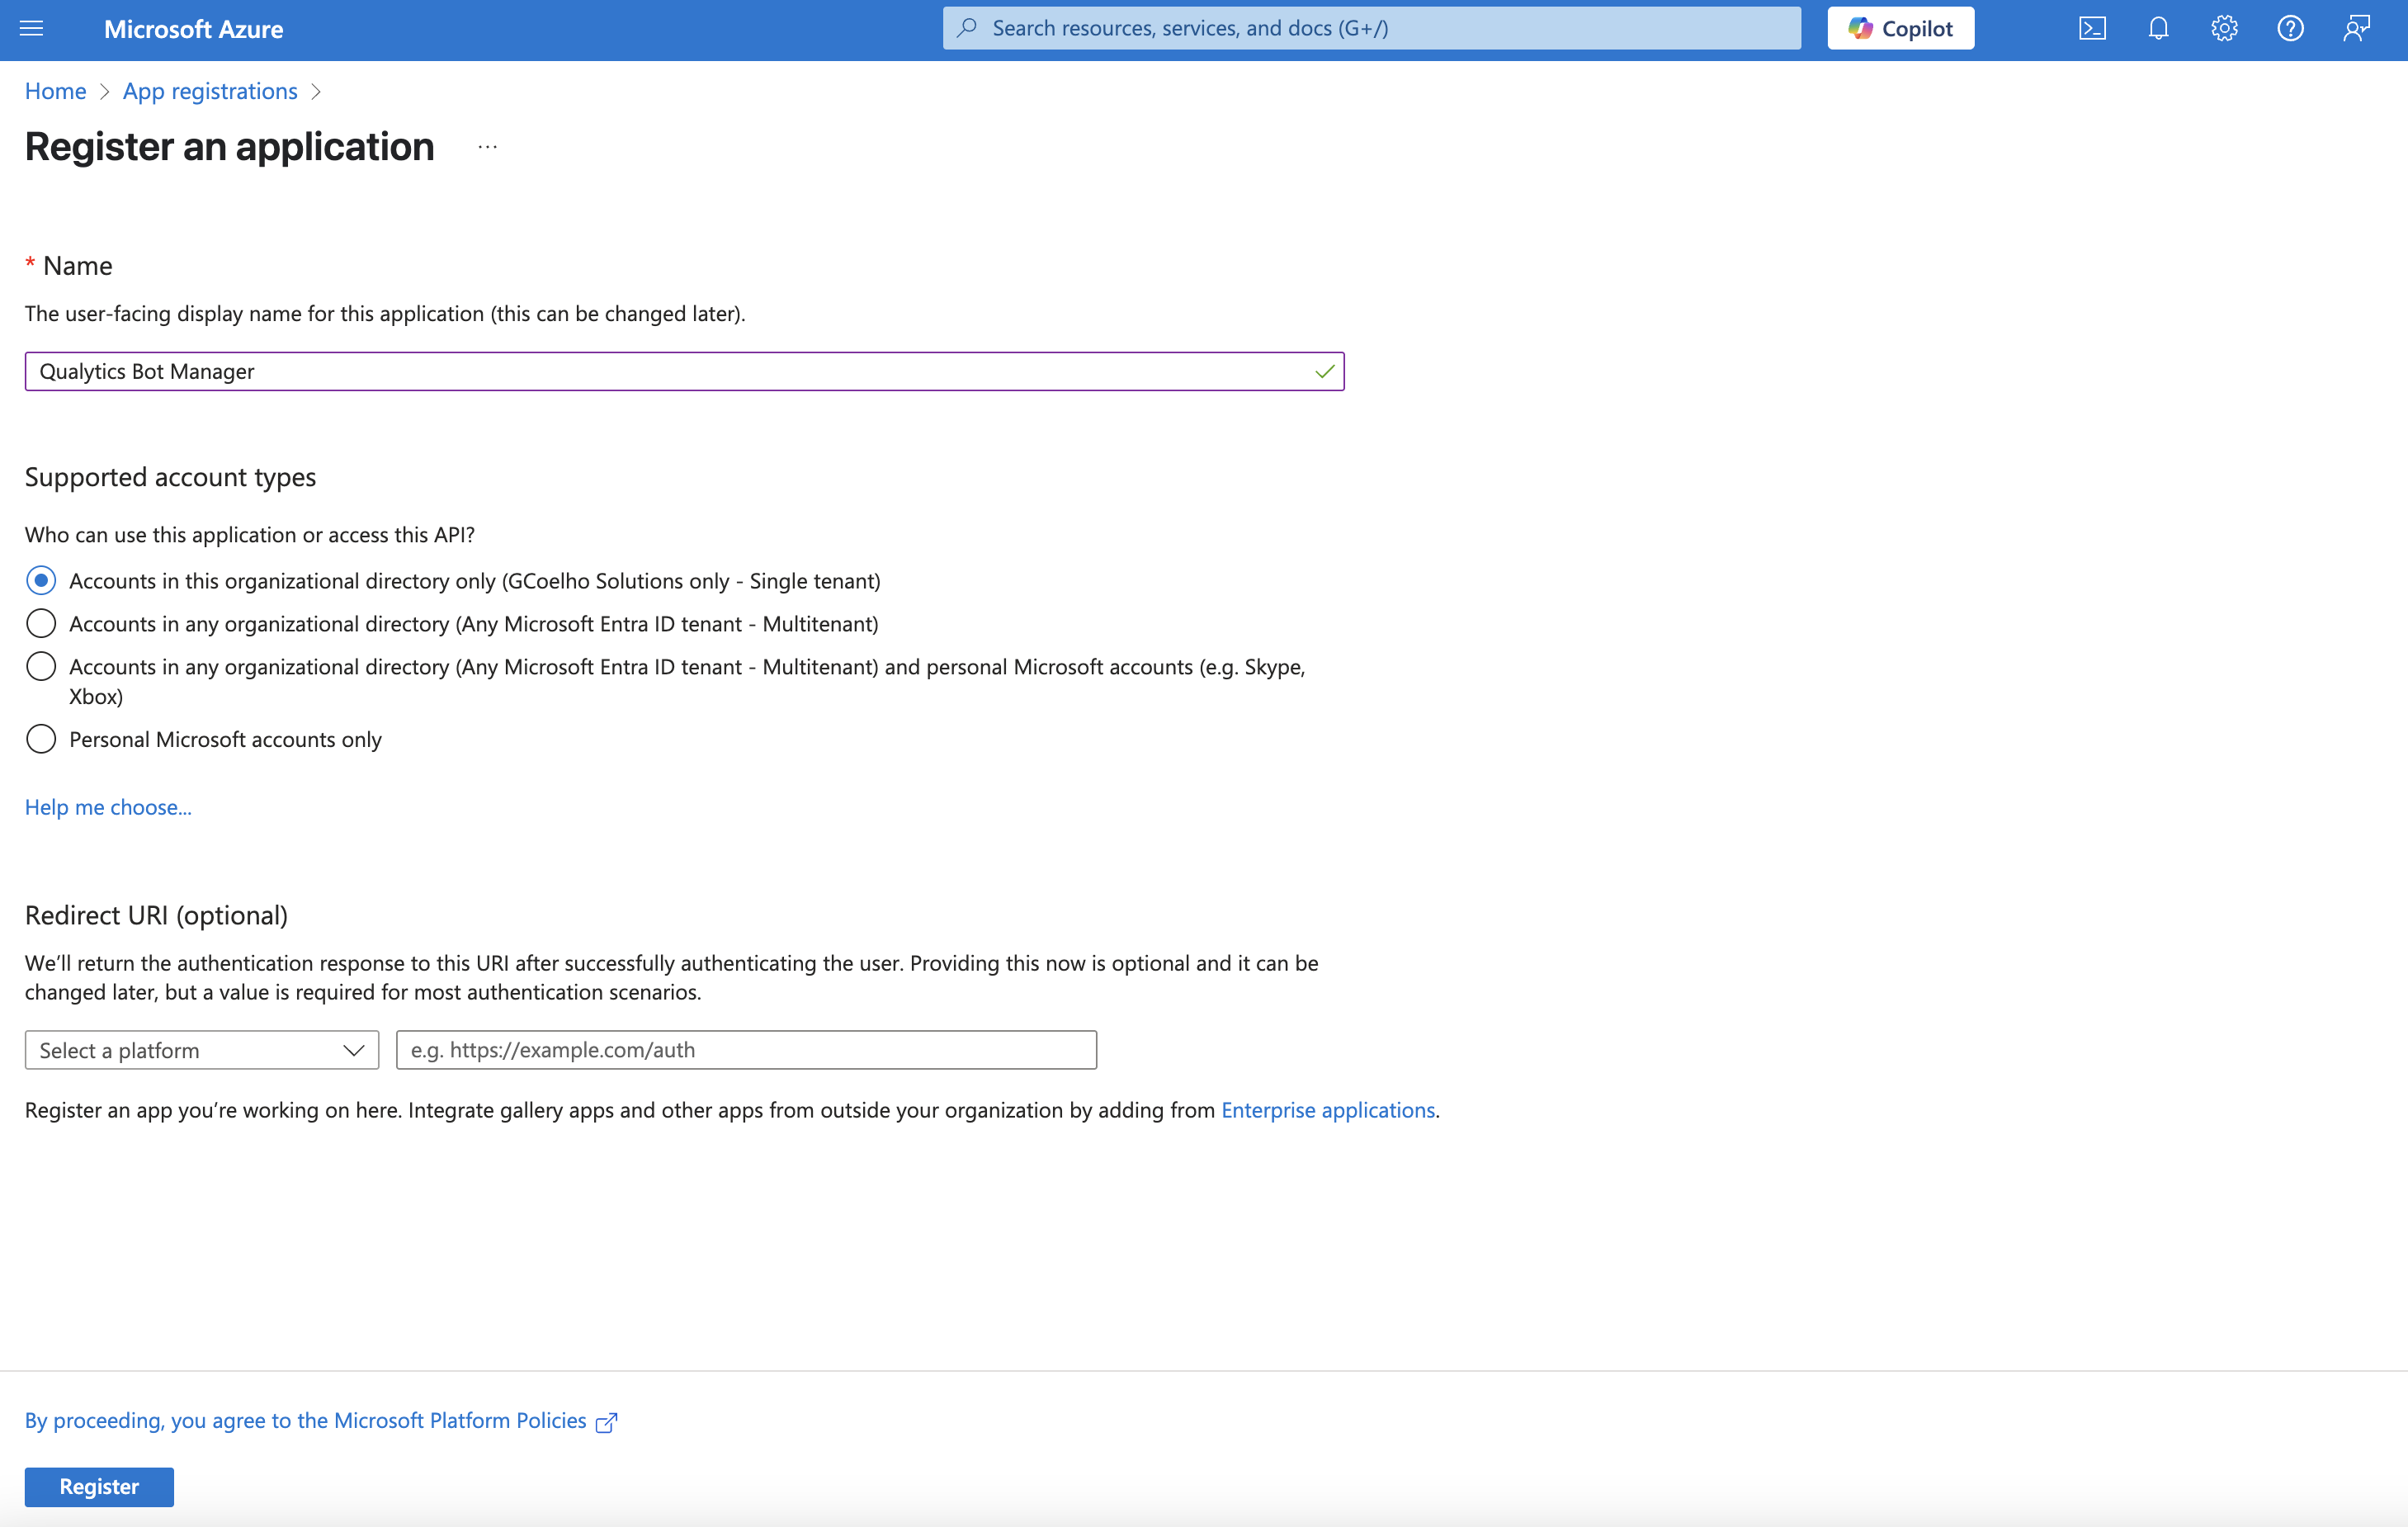
Step 2: You will be navigated to the App registrations dashboard. Fill in the required details for the app registration:
-
Name: Enter a name for your app (e.g., Qualytics Bot Manager).
-
Supported account types: Select "Accounts in this organizational directory only (Single tenant)".
-
Redirect URI: Leave this field blank, as it is not required for this integration.
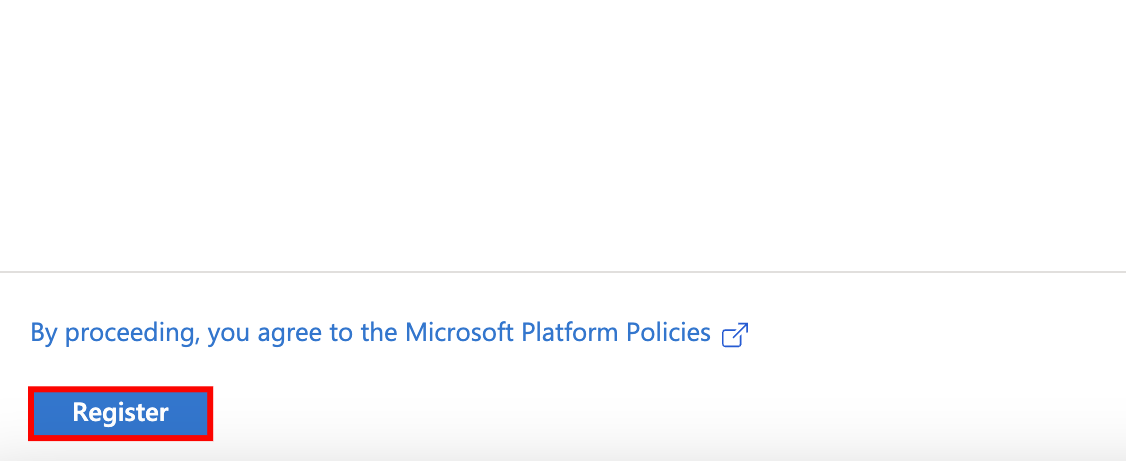
Step 3: Click Register button to complete the app registration.
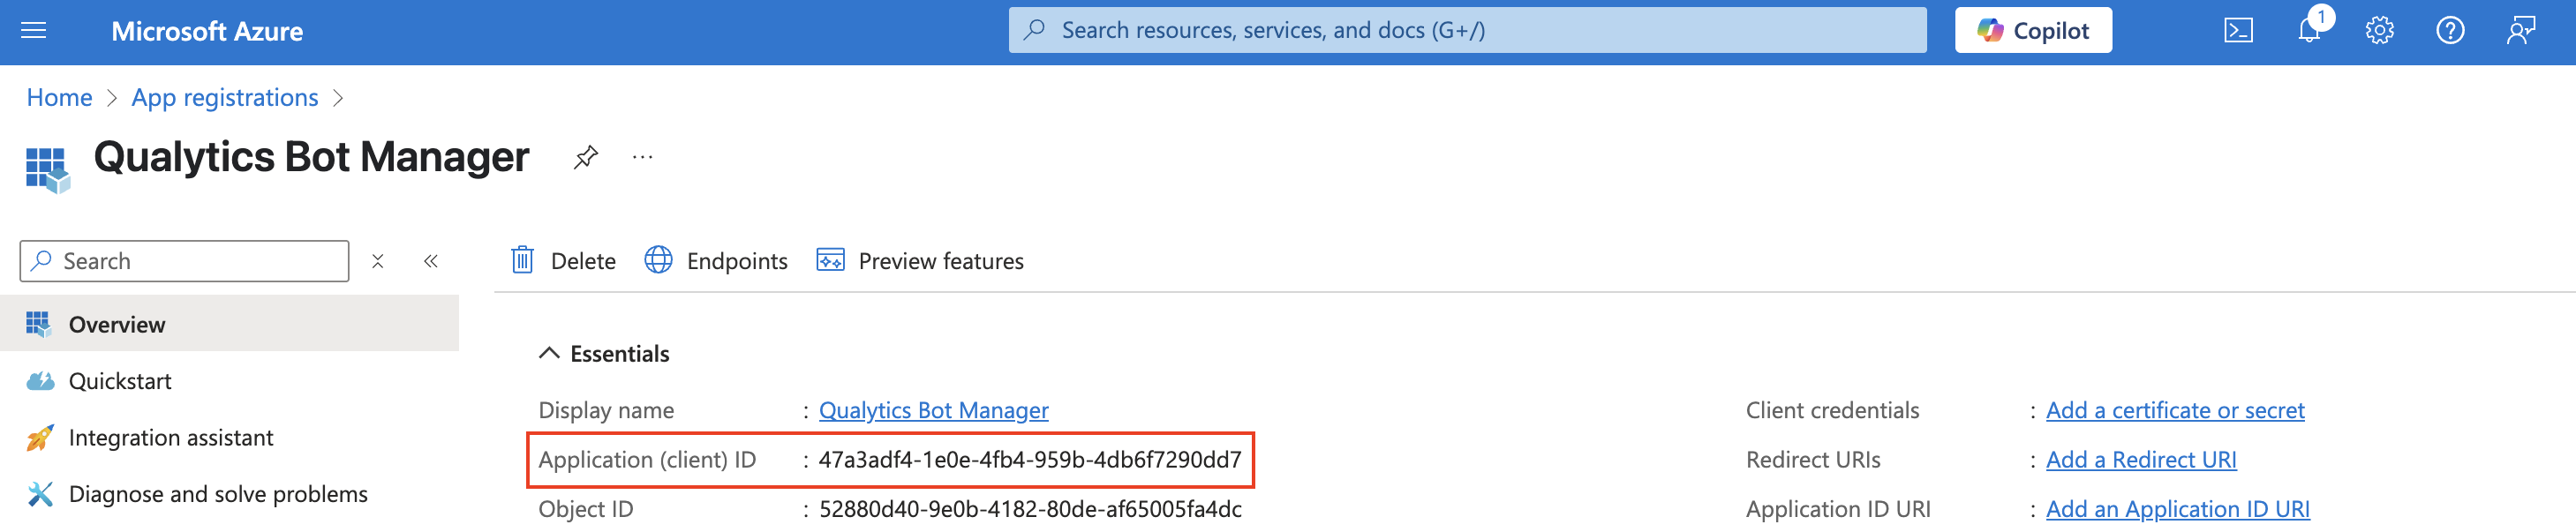
Step 4: After the app is registered, you’ll be redirected to the Overview page, where the Application (client) ID is displayed. Copy this ID since it will be needed later for the Qualytics integration.
Adding API Permissions
The Microsoft Entra App needs the "Application.ReadWrite.OwnedBy" permission to create and manage bot resources.
Step 1: In your app registration, go to the side panel and click Manage, then select API permissions from the dropdown.
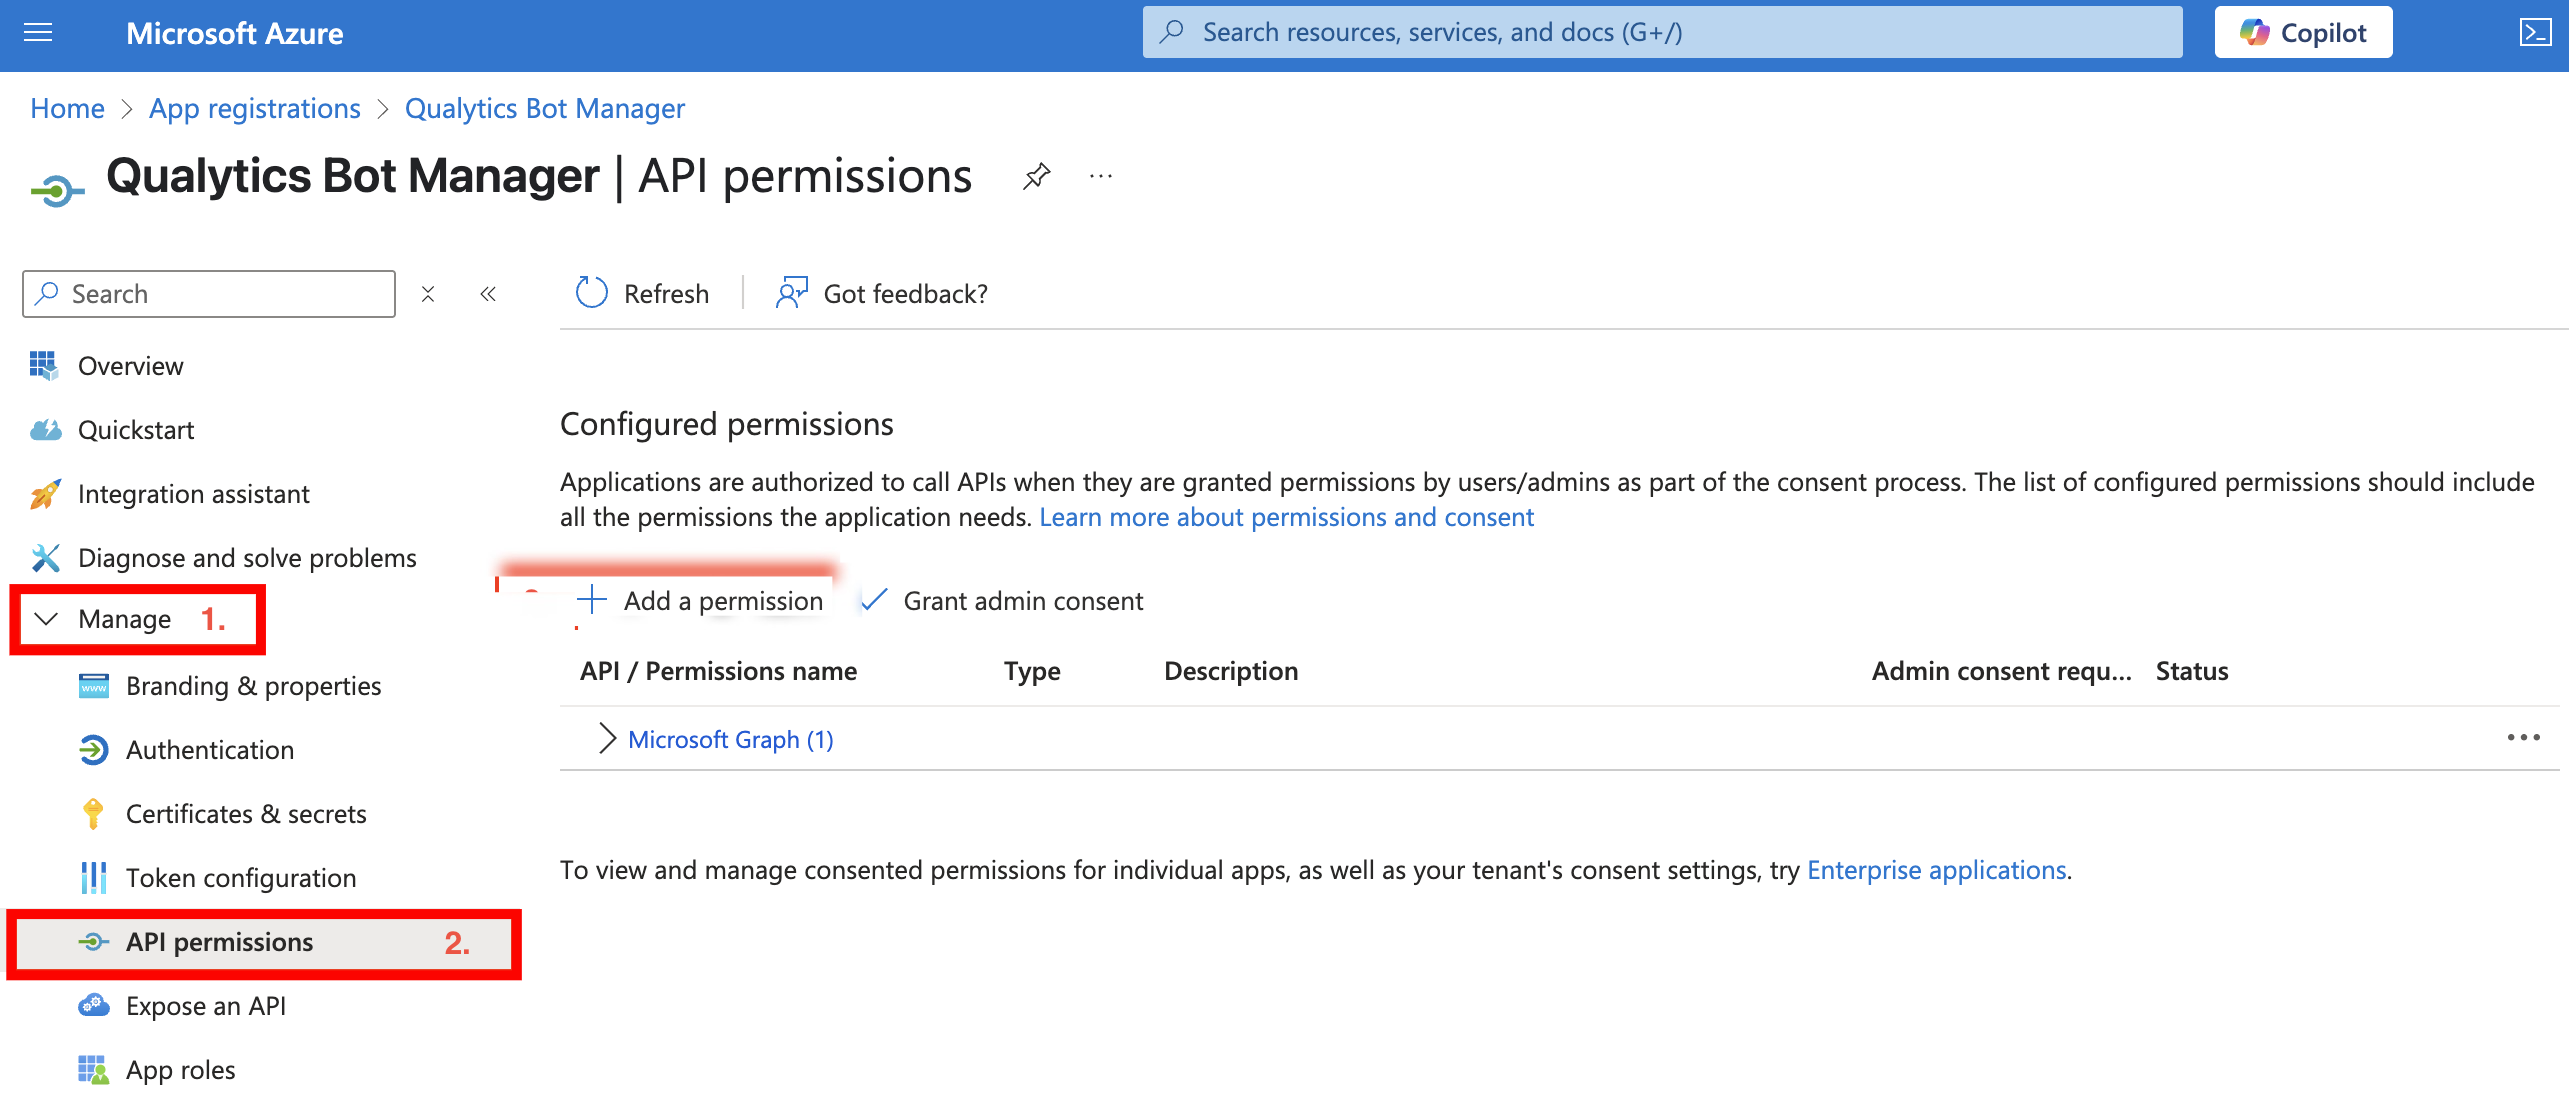
Step 2: Click on Add permission to begin configuring access permissions for the app.

Step 3: A right side panel titled Request API permissions will appear. Select Microsoft Graph from the list of options.
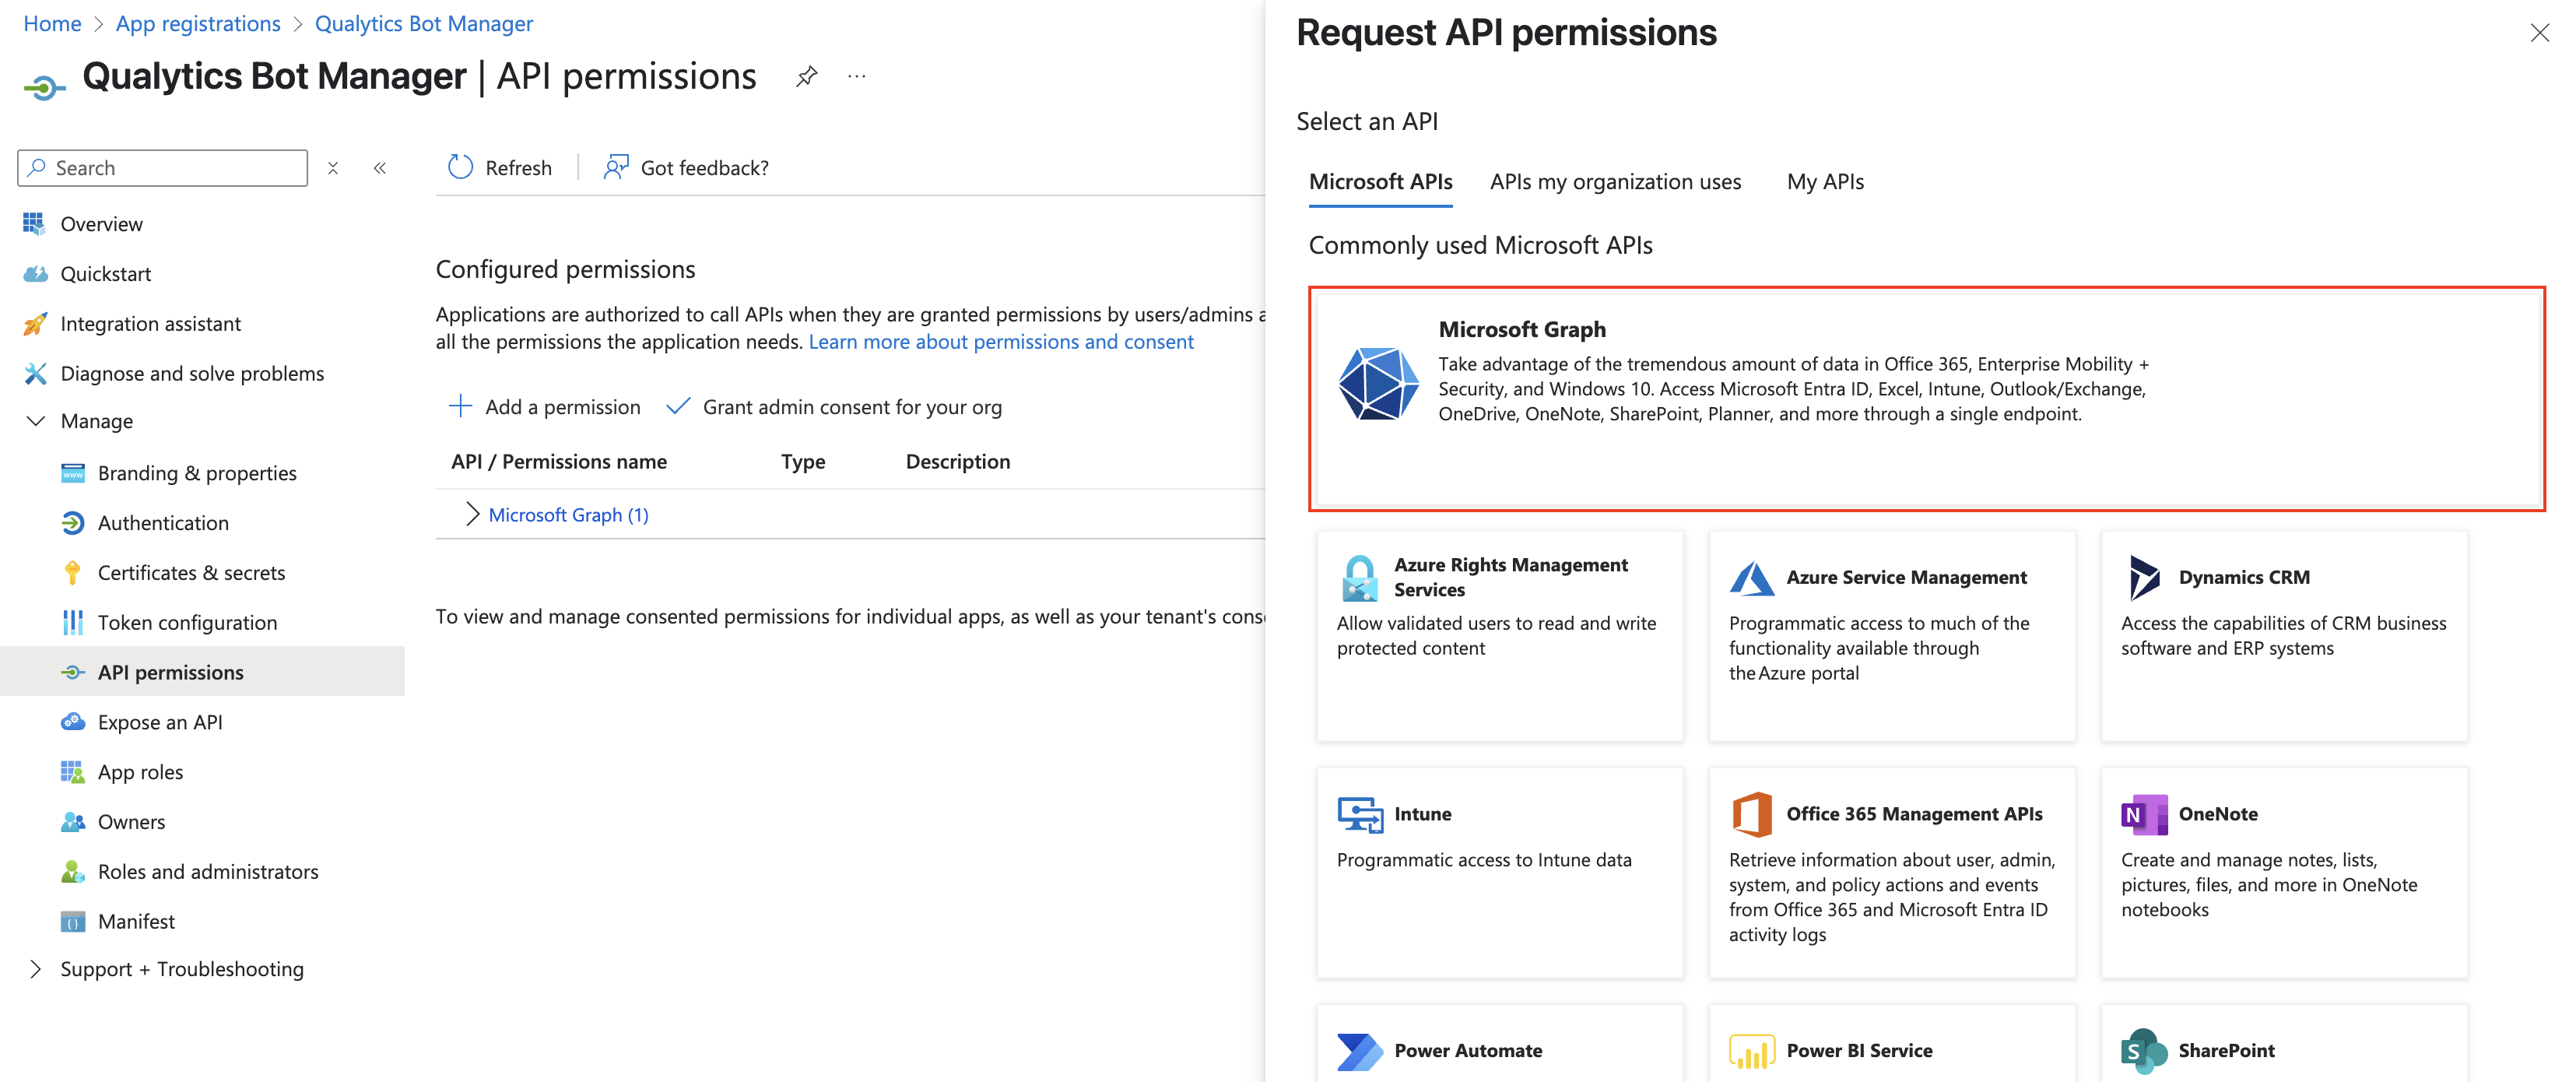
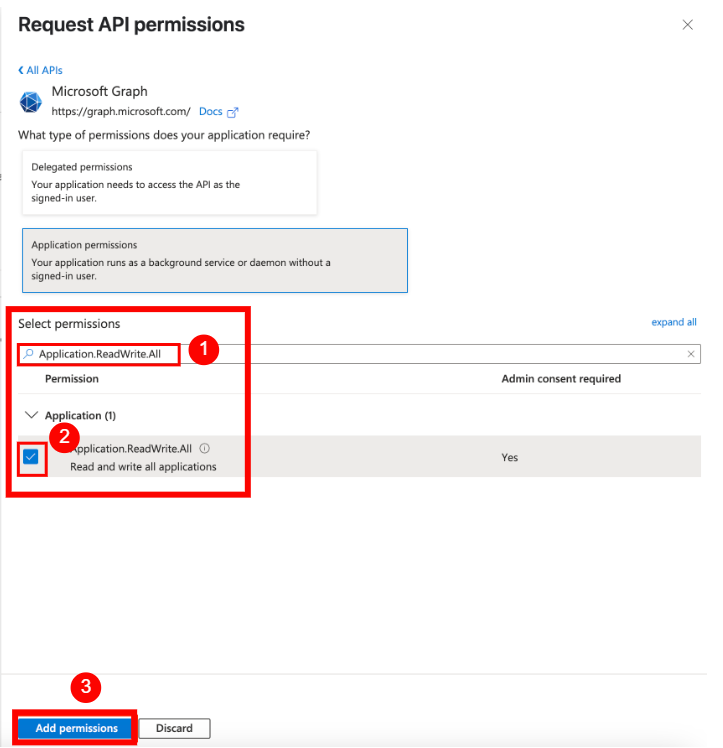
Step 4: After selecting Microsoft Graph, choose Application permissions.

A dropdown appears search for Application.ReadWrite.OwnedBy, check the box under Application permissions, and click Add permissions.
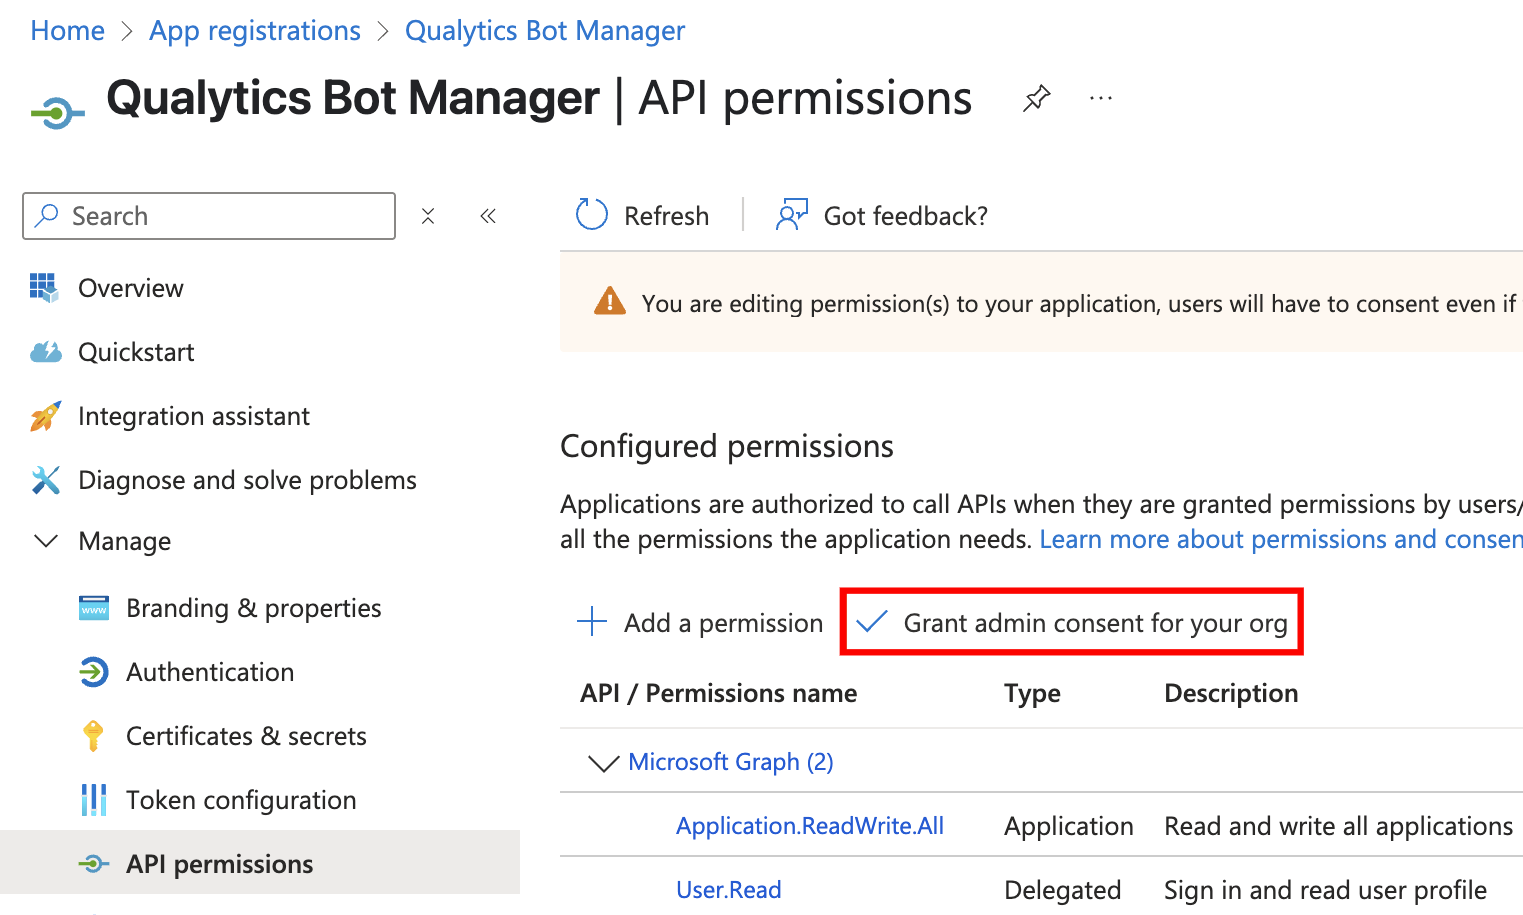
Step 5: Once the permission is added, you'll return to the API permissions page. Click Grant admin consent for [Your Organization] to approve the selected permissions.
Creating a Client Secret
The Client Secret authorizes Qualytics to programmatically create bot resources.
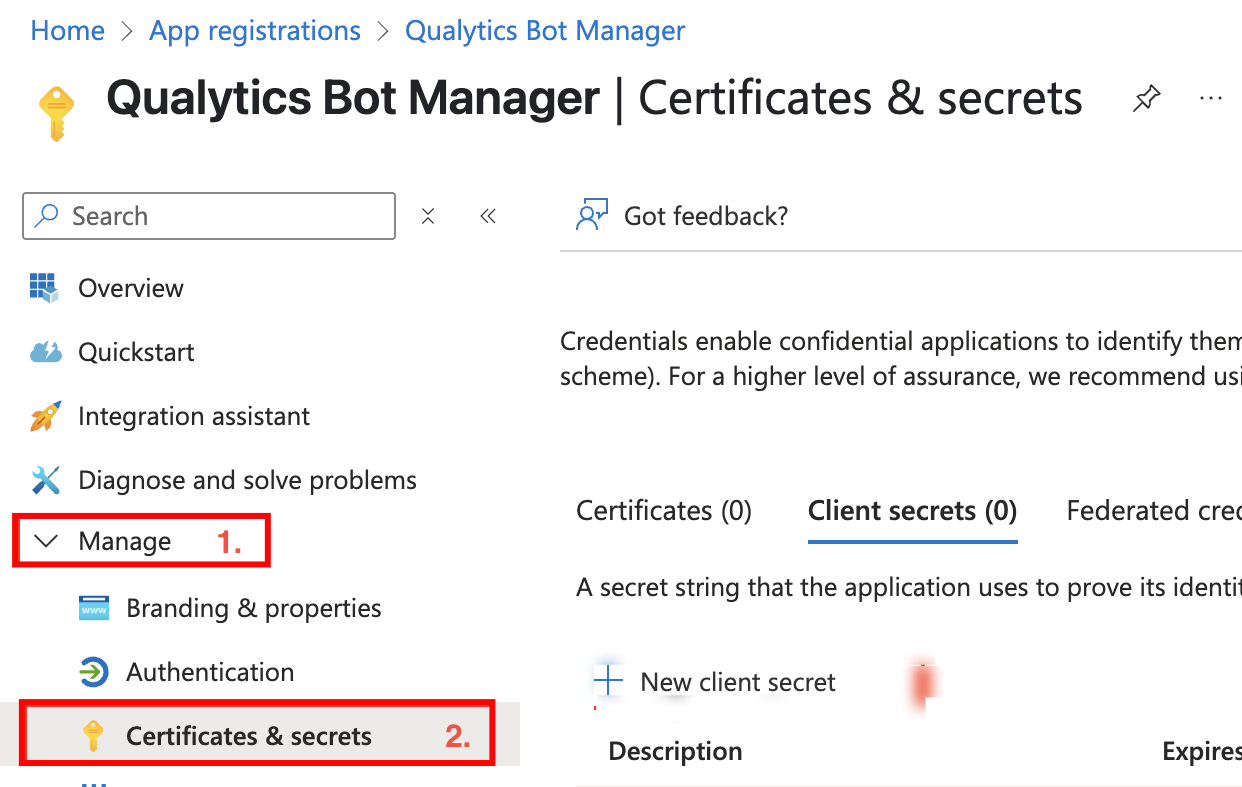
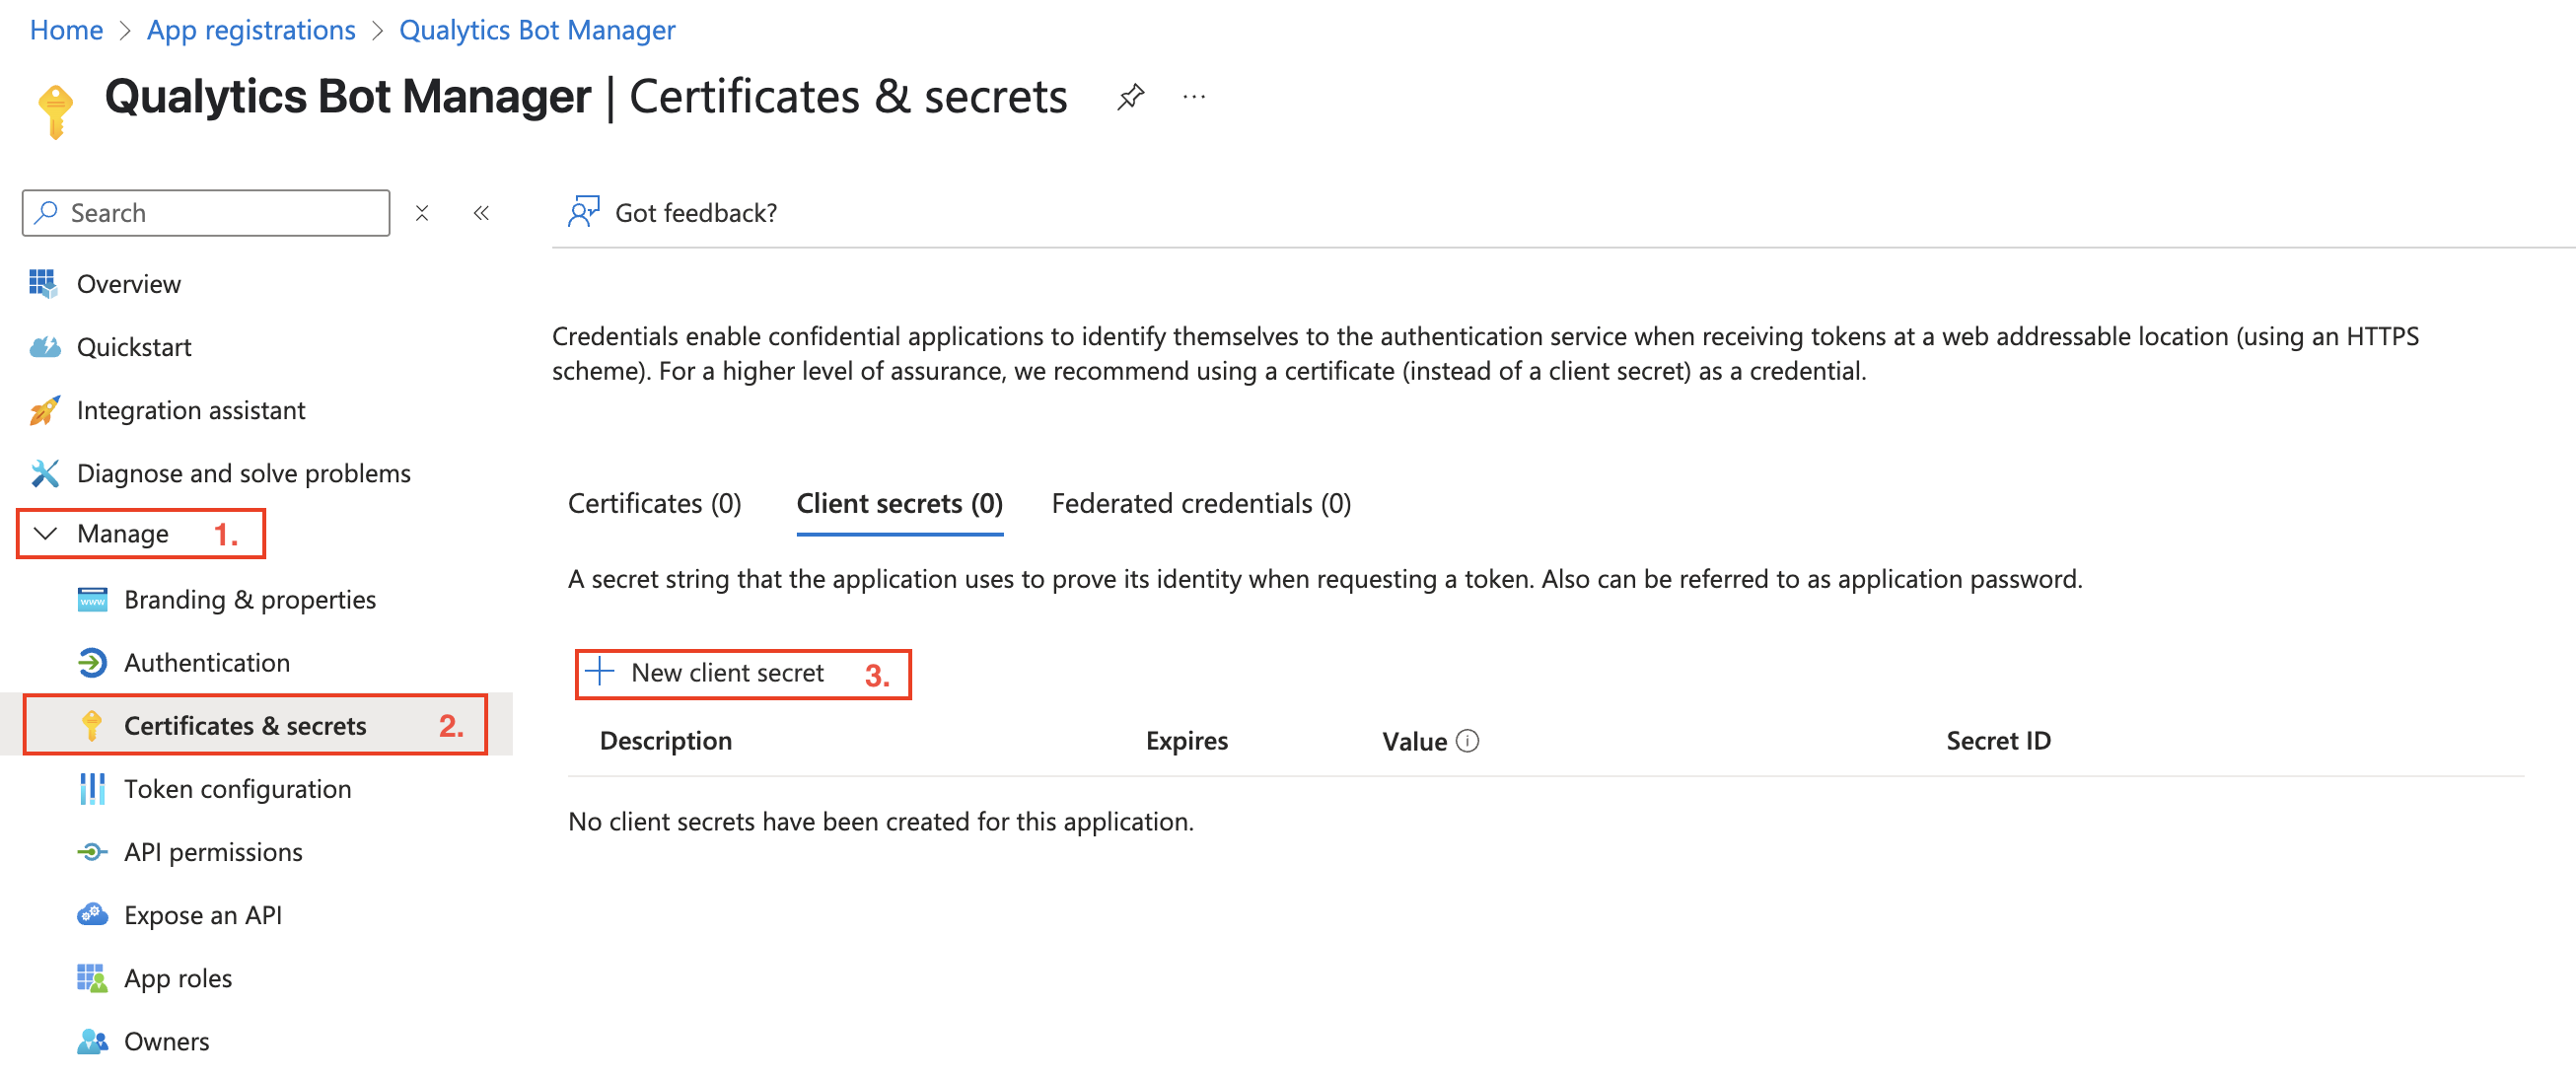
Step 1: In your app registration, go to the side panel and click Manage, then select Certificates & secrets from the dropdown.
Step 2: Click on + New client secret to generate a new secret key for the application.
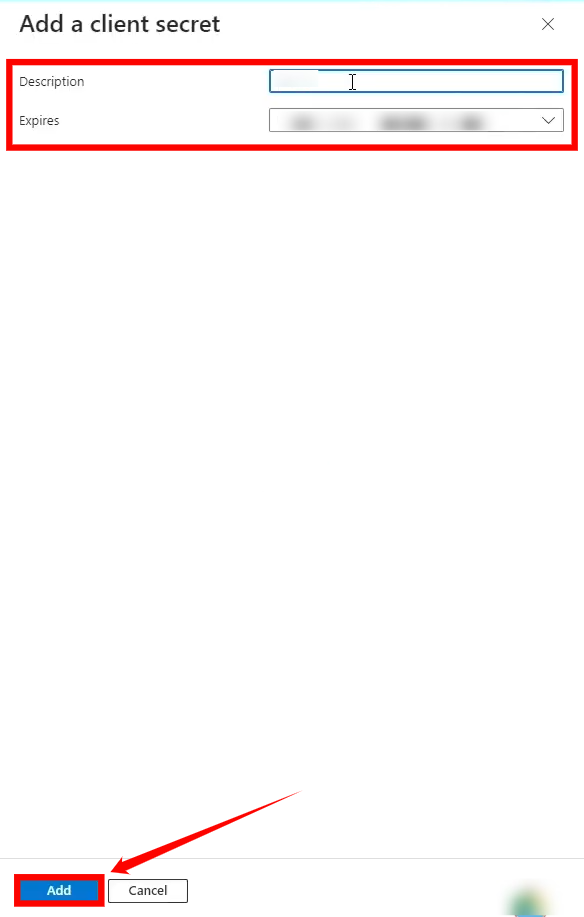
Step 3: After clicking + New client secret, a panel will appear. Enter a description (e.g., Qualytics Integration) and choose an expiration period (up to 24 months). Then click Add.
Step 4: Once the client secret is created, copy the Value immediately and save it securely. This will be used as the App Client Secret for the Qualytics integration.
Warning
The client secret value is only displayed once immediately after creation. Make sure to copy and securely store it as you won't be able to retrieve it again.
Retrieving the Azure Subscription ID
The Subscription ID is required to manage bot resources in your Azure environment.
Step 1: Navigate to Subscriptions in the Azure Portal and select the subscription you want to use for the Teams integration.
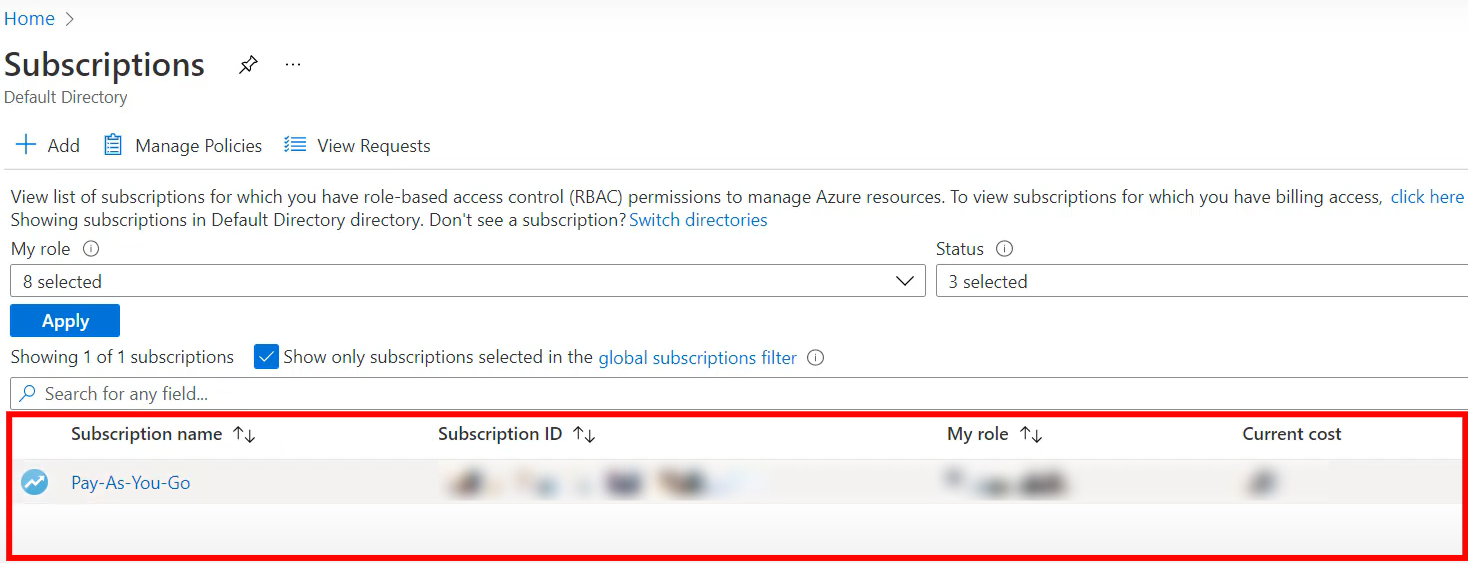
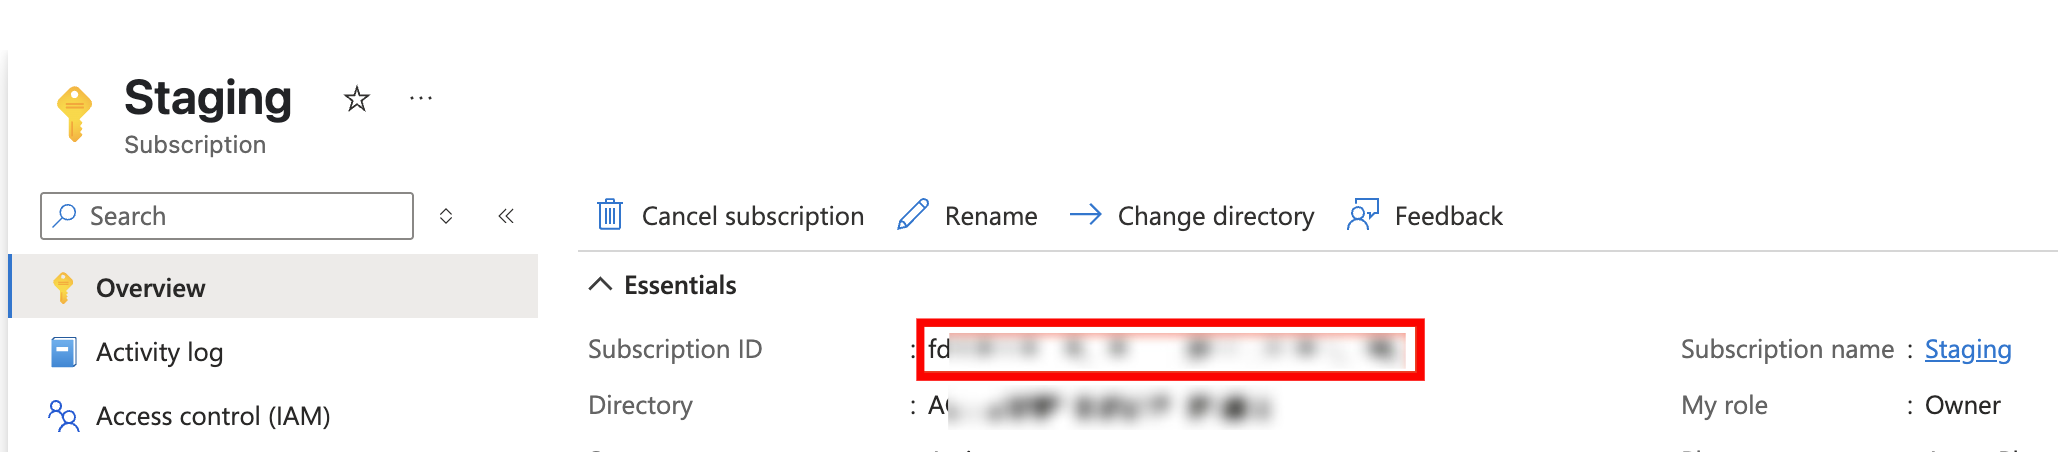
Step 2: Copy the Subscription ID from the Overview section of your selected subscription. This ID is required later to assign roles and permissions for the Microsoft Teams integration.
Verifying the Microsoft Bot Service
You need to verify if the Microsoft Bot Service resource provider is registered in your subscription.
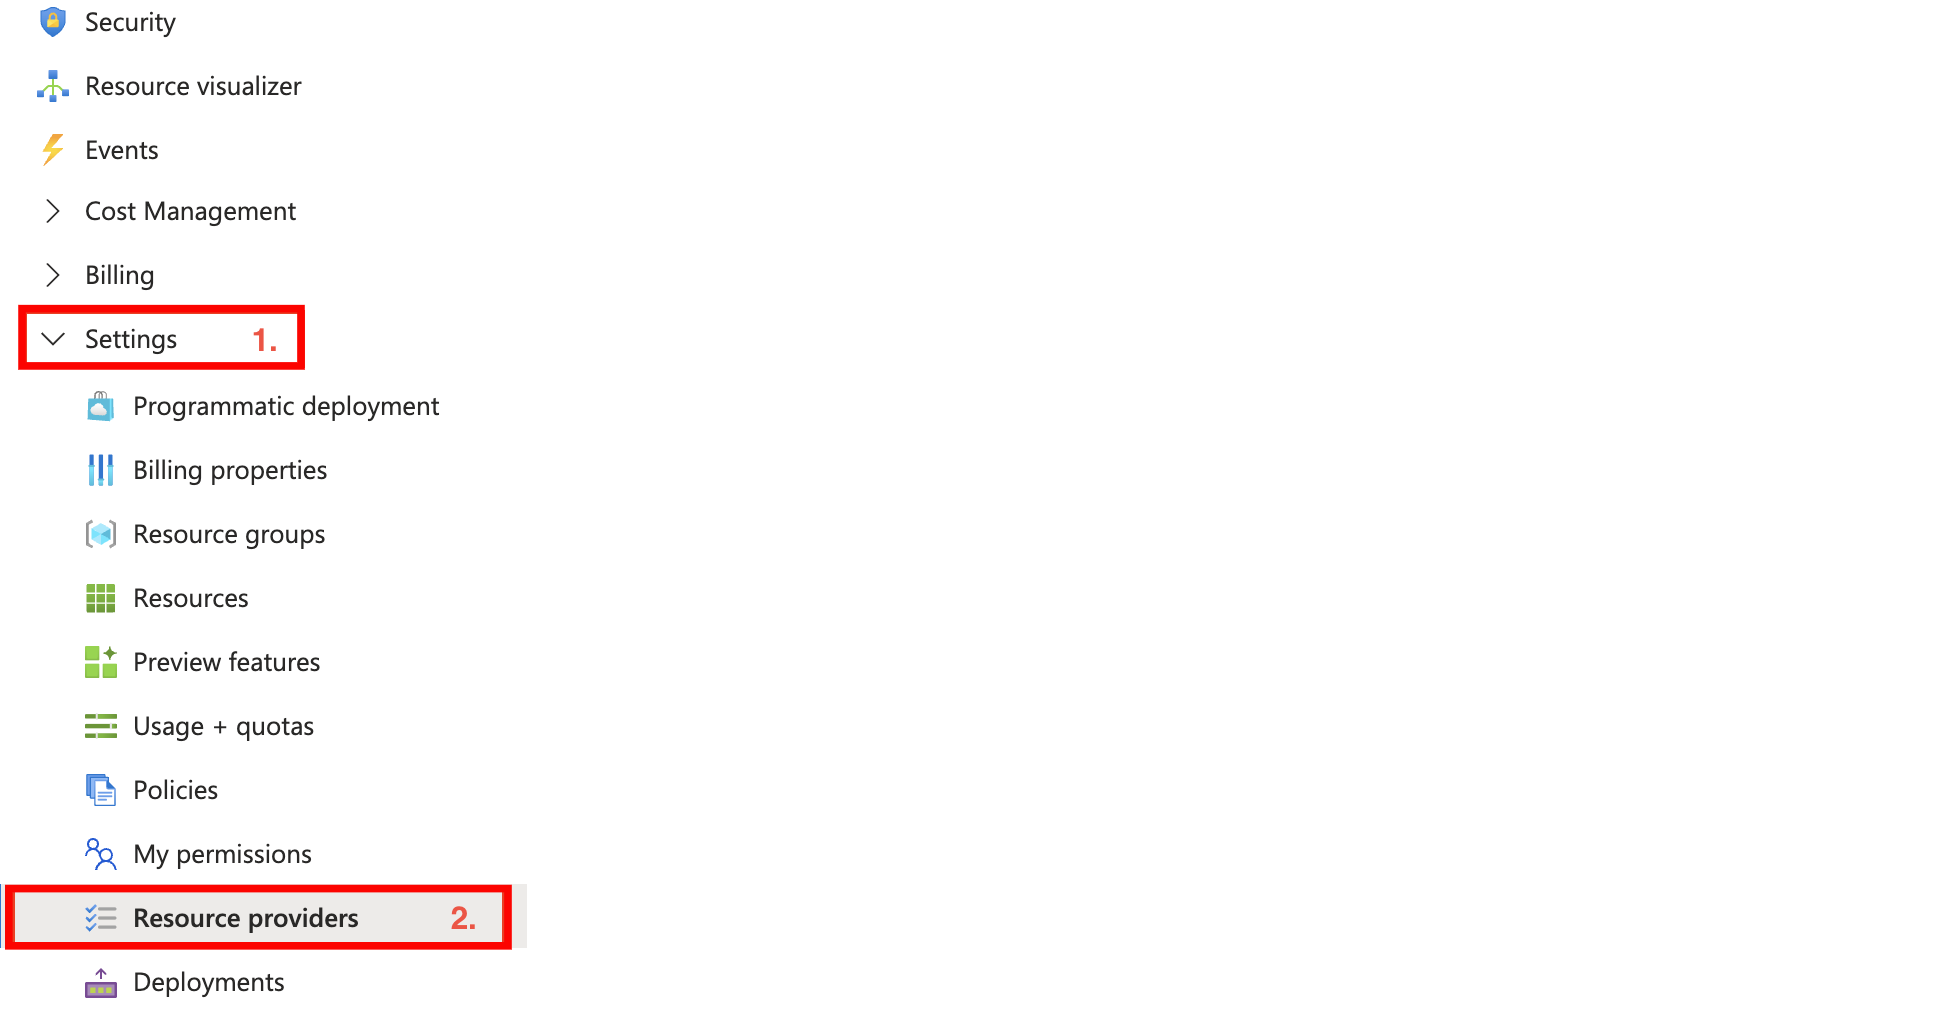
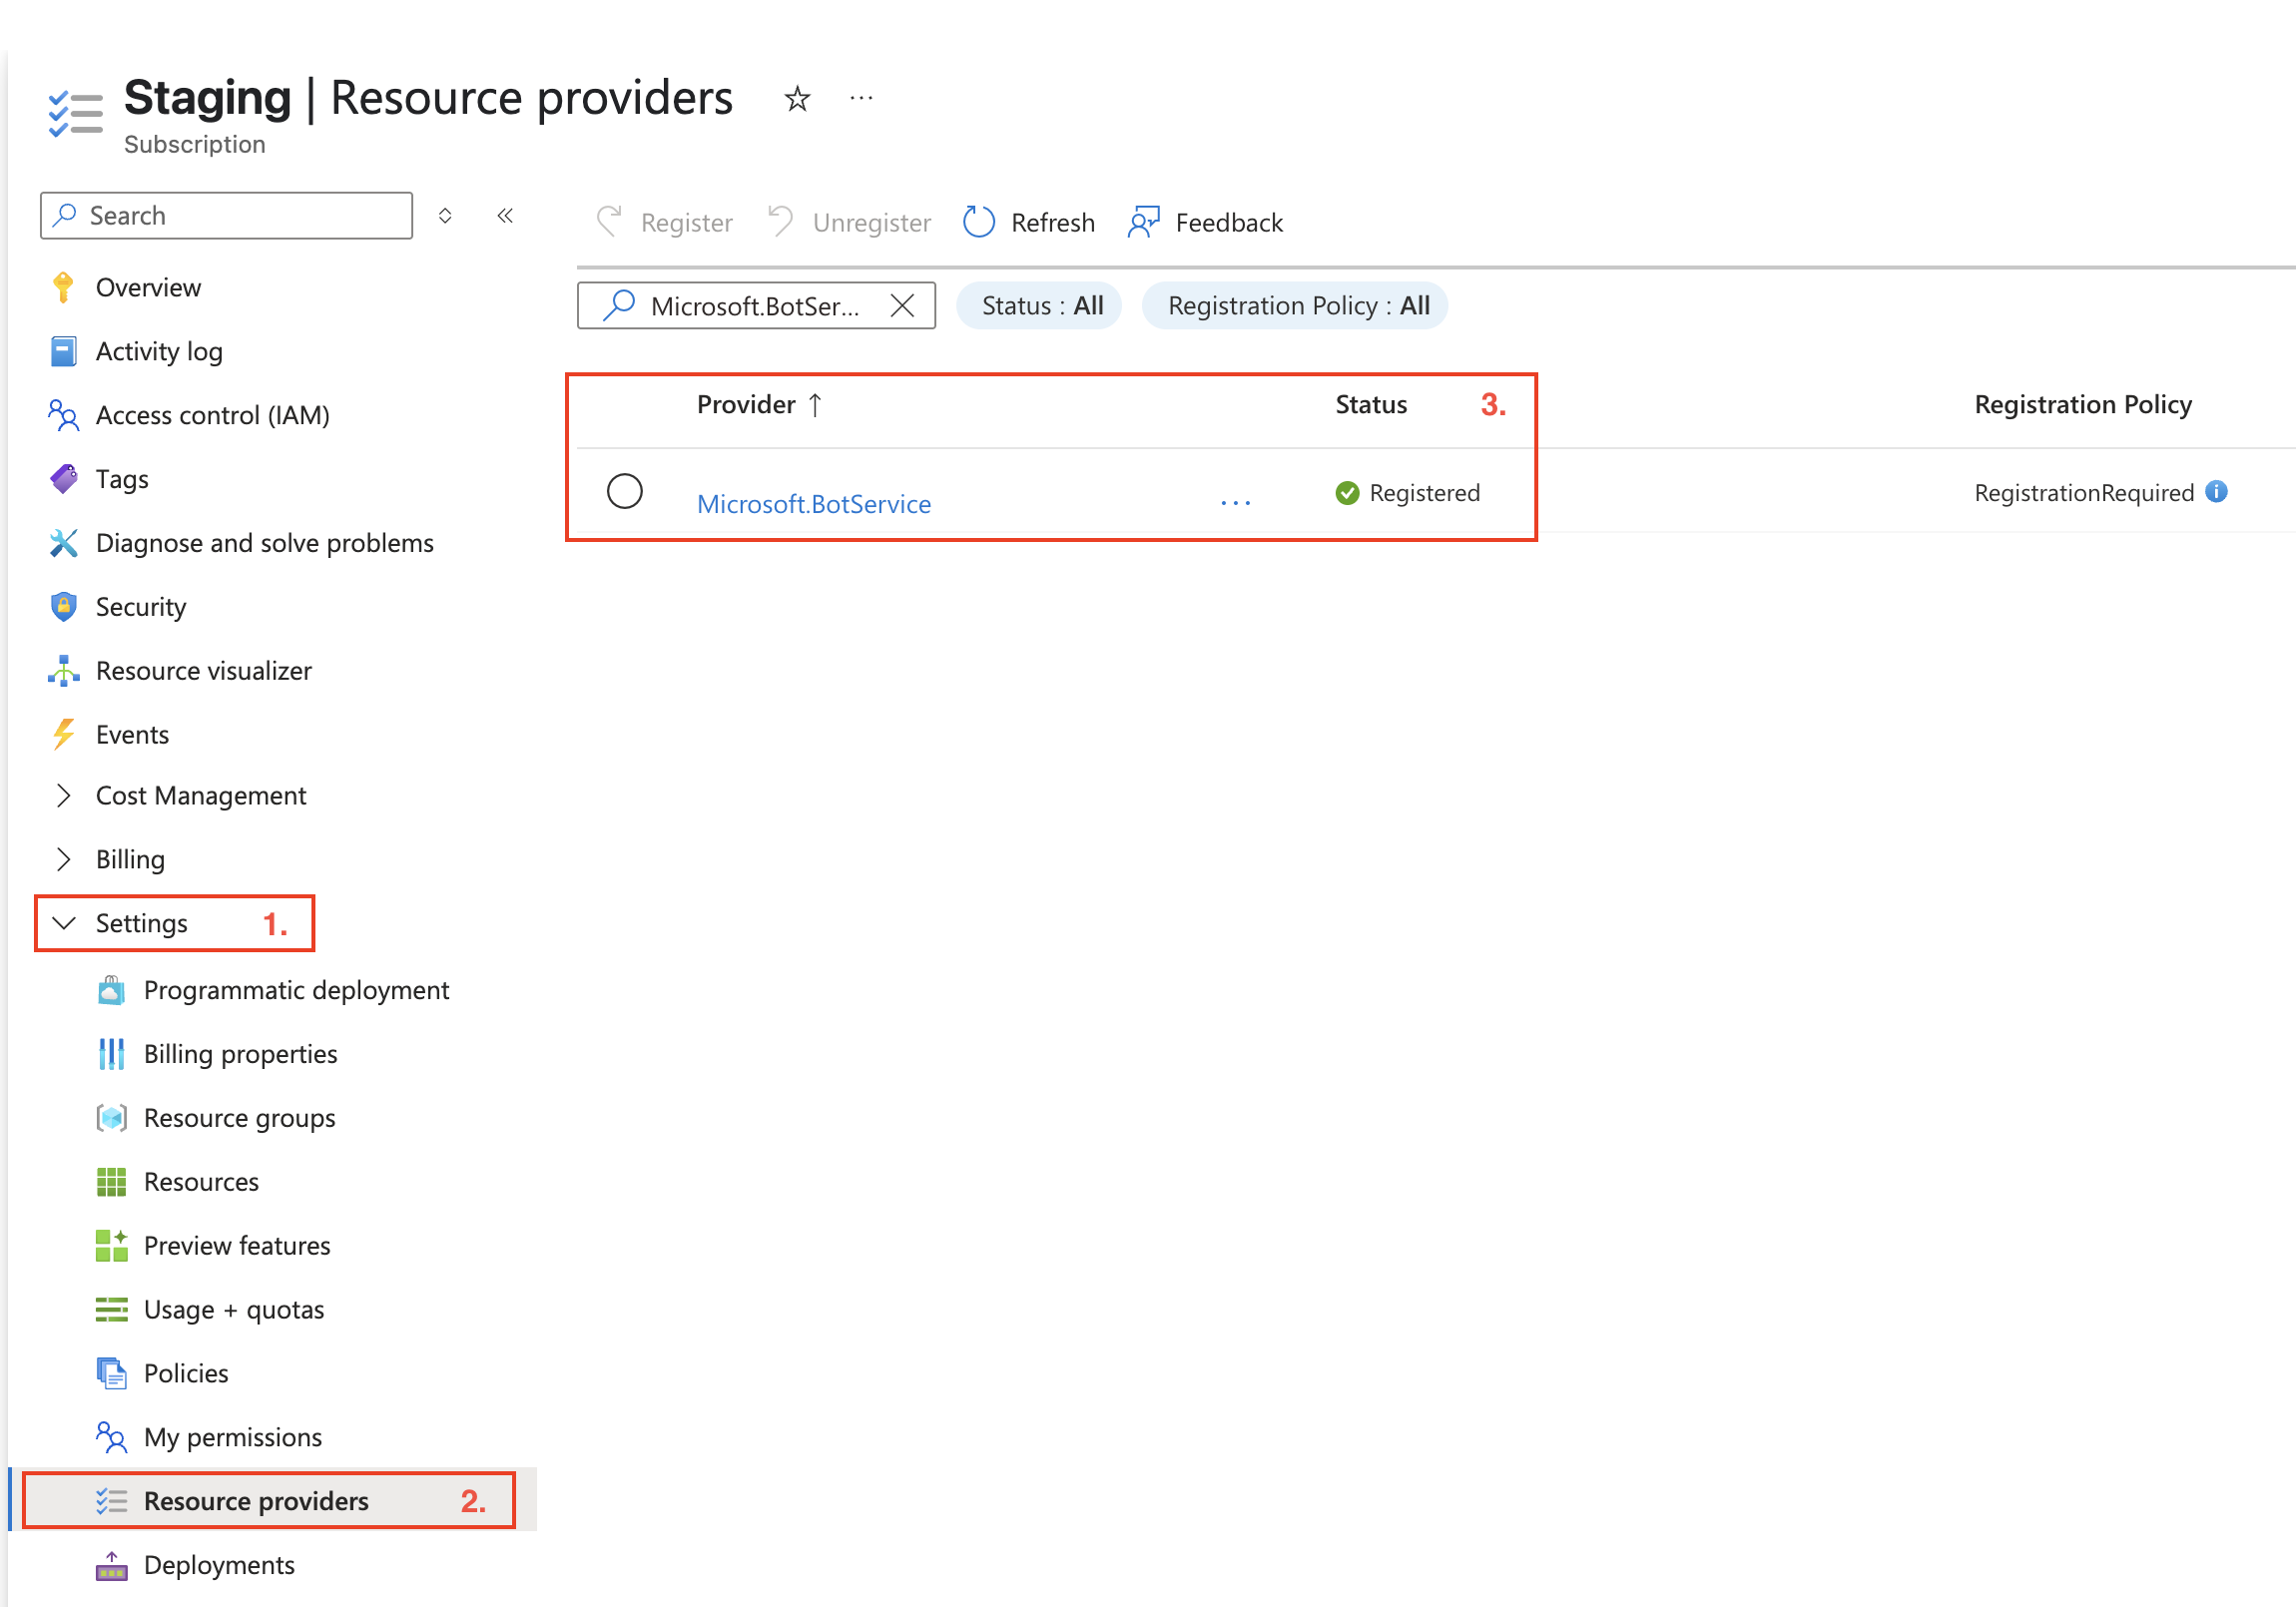
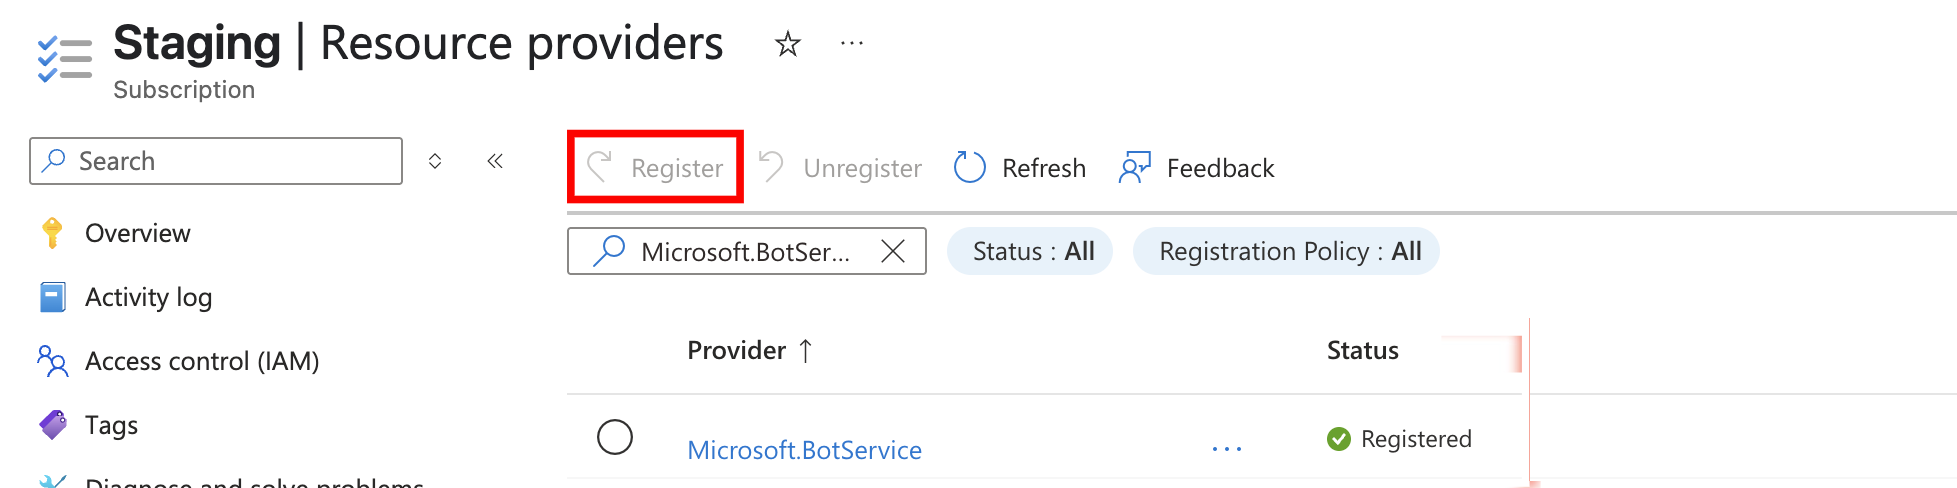
Step 1: In your subscription, click Settings from the left-hand menu, then select Resource providers from the dropdown.
Step 2:Search for Microsoft.BotService in the provider list and check that the Status is Registered.
Note
The step 3 is only required if the resource provider is not already registered. If the Microsoft.BotService provider is already marked as "Registered" in your subscription, you can skip this step.
Step 3 (maybe optional): Click Register to enable the resource provider if it's not already registered.
Setting Up the Resource Group
The Resource Group will hold and manage the bot resources created by Qualytics.
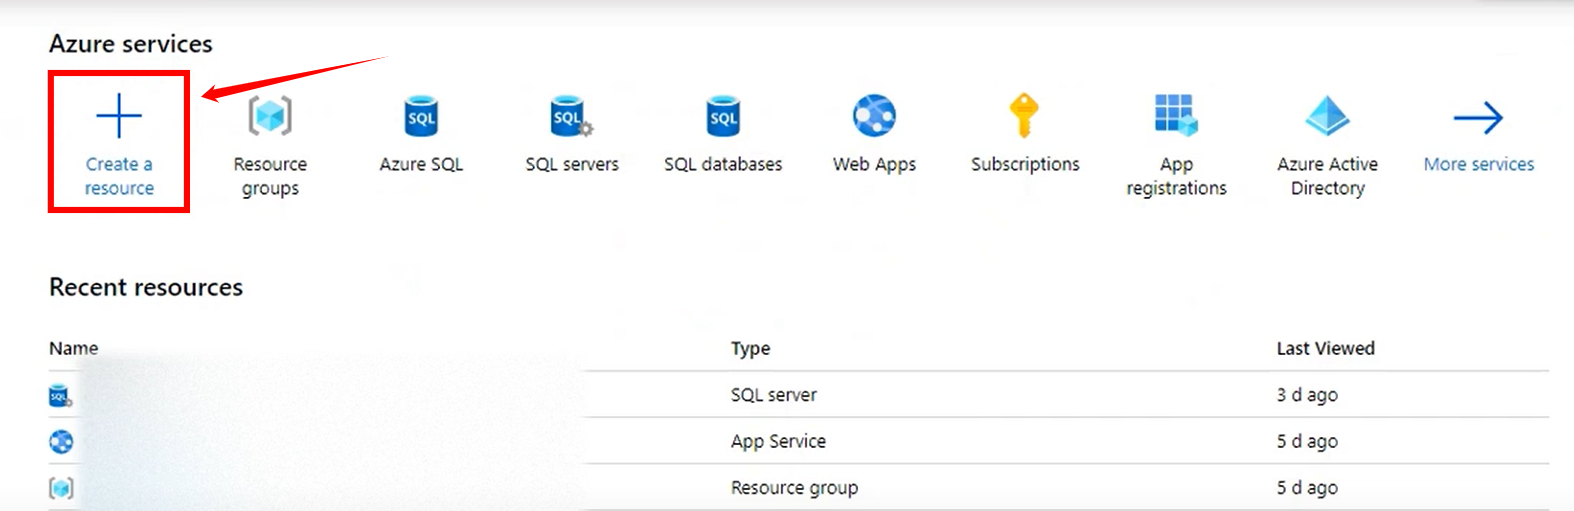
Step 1: Navigate to Resource Groups in the Azure Portal and click Create a resource to set up a new resource group if you don’t already have one.
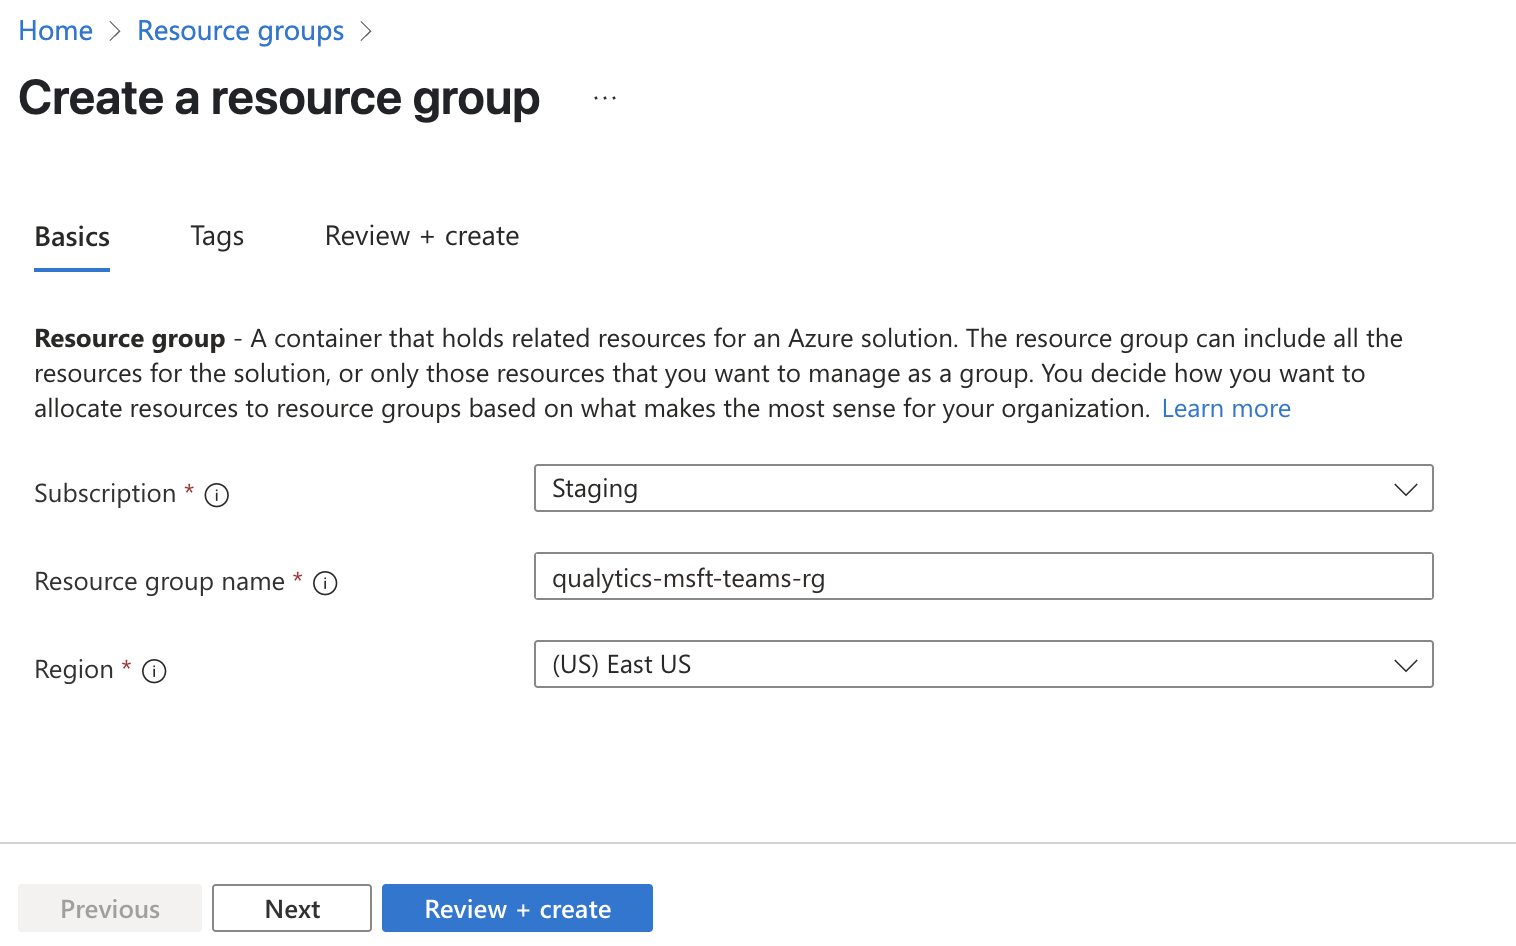
Step 2: Choose your Subscription, enter a Resource group name (e.g., qualytics-msft-teams-rg), select a Region, and then click Review + create.
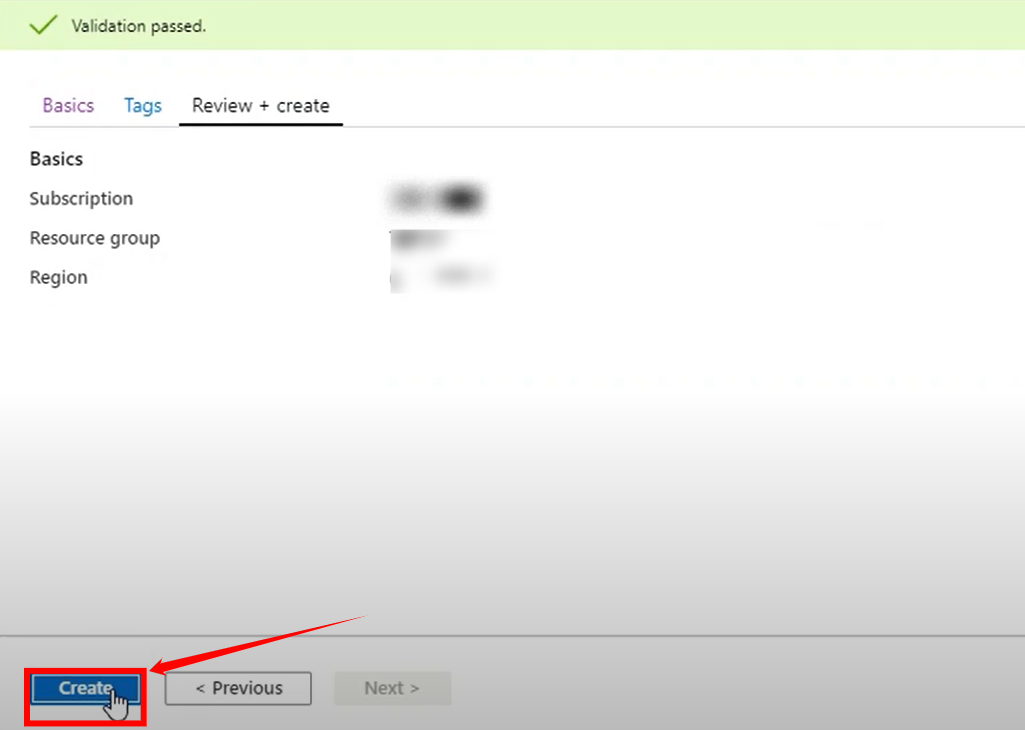
Step 3: After clicking Review + create, you'll see a summary of the details. Once validated, click Create.
Note
Once created, note the Resource Group name for the Qualytics integration.
Assigning the Azure Bot Service Contributor Role
The Microsoft Entra App needs the "Azure Bot Service Contributor" role to manage bot resources.
Step 1: Navigate to your Resource Group and select Access control (IAM) from the left menu and click on the Add and select Add Role Assignment from the dropdown.
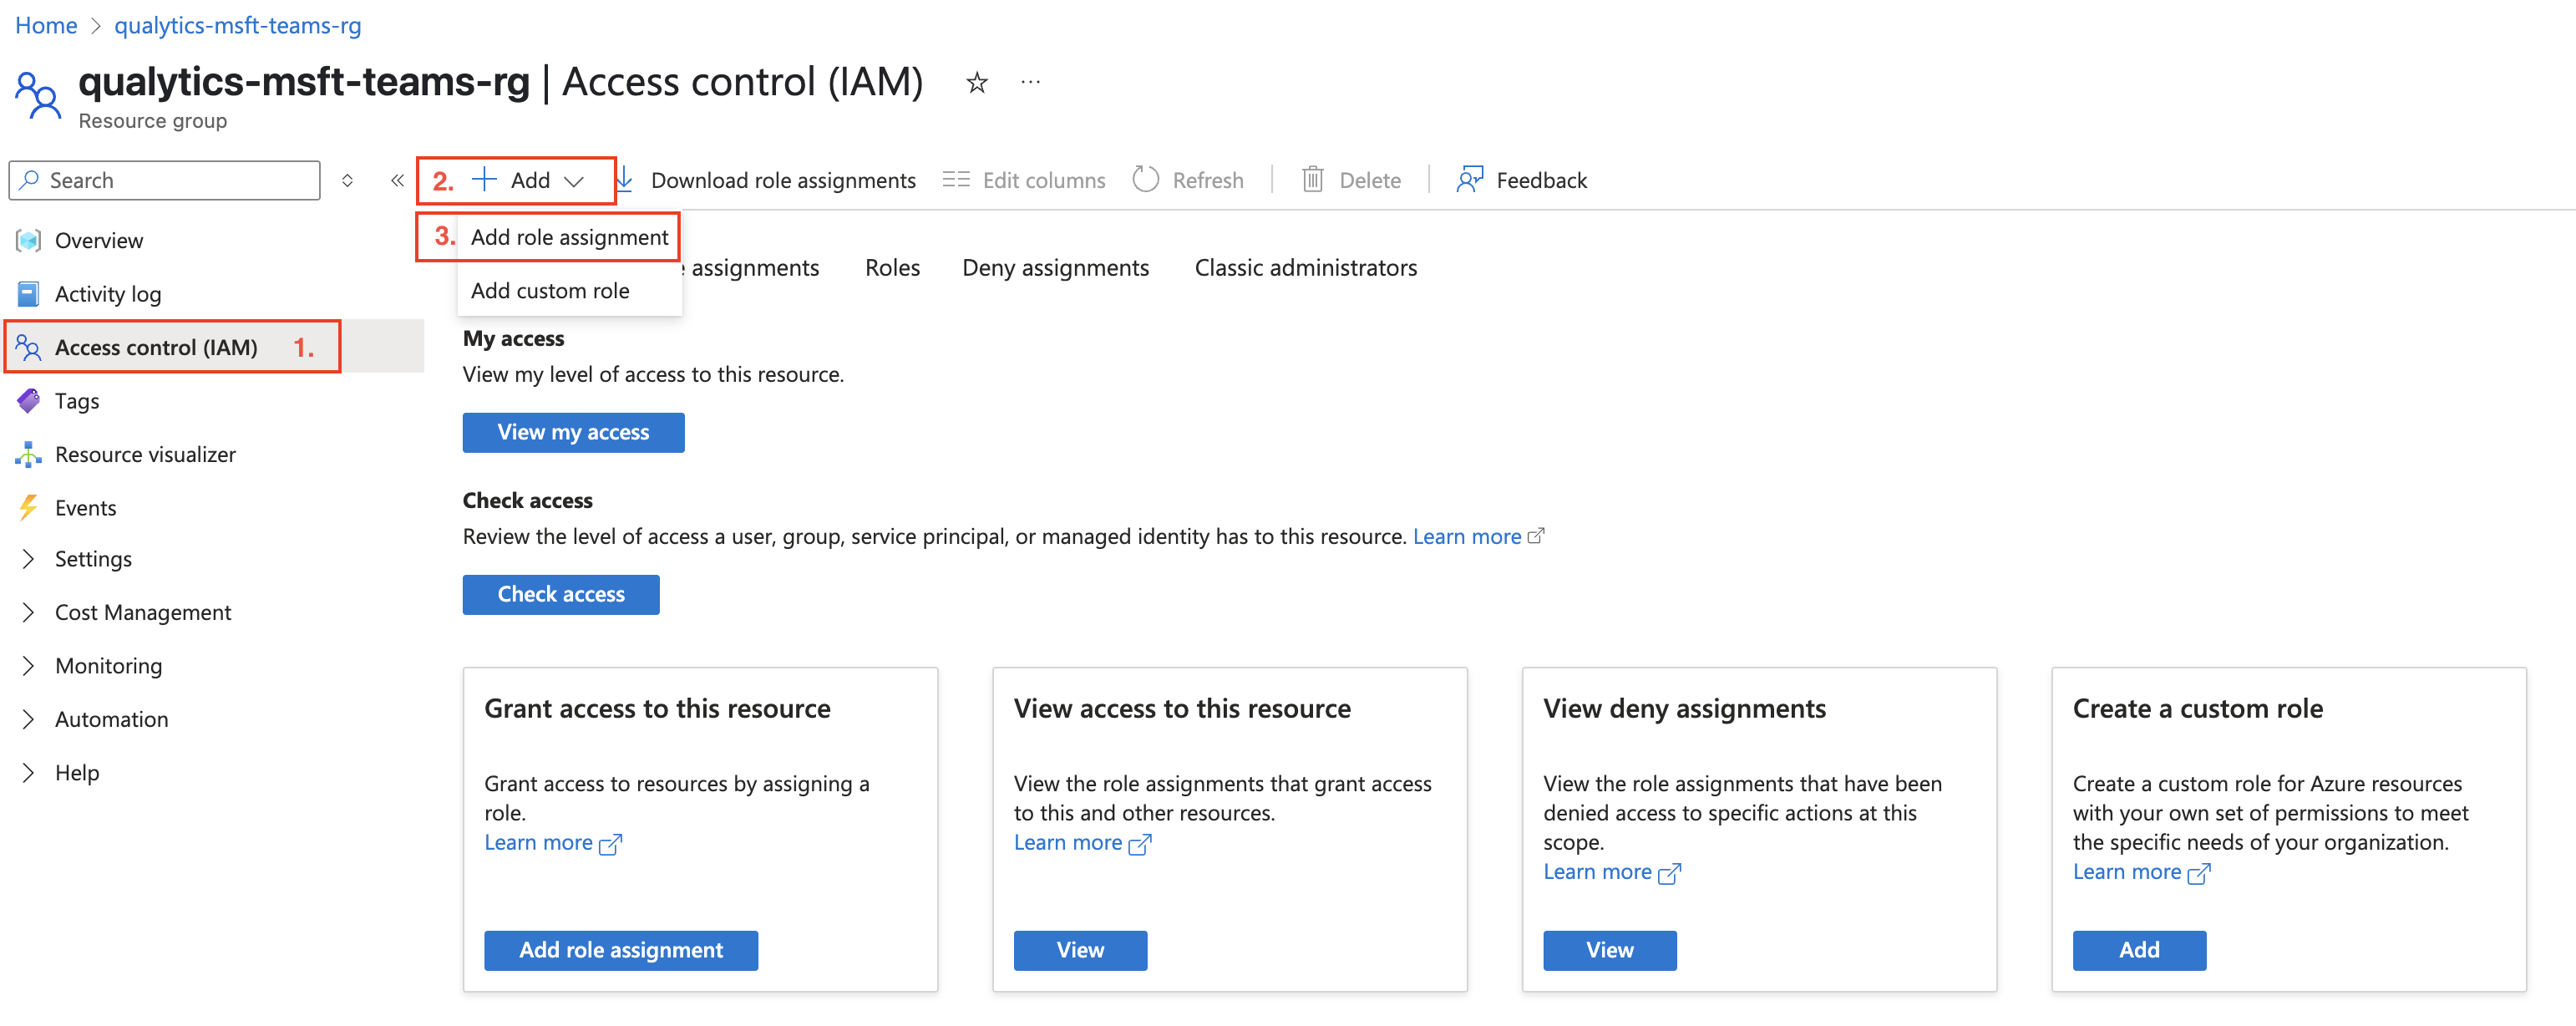
Step 2: You’ll be navigated to the Add role assignment tab. In the Role section, search and select Azure Bot Service Contributor Role, then click the Next button to continue.

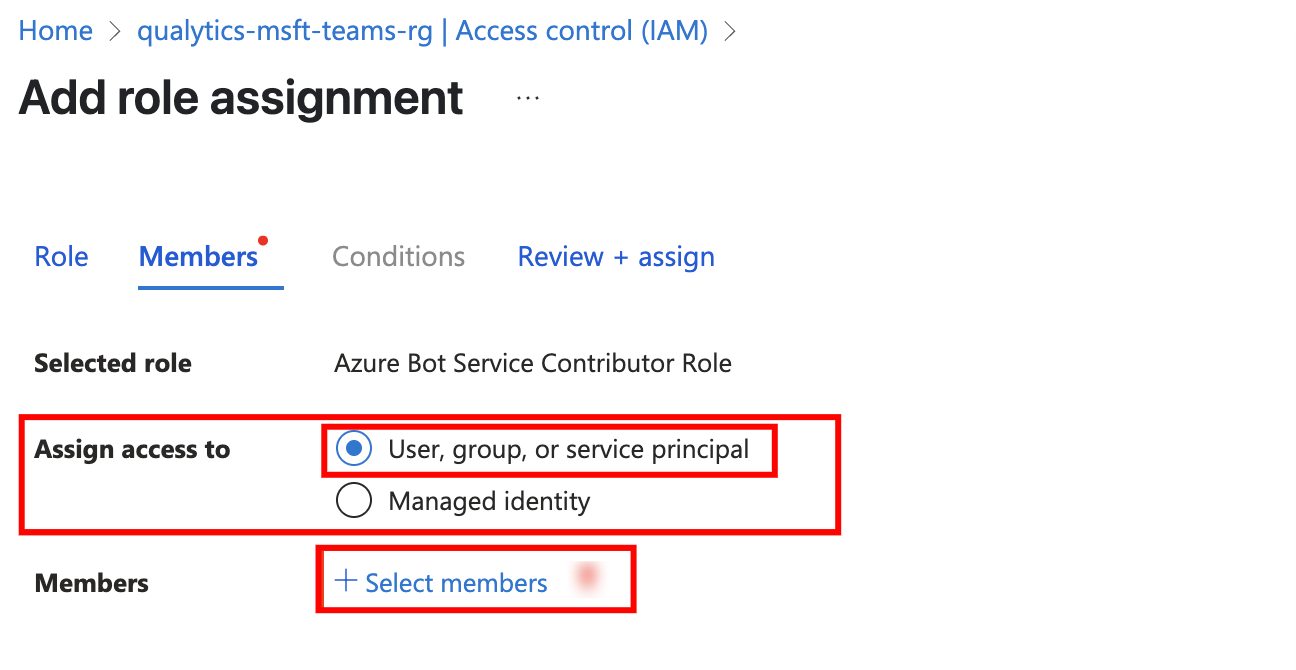
Step 3: You will be navigated to the Members tab. Under Assign access to, select User, group, or service principal, then click on Select members.
A Select members panel will appear. Search for the Microsoft Entra app you created earlier (e.g., Qualytics Bot Manager), select it from the list, and click on the Select button.
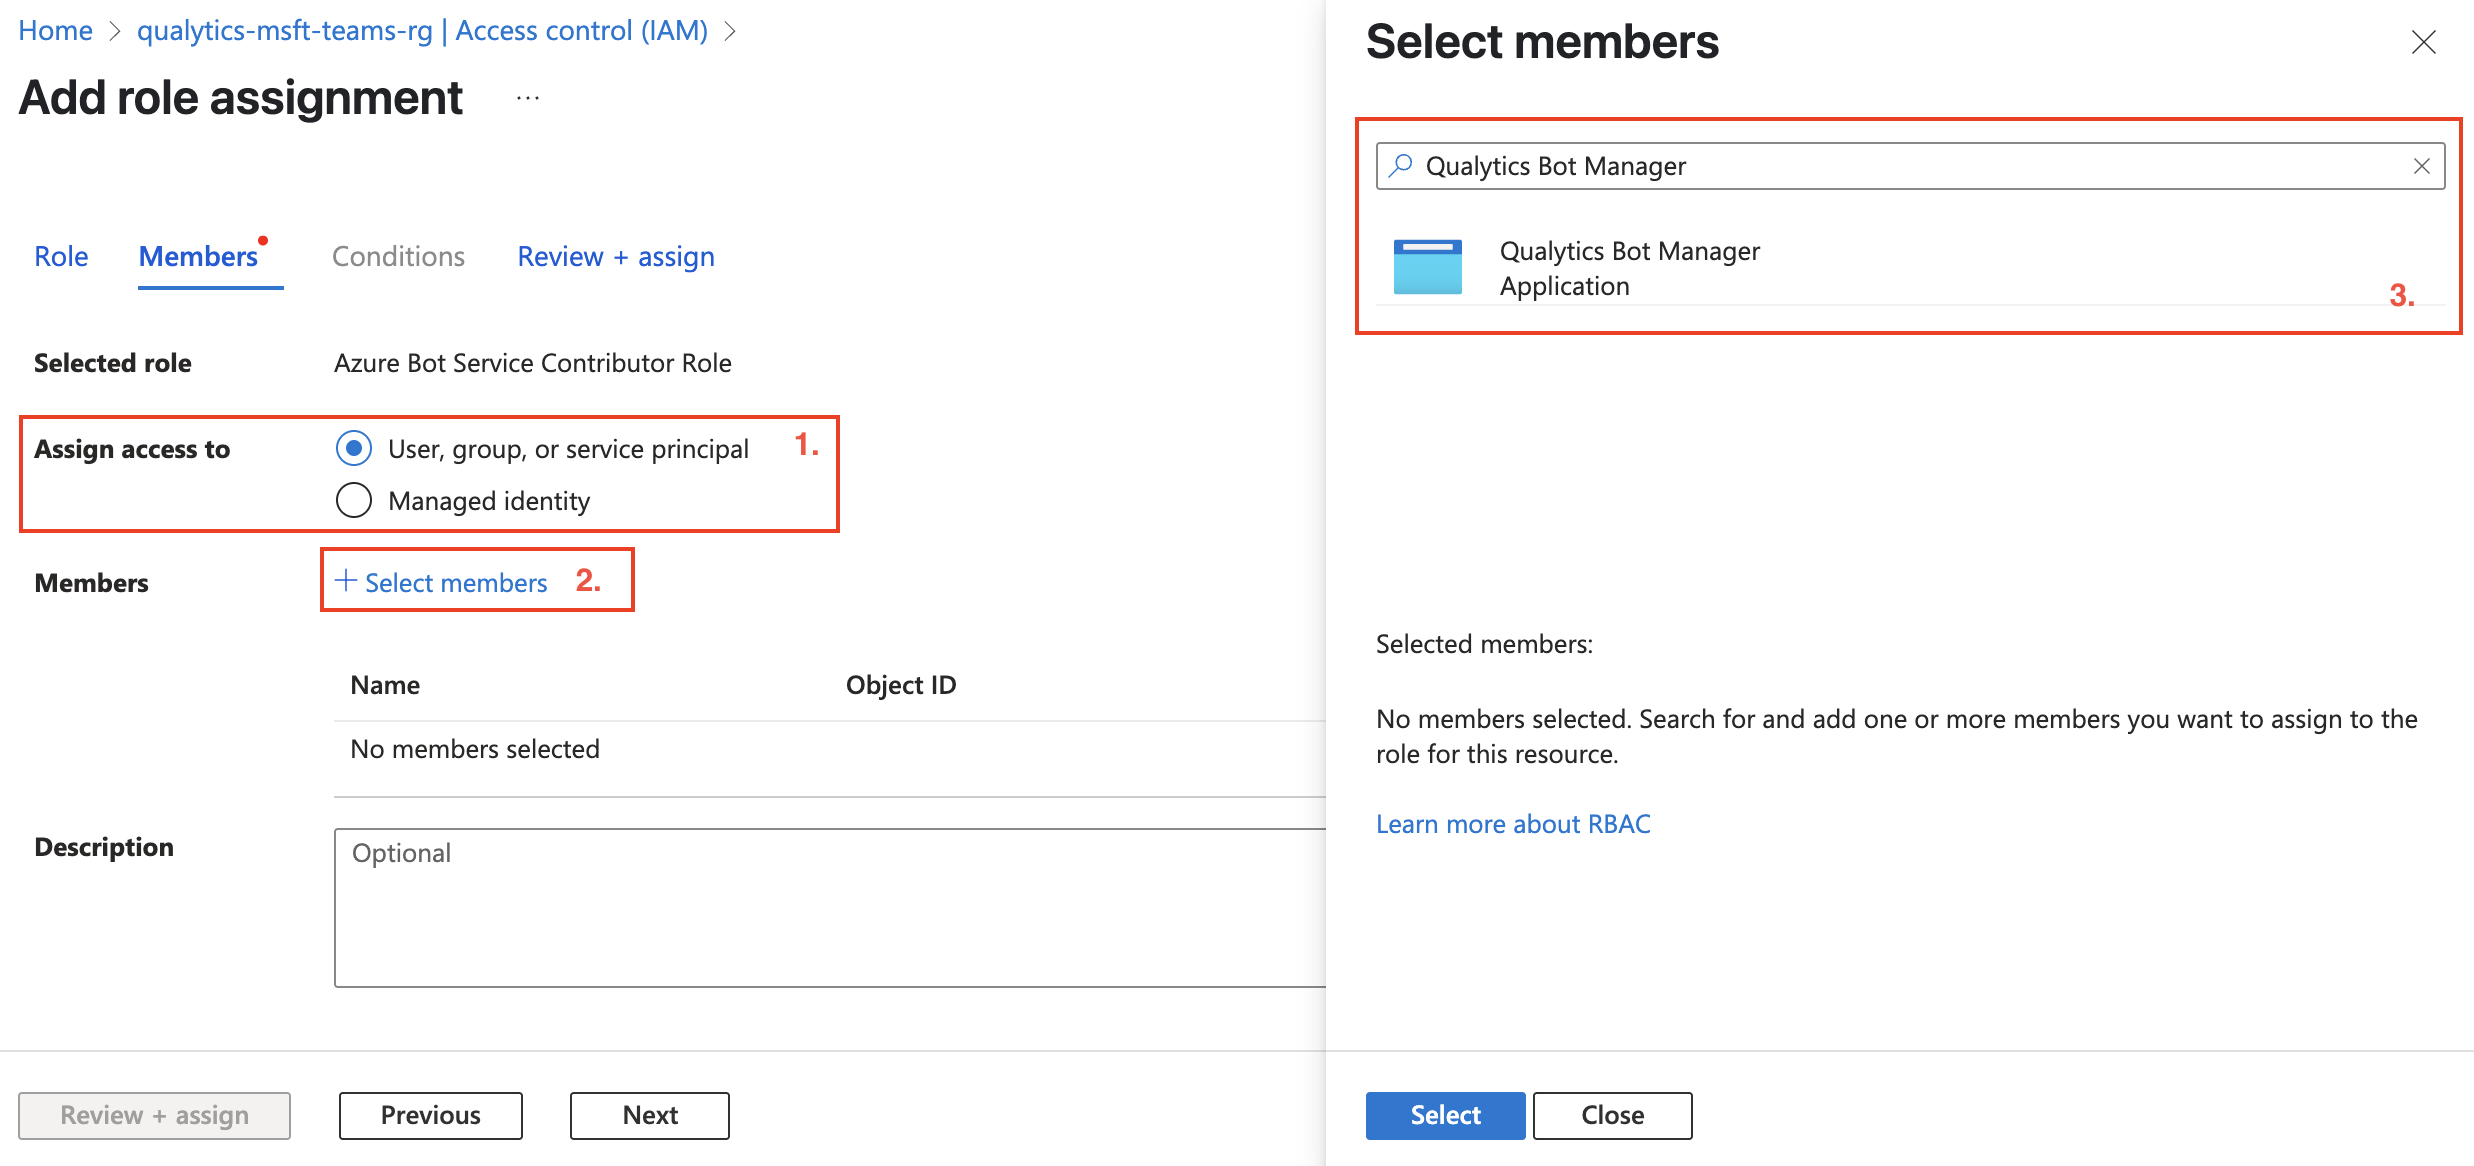
Tip
Enterprise Applications will only appear in the search results when you start typing the exact name used in your Entra App registration. If you don't see your app immediately, try typing the full name as you entered it when creating the app.
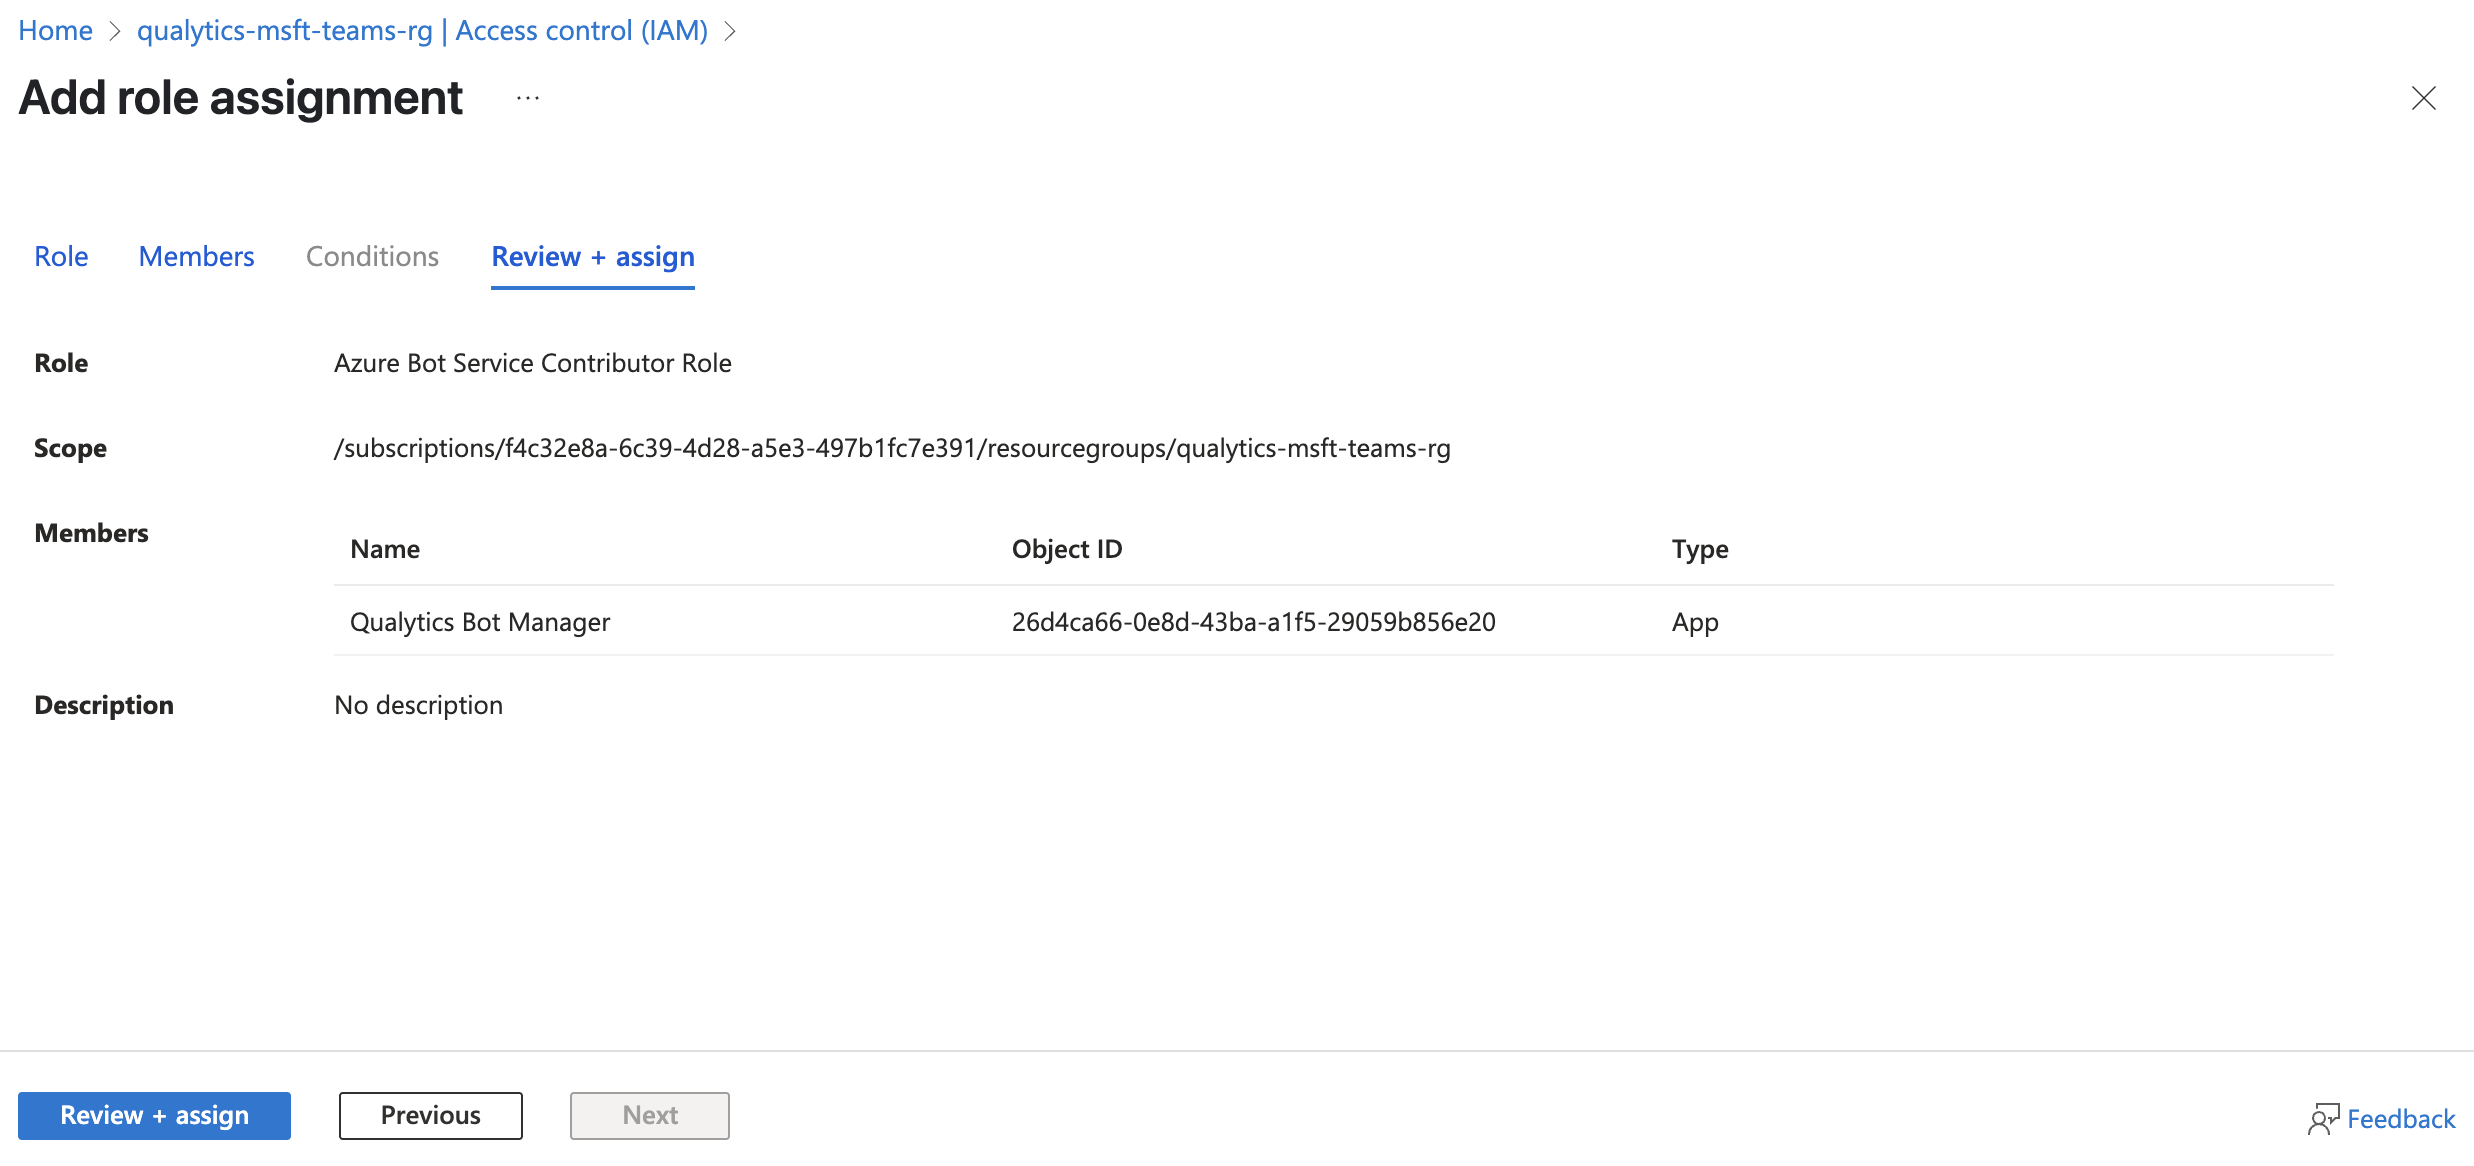
Step 4: Click on Review + assign from the navigation bar and confirm the role assignment then click on Review + assign button.
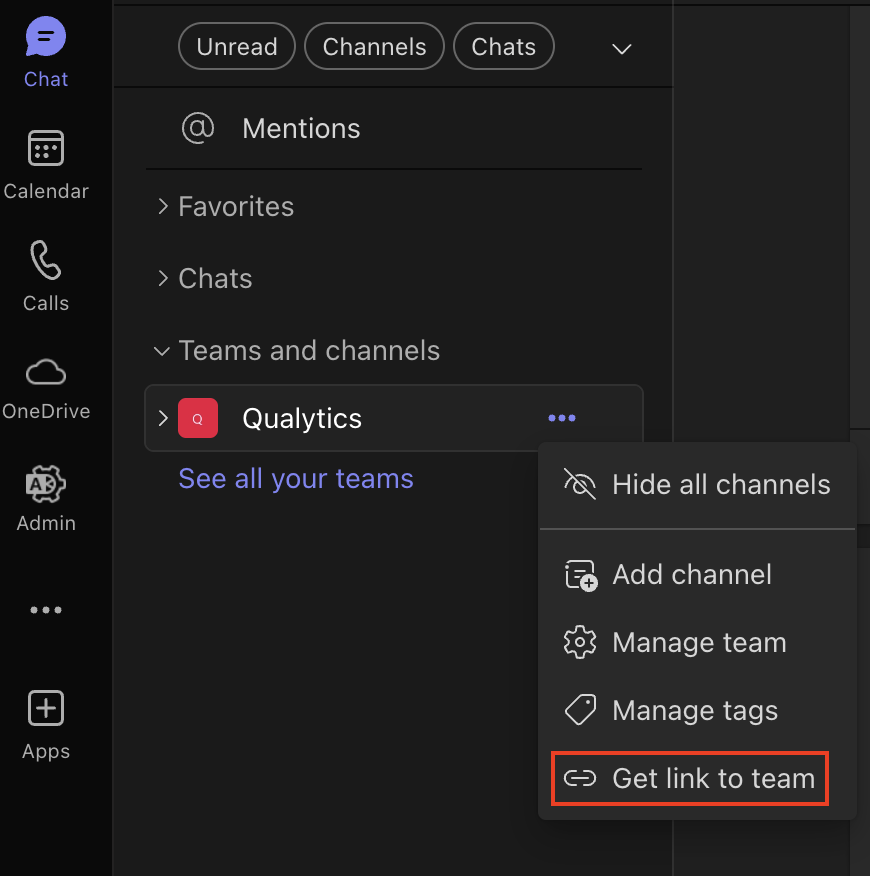
Getting Your Microsoft Teams Link
You need to provide the link to your Microsoft Teams workspace.
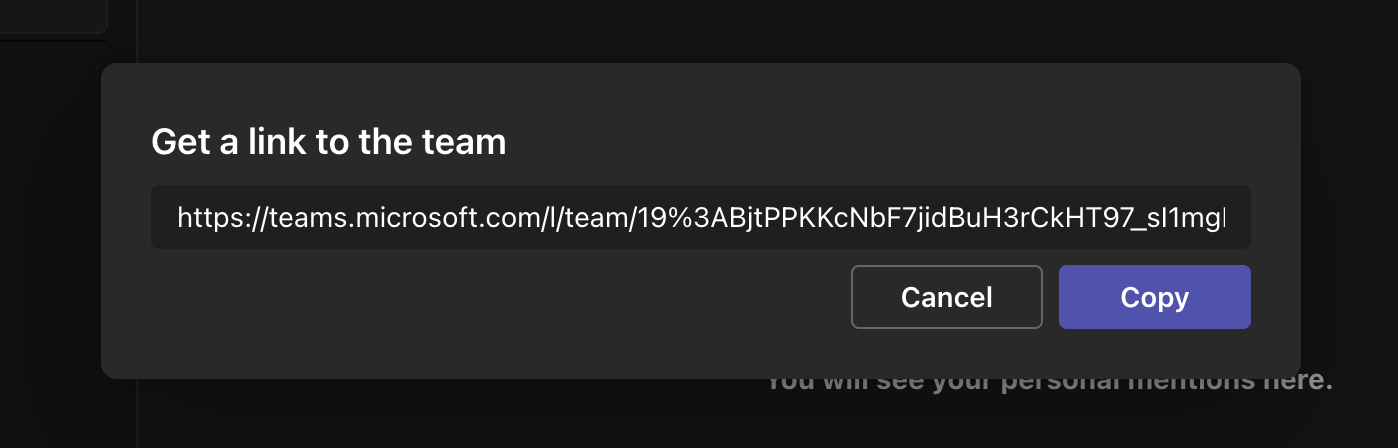
Step 1: Log in to your Microsoft Teams desktop or web application. Navigate to the team where you want to receive Qualytics notifications, then right-click on the team name and select Get link to team.
Step 2: A modal window titled Get a link to the team will appear. Click the Copy button to copy the team link.
Integration Summary
Now that you've gathered all the necessary information and configured the Azure resources, you're ready to integrate Microsoft Teams with Qualytics.
In the next section, we'll walk through the steps to access the Qualytics integration interface and enter these credentials to establish the connection between Qualytics and Microsoft Teams.
Navigation to Integration
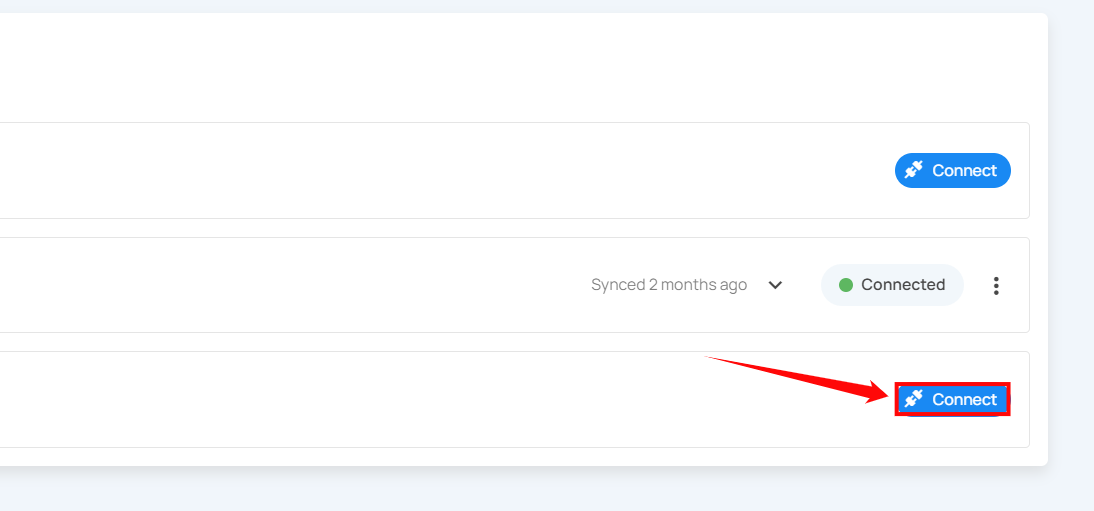
Step 1: Log in to your Qualytics account and click the "Settings" button on the left side panel of the interface.
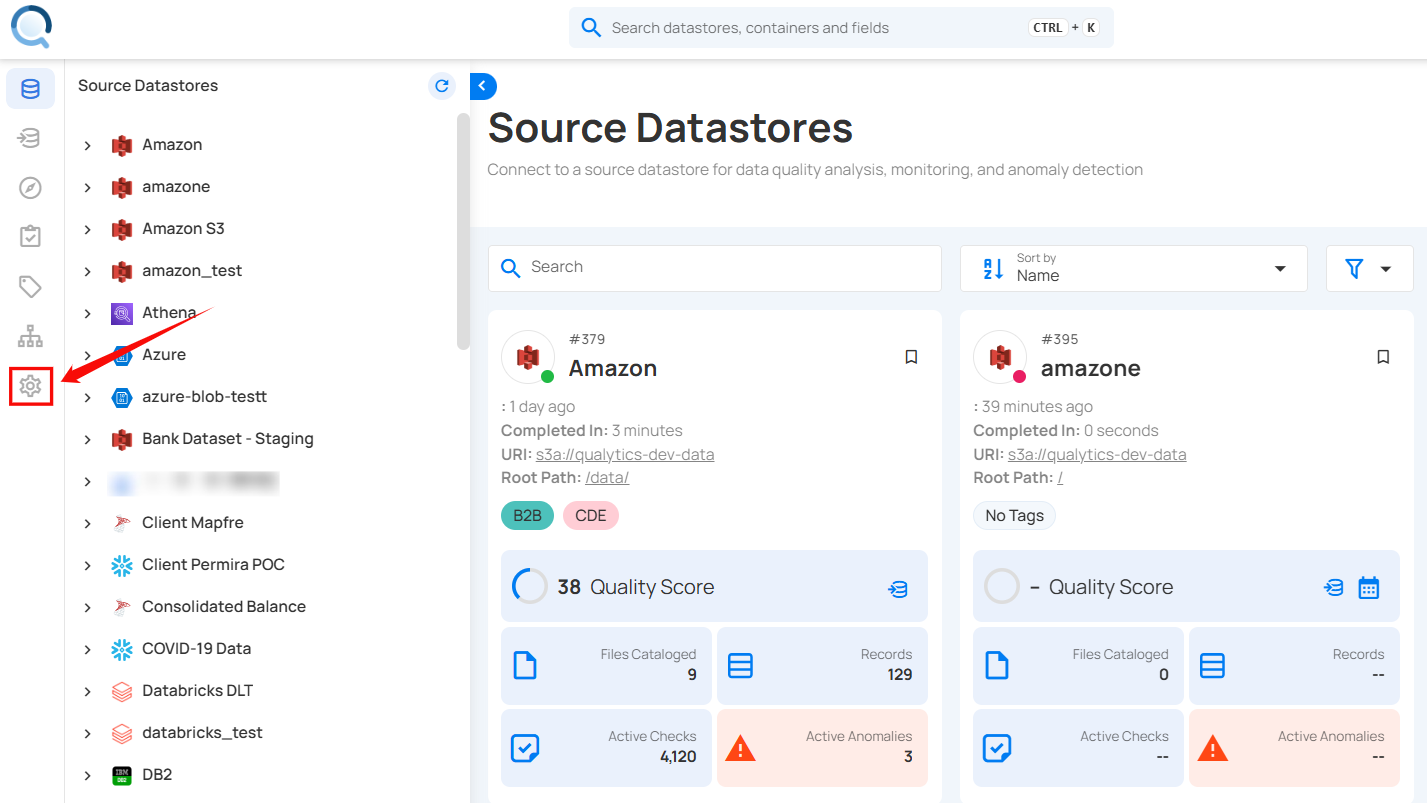
Step 2: By default, Connections tab will open. Click on the Integrations tab.
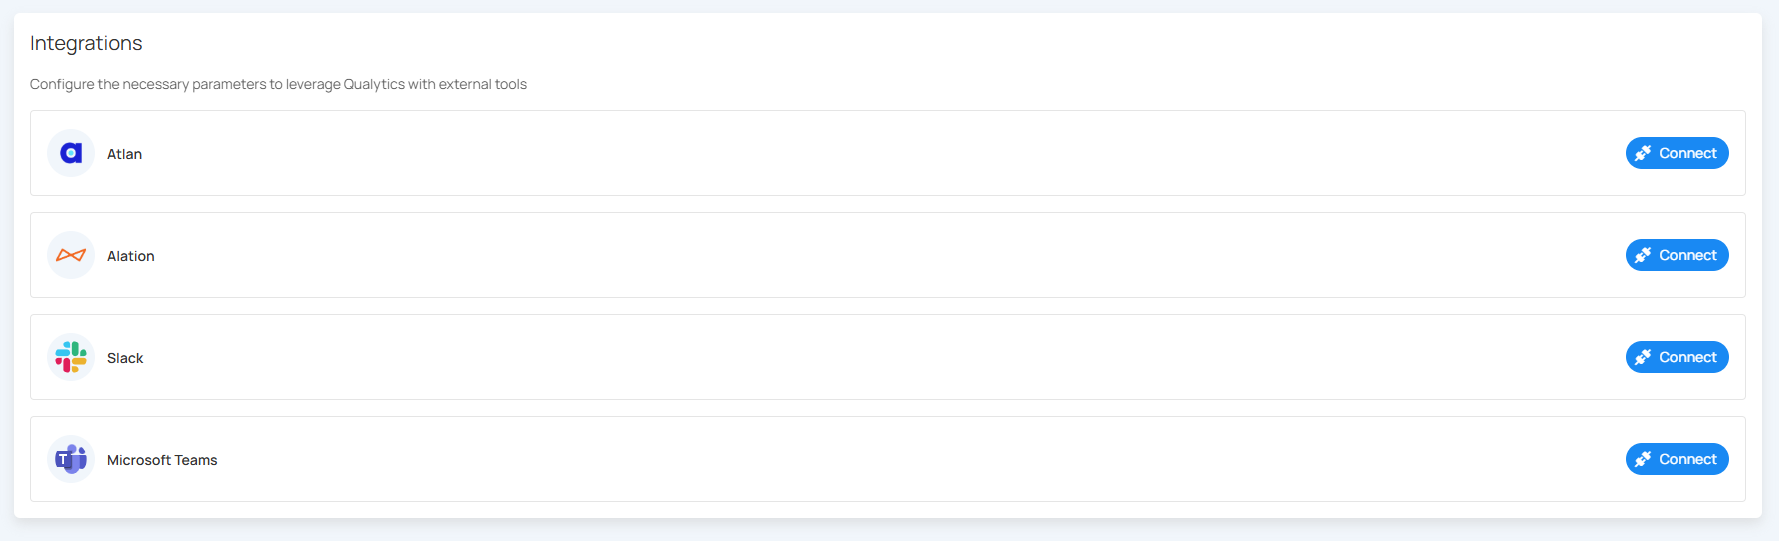
Connect Microsoft Teams Integration
Connect Microsoft Teams by providing necessary Azure credentials, configuring bot resources, and establishing a direct link to your Teams workspace for secure communication.
Step 1: Click on the Connect button next to Microsoft Teams to connect to the Teams Integration.
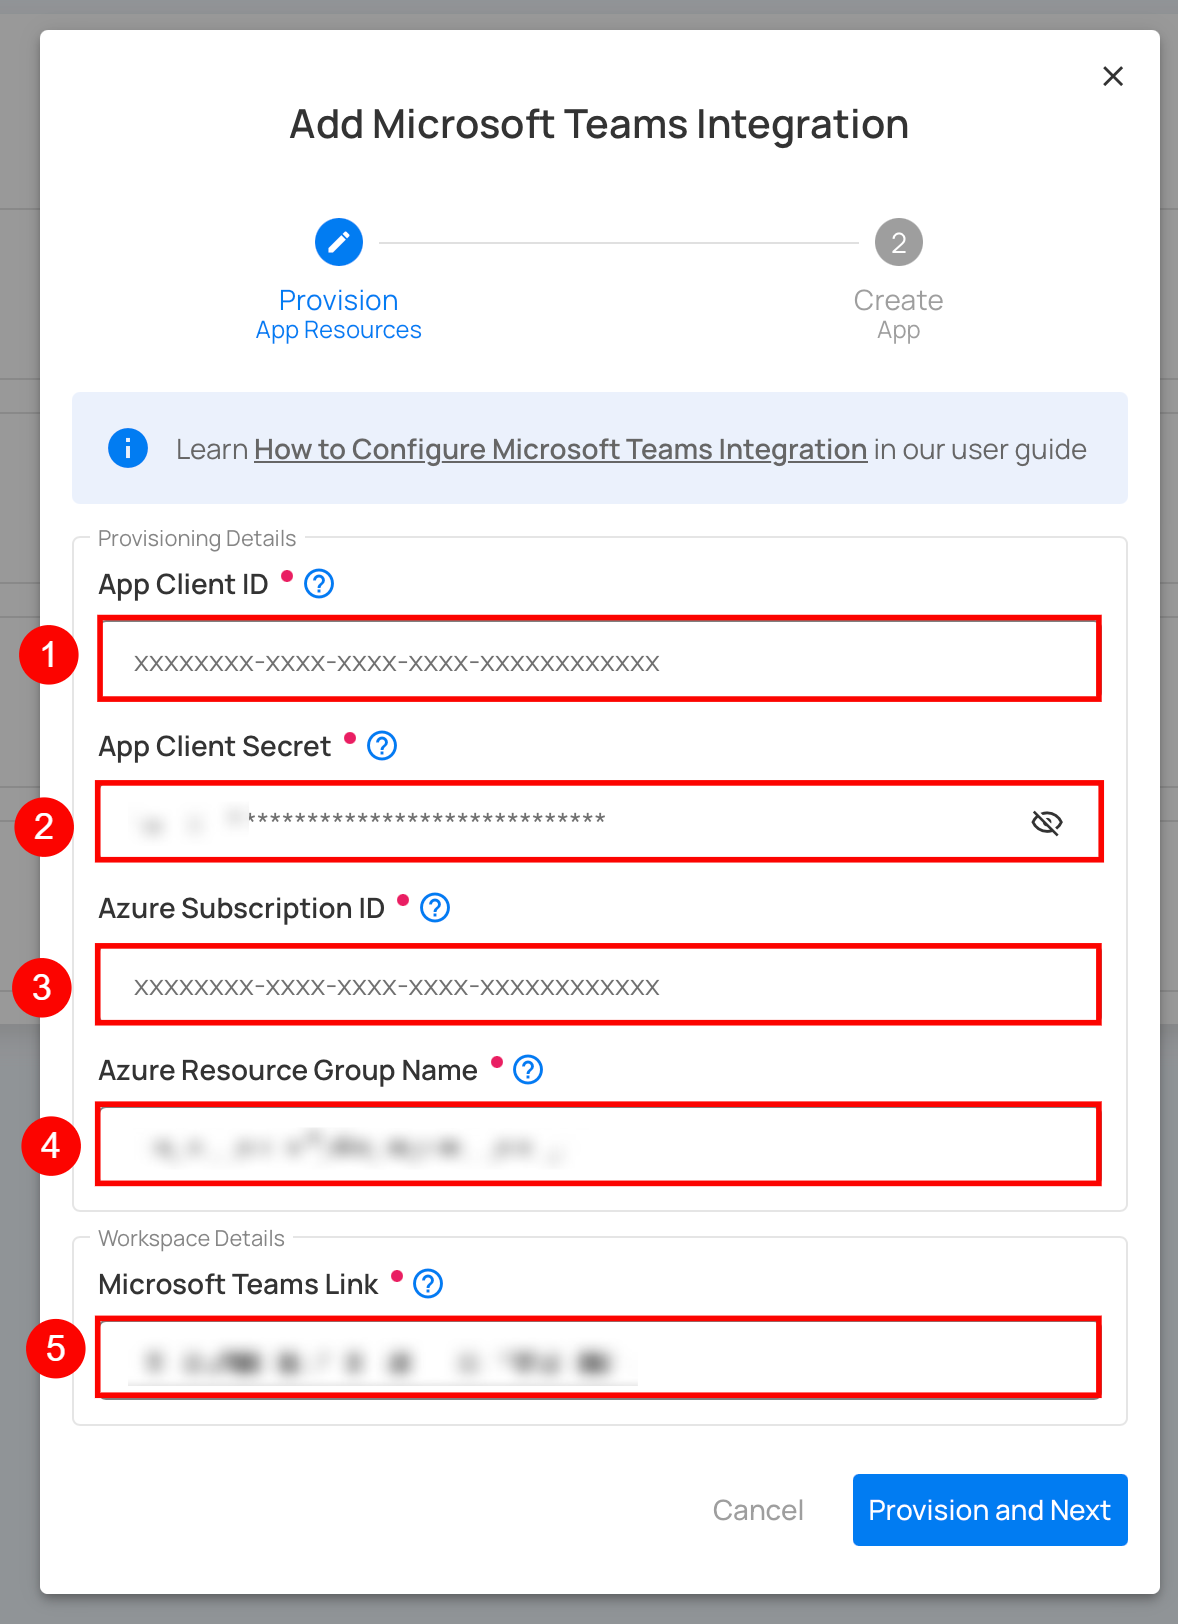
A modal window titled "Add Microsoft Teams Integration" appears. Fill in the connection properties to connect to Microsoft Teams.
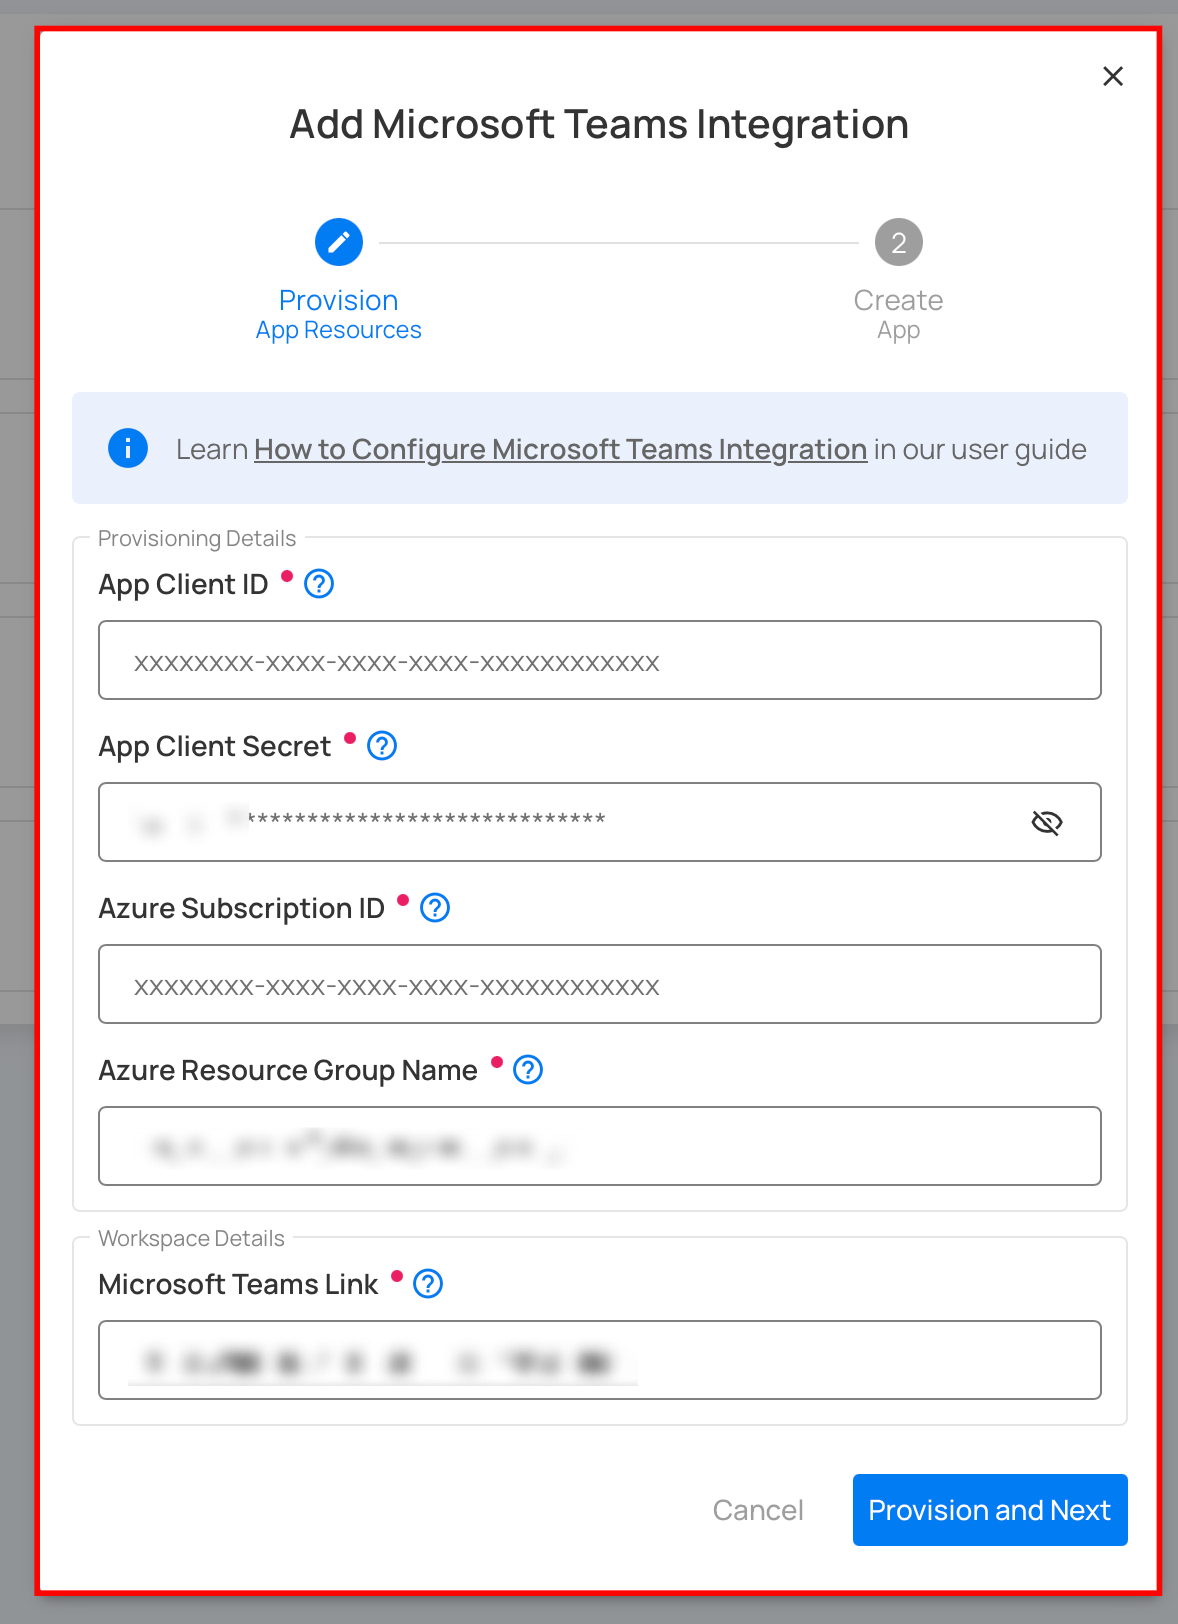
Step 2: Fill out the required provisioning properties for the Microsoft Teams integration:
| No. | Field Name | Description |
|---|---|---|
| 1. | App Client ID | The Application (client) ID from the Overview page of your Entra App registration. |
| 2. | App Client Secret | The secret value you copied after creating a new client secret in your Entra App. |
| 3. | Azure Subscription ID | The Subscription ID you copied from the Azure Subscriptions page. |
| 4. | Azure Resource Group Name | The name of the Resource Group you created or selected for bot resources. |
| 5. | Microsoft Teams Link | The team link you copied from Microsoft Teams using the "Get link to team" option. |
Step 3: Click the Provision and Next button to provision the app resources and proceed with publishing the Qualytics app to the Microsoft Teams App Catalog.
Note
Provisioning the app resources may take around 15 seconds to complete.
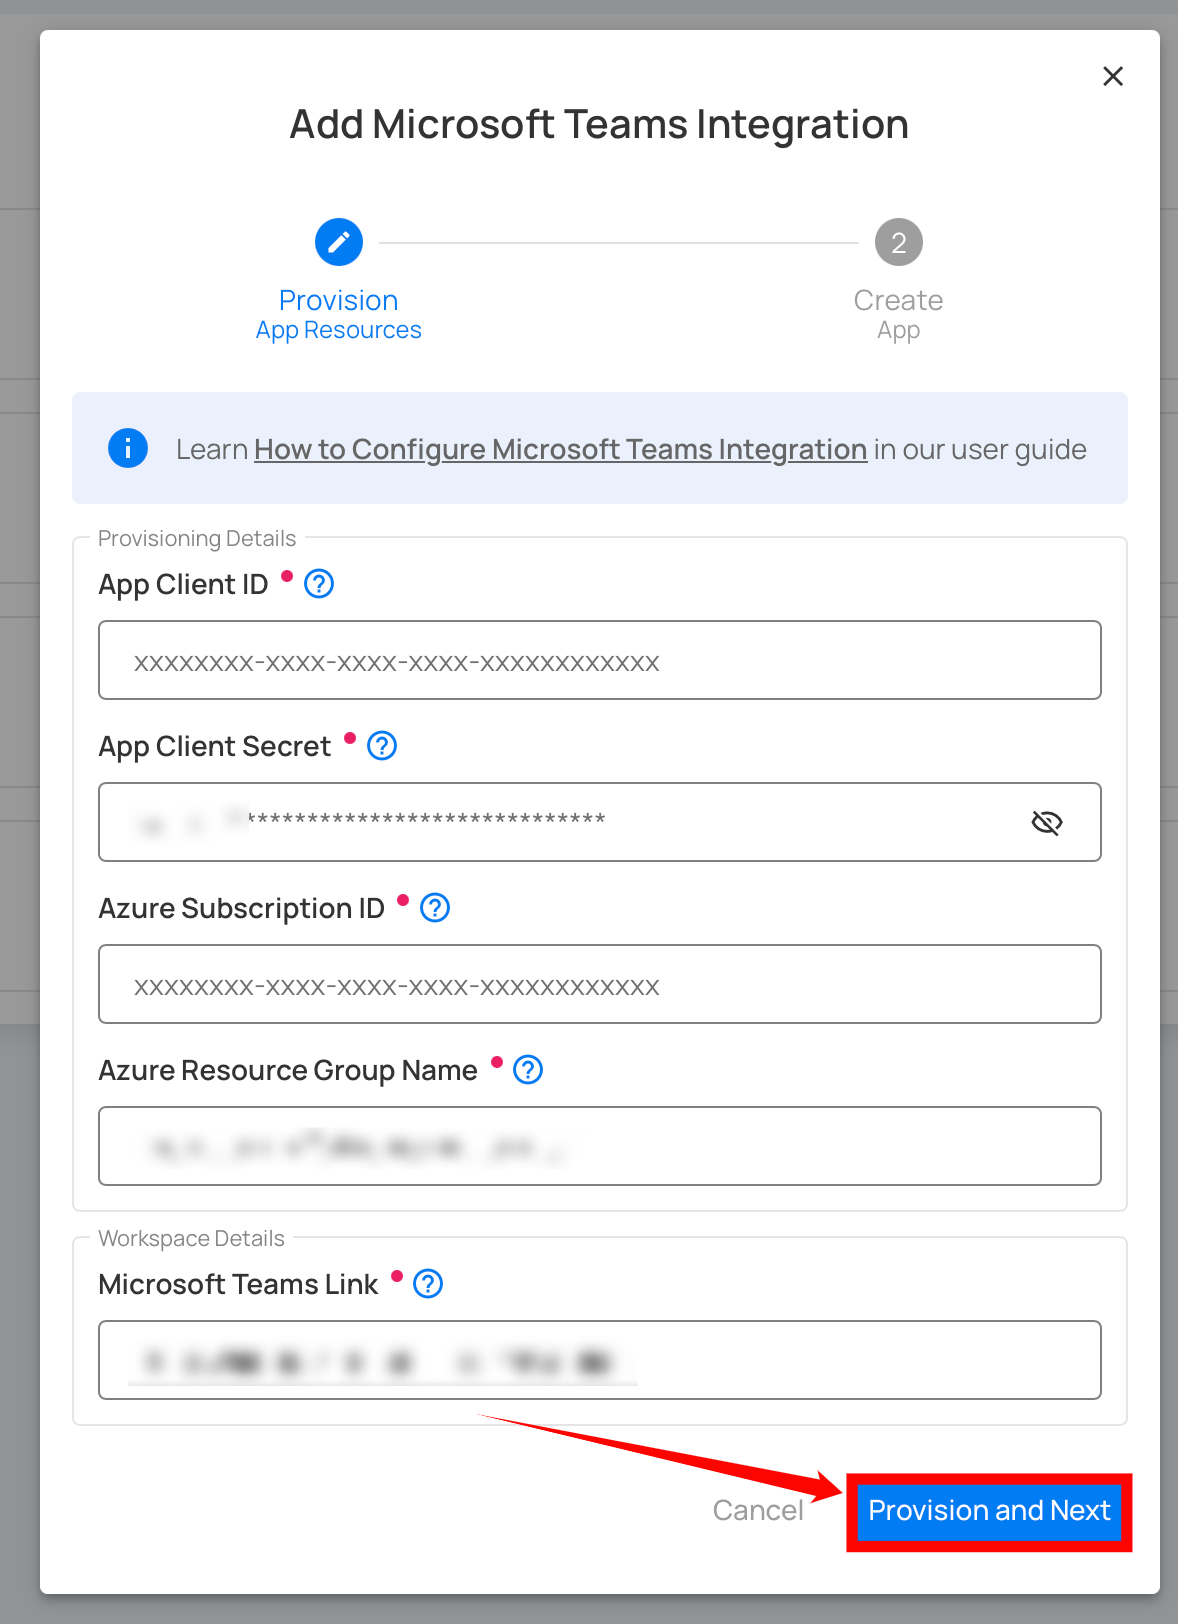
Once the app resources have been successfully provisioned, a confirmation message will appear stating, "The Teams app resources have been successfully provisioned."

Step 4: Click the Publish button to publish the Qualytics app to your organization's Microsoft Teams App Catalog.
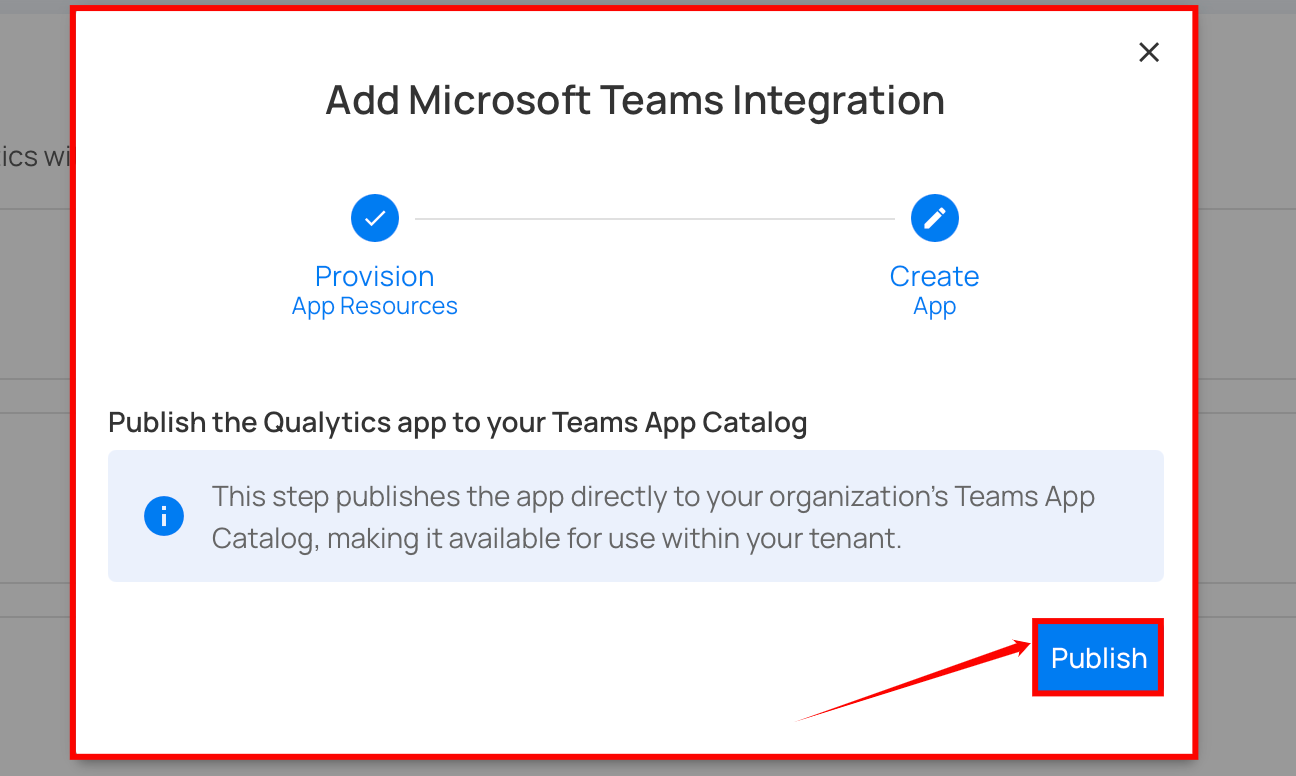
A microsoft dialog will appear asking you to accept the requested permissions. Click Accept to proceed with the publication.
Once the app has been successfully published, a confirmation message will appear stating, "The Teams app has been successfully published to your organization's App Catalog.".
Warning
Microsoft may take up to 24 hours to make the app available in Teams after it's published.
Completing the Teams Integration
After publishing the app to your organization's Teams App Catalog, the integration will show a "Pending" status in Qualytics until the app is installed in a Teams channel.
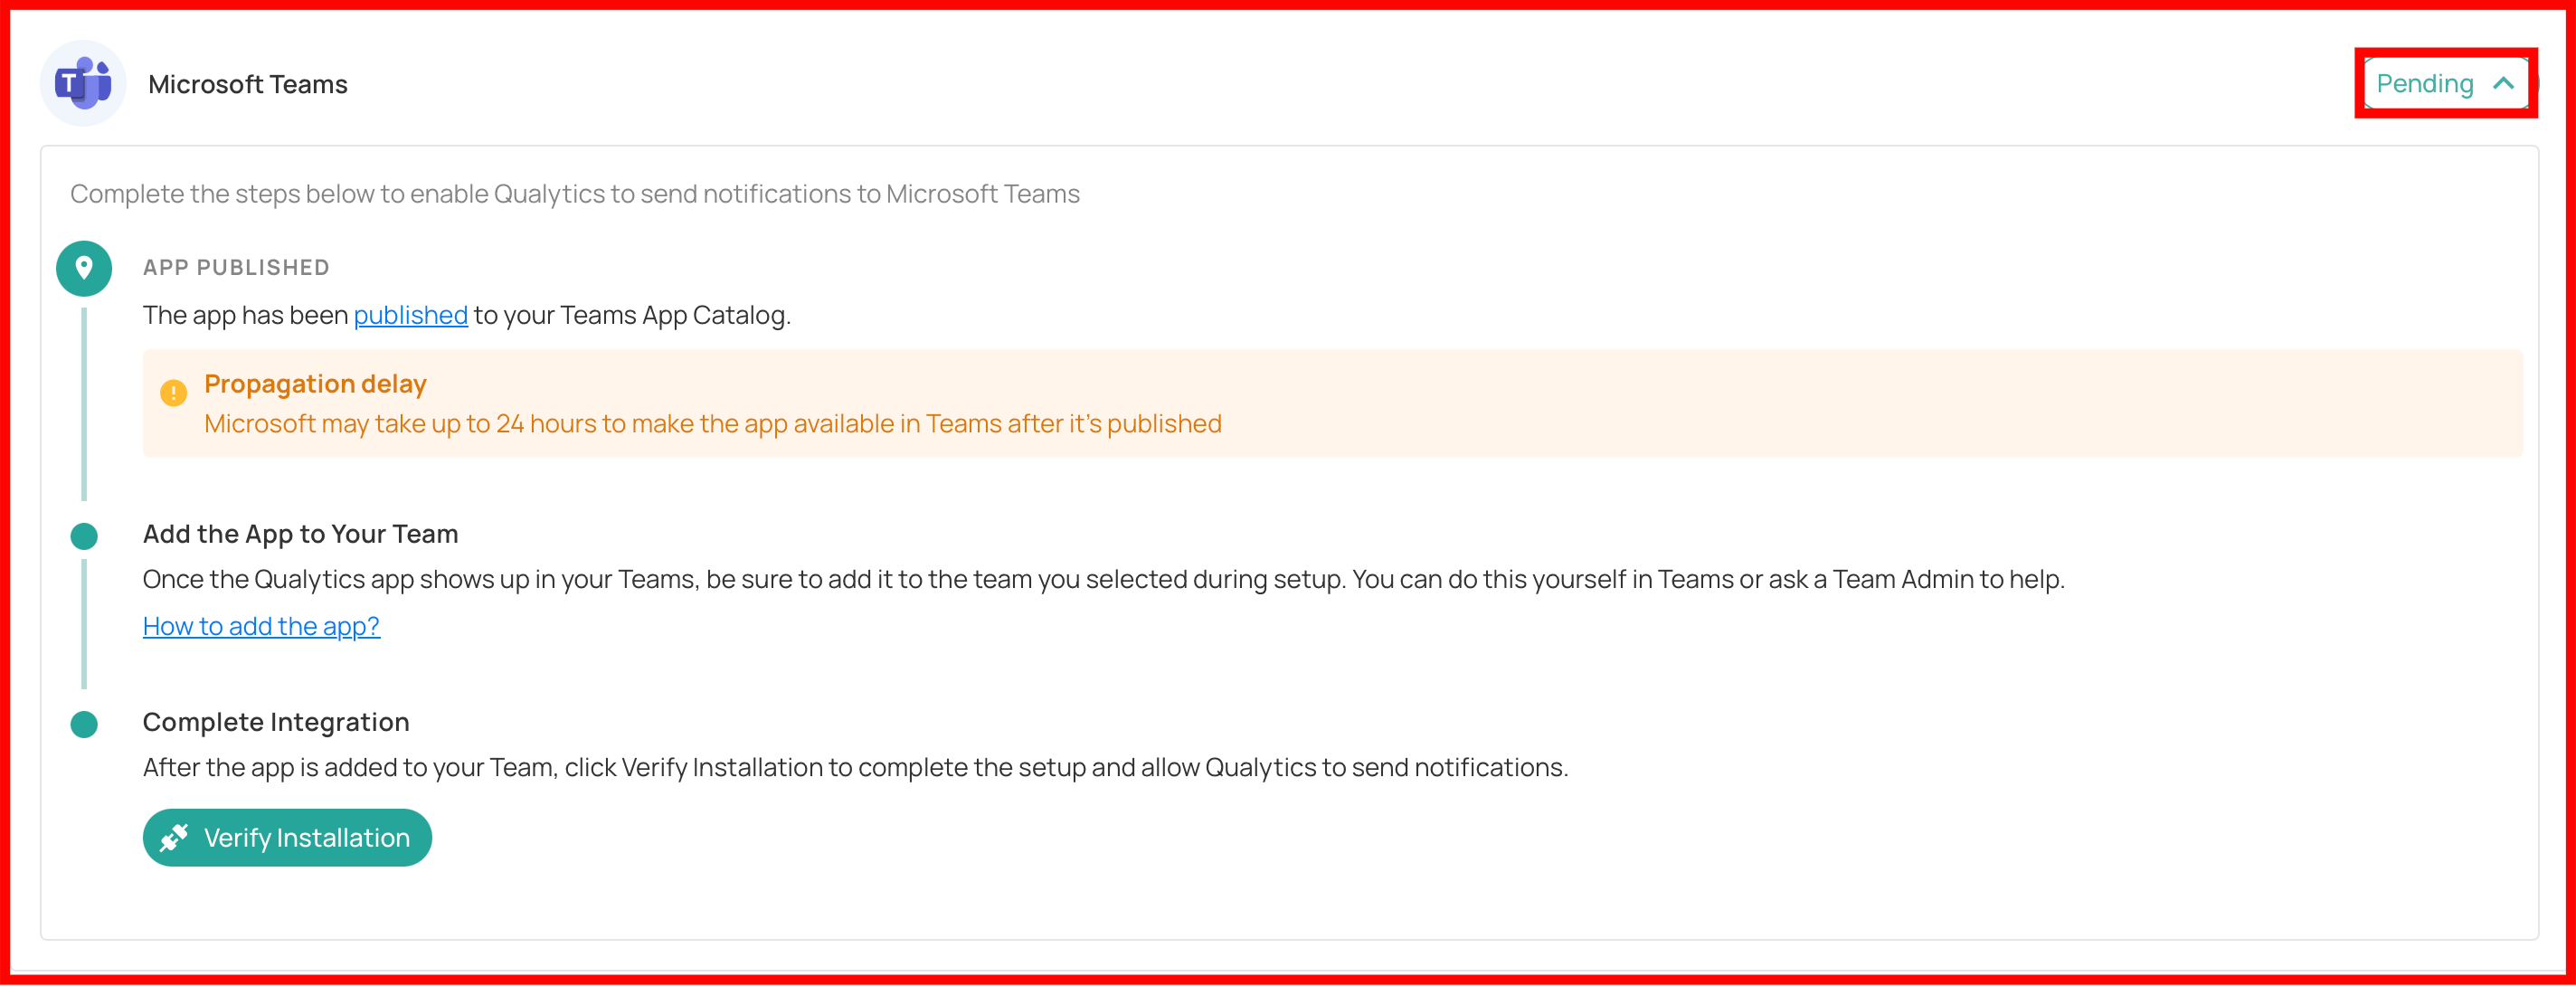
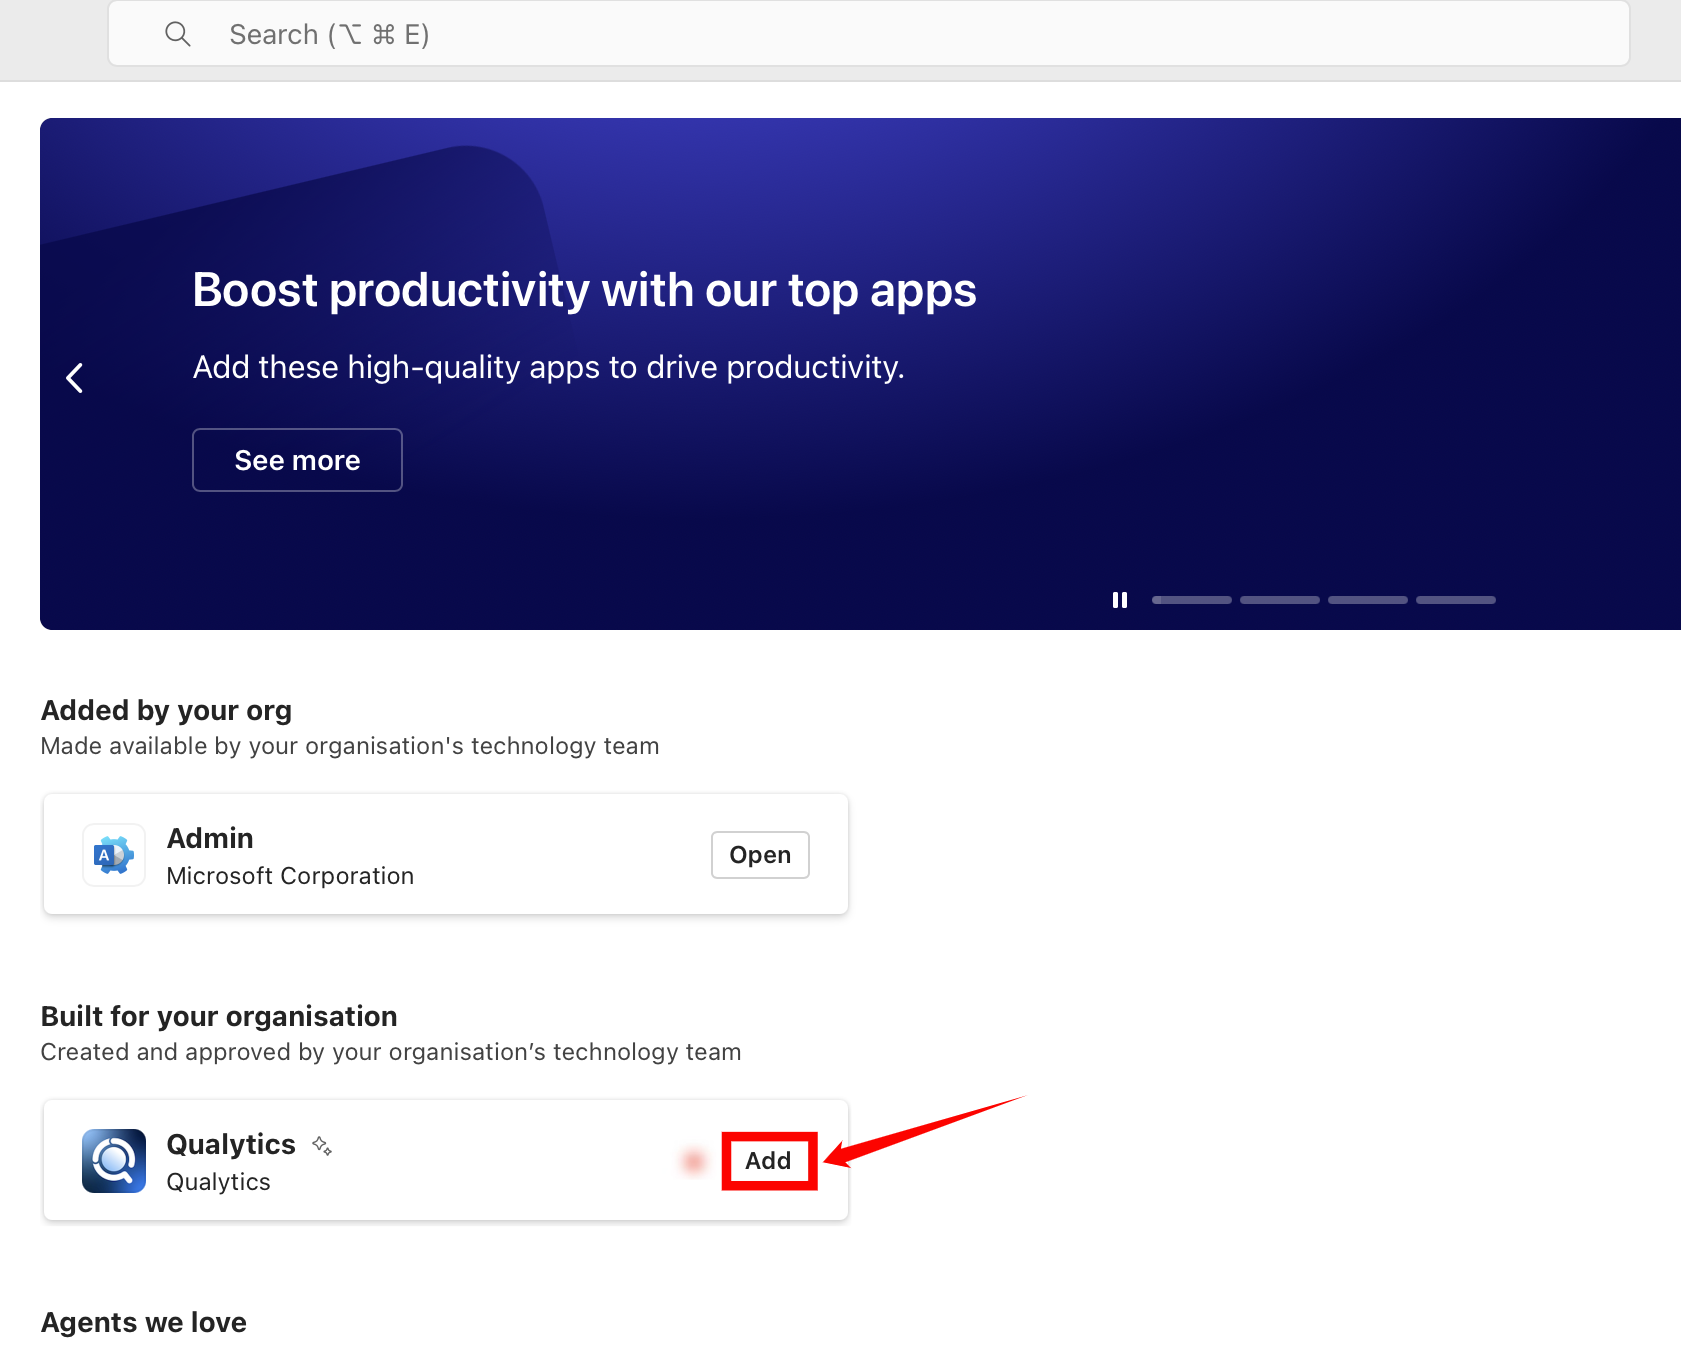
Installing the App in Microsoft Teams
To complete the integration, you need to install the Qualytics app in Microsoft Teams:
Step 1: Log in to your Microsoft Teams desktop or web application and click on Apps in the left sidebar.
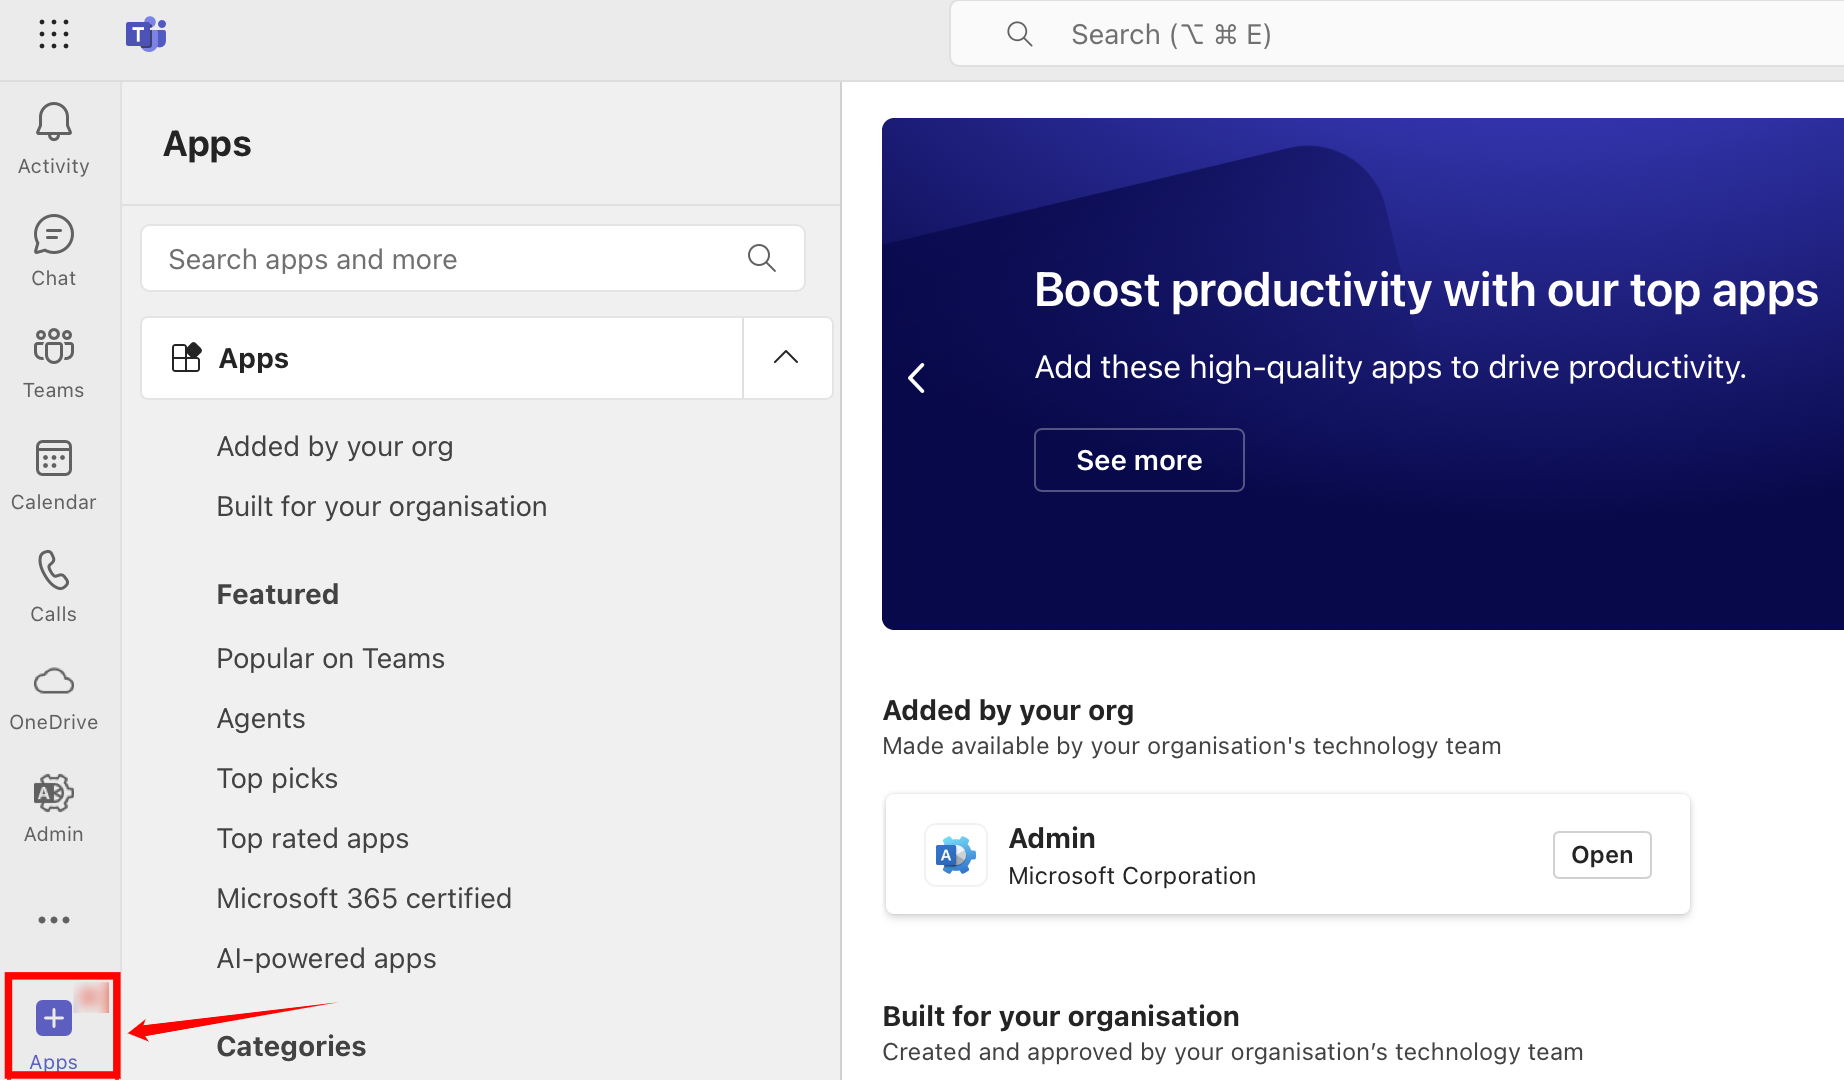
Step 2: After click on apps you will navigated to app dashboard. Select Built for your org to see custom apps for your organization and select the "Qualytics" app.
Note
If you don't see the app immediately, it might still be propagating through Microsoft's systems. This can take up to 24 hours.
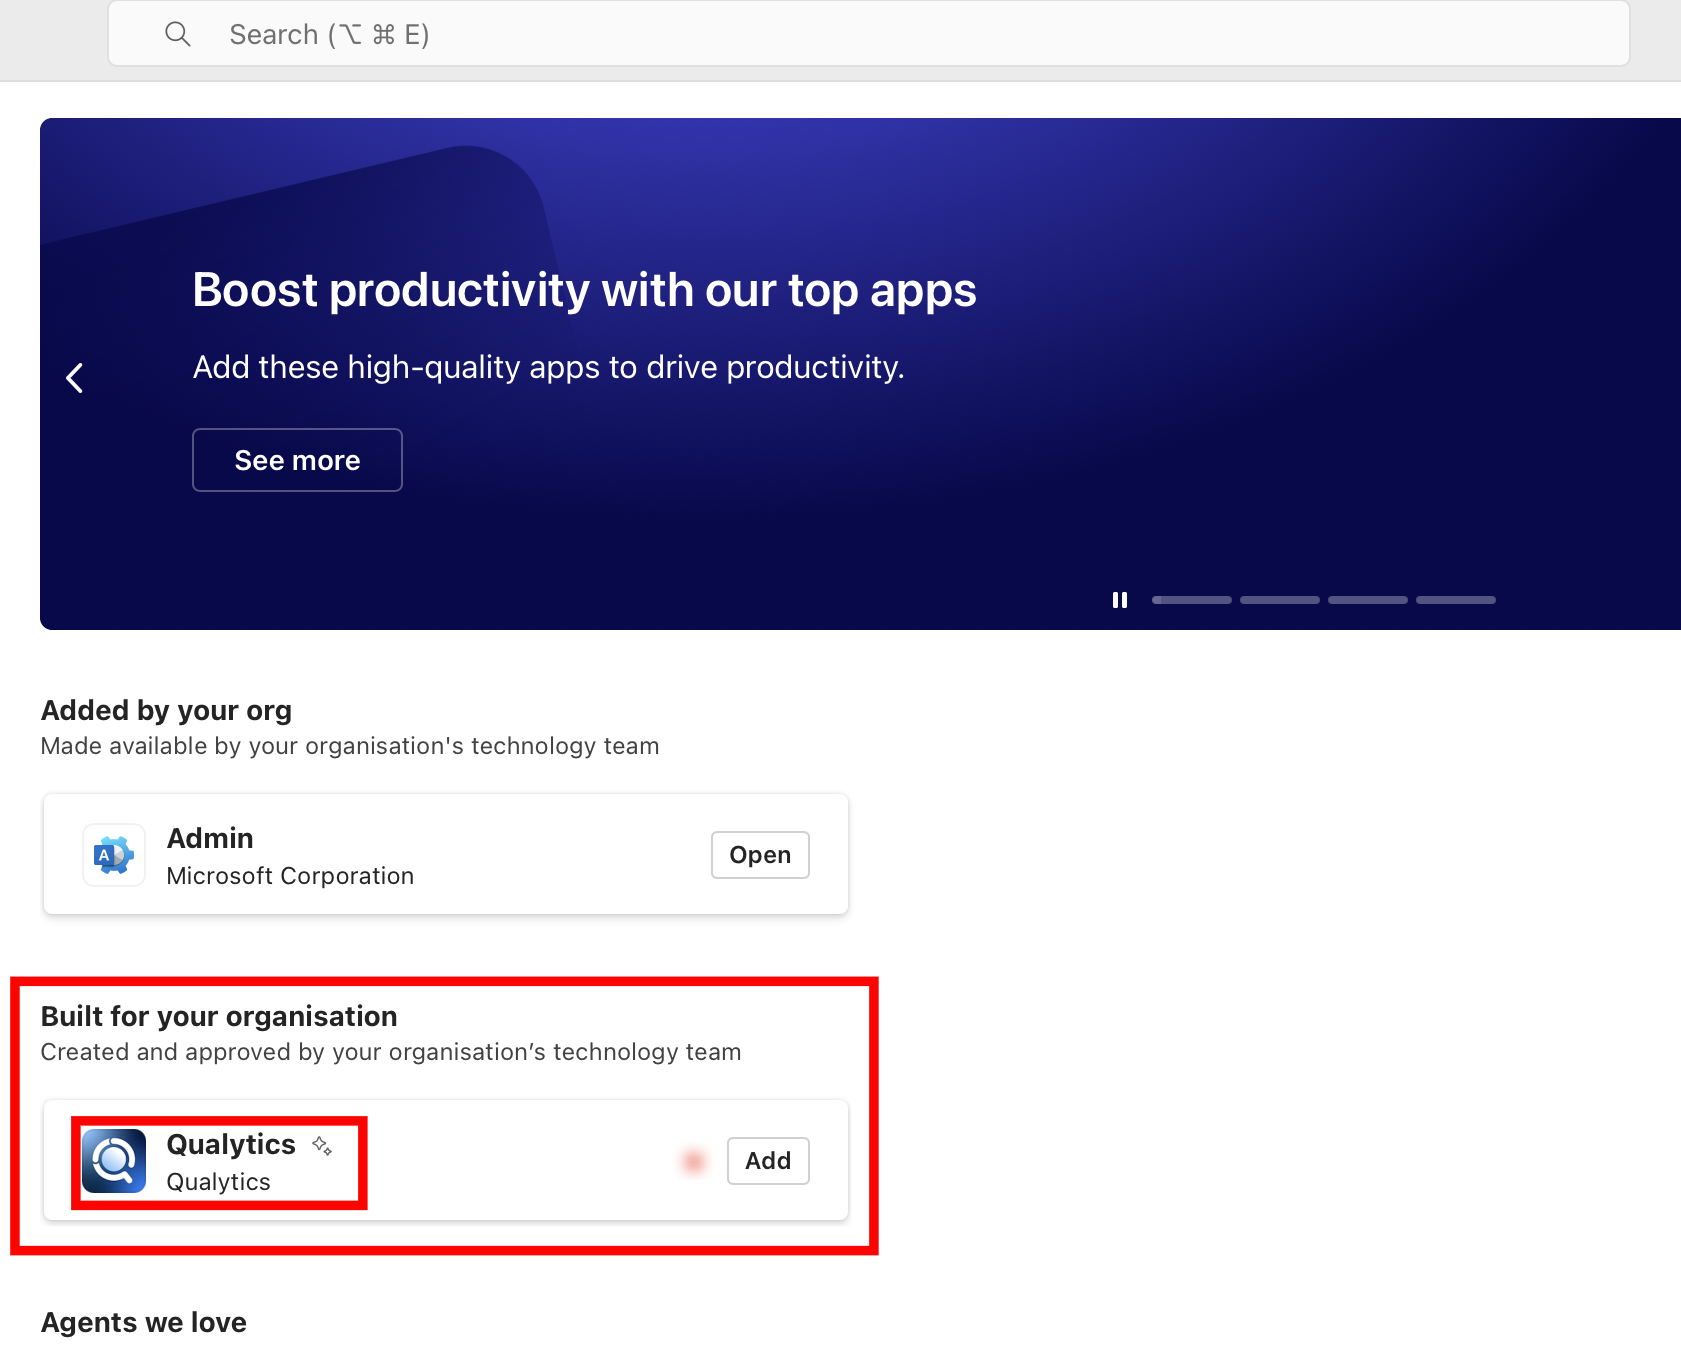
Step 3: Click Add to begin the installation process.
Step 4: After clicking the Add button, a window will appear prompting you to select a team and channel where you want to add the Qualytics app. Once selected, click Go to complete the installation.
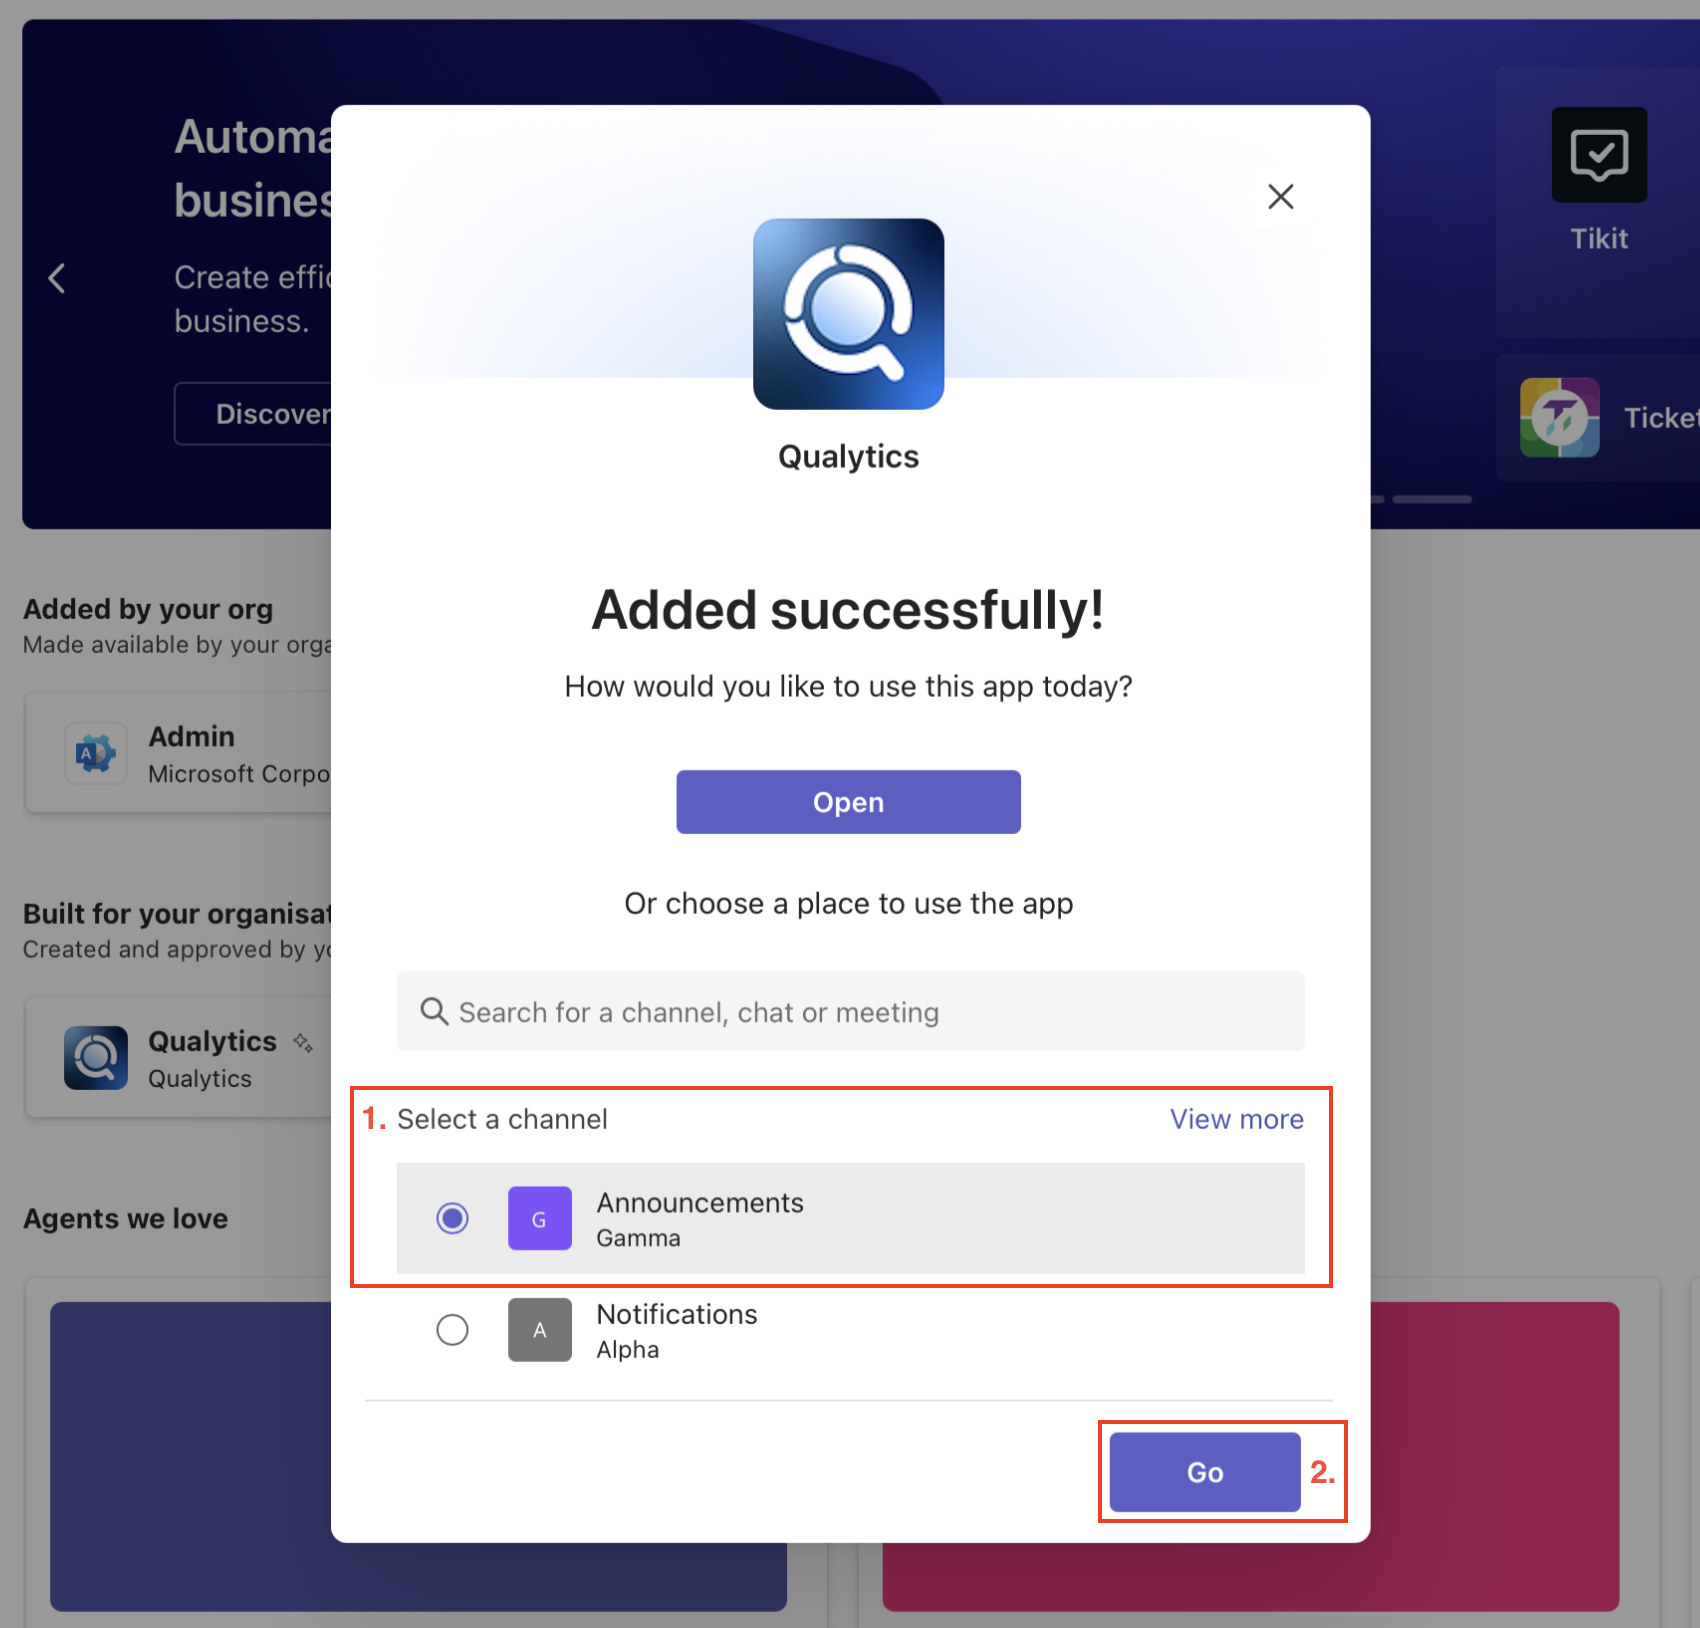
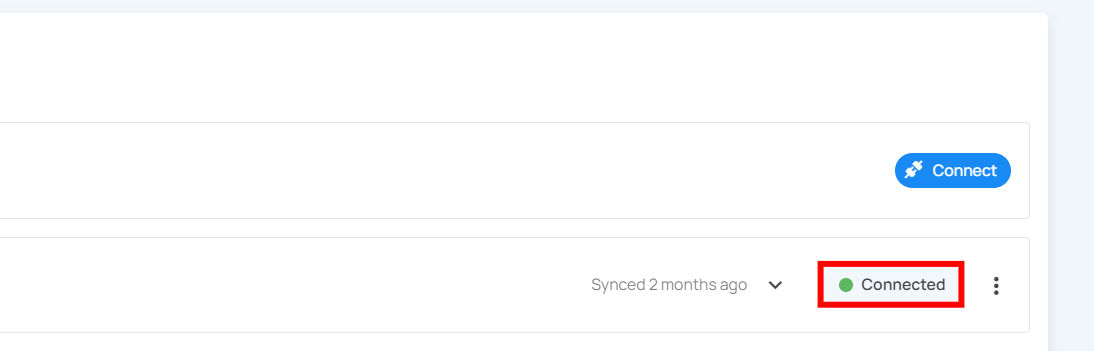
When you add the app to a team and channel, Qualytics will automatically detect the installation. You may need to refresh your browser to see the status update from "Pending" to "Connected" in the Qualytics Integrations page.
Manual Verification (optional)
Important
Manual verification serves as a fallback method if Qualytics doesn't automatically detect the app installation after adding it to a channel. If the status remains "Pending" after installing the app and refreshing the Qualytics page, use this manual verification process to complete the integration.
To manually verify the integration:
Step 1: Return to the Qualytics Integrations page and click on the Verify app installation button next to the Microsoft Teams integration.
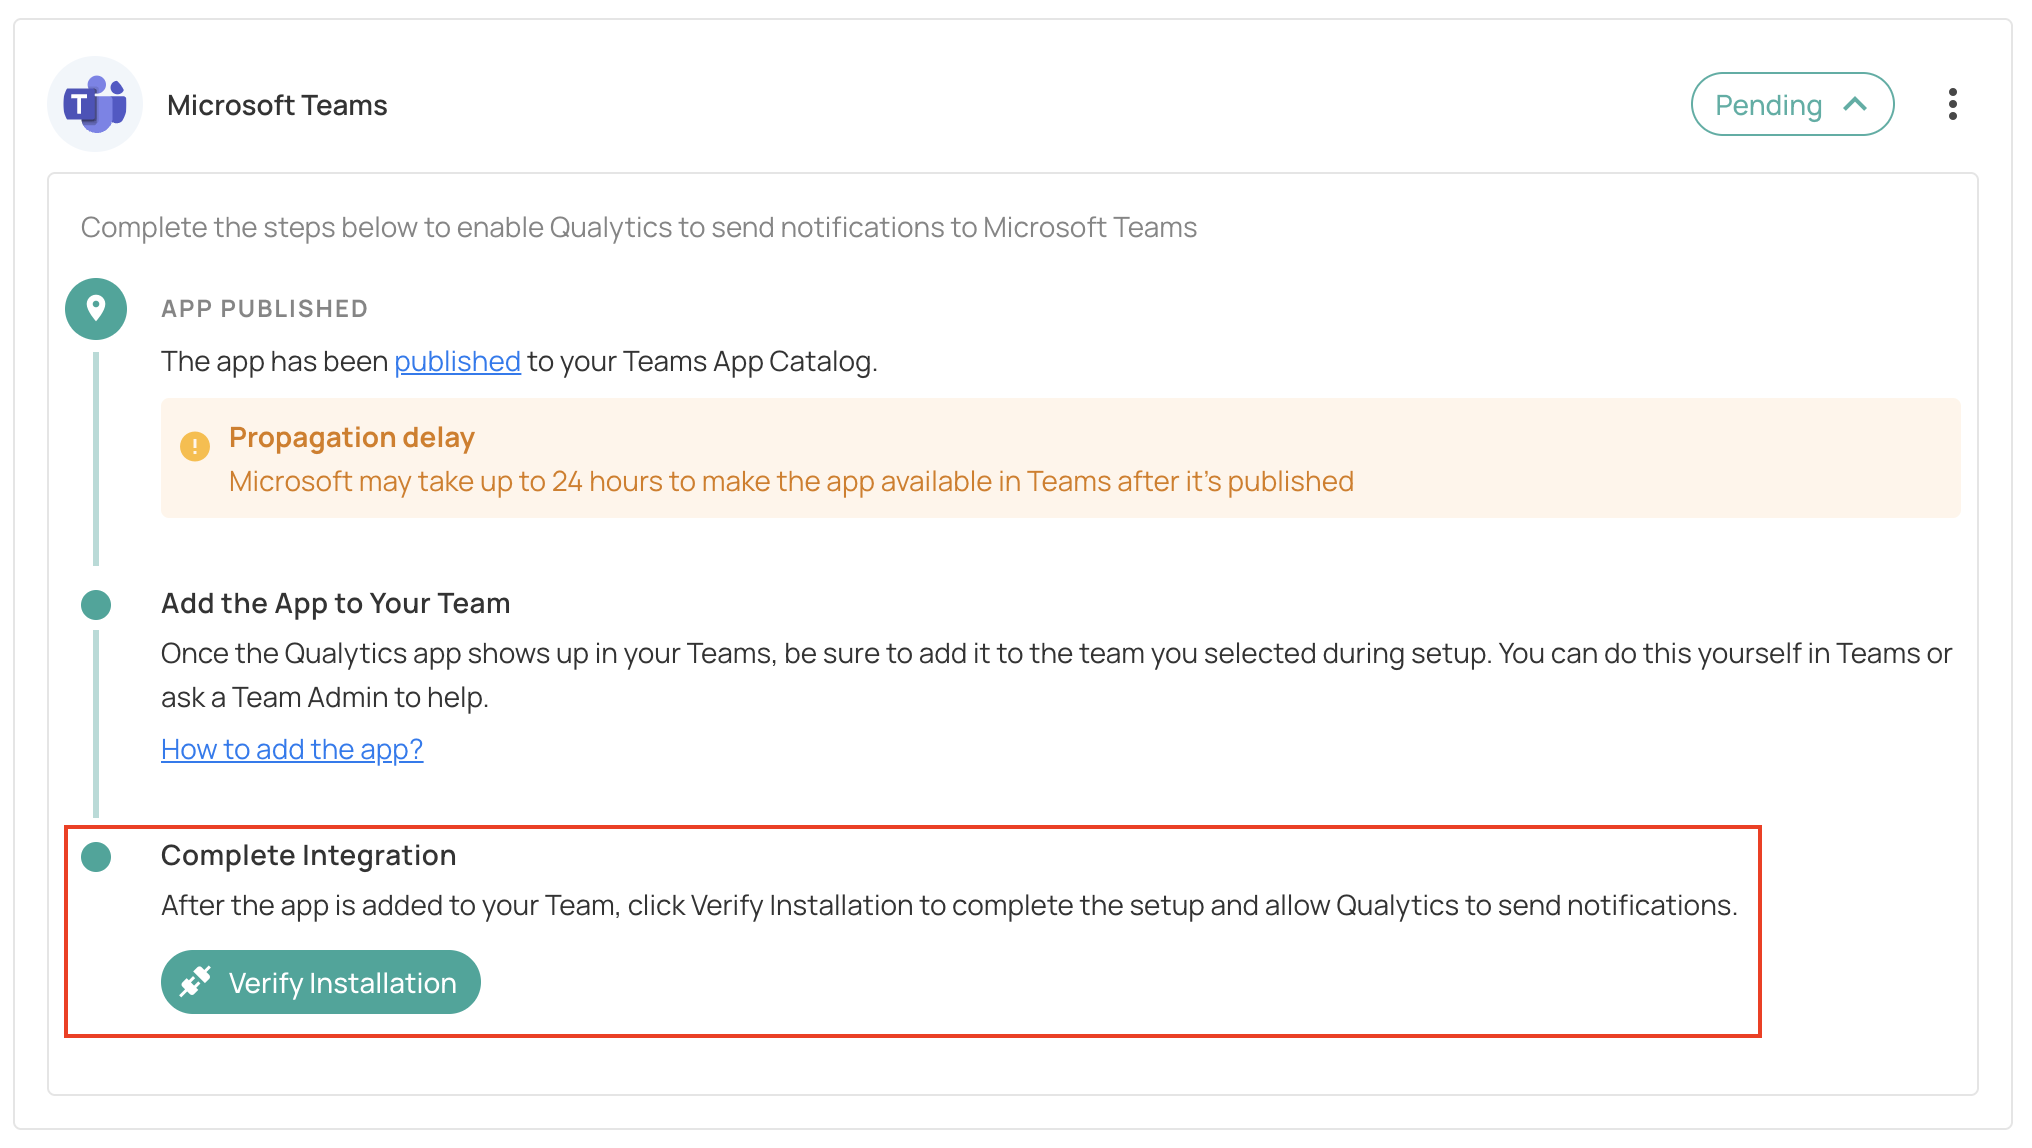
When the verification is successful, the integration status will change to "Connected", indicating that Qualytics can now send notifications to your Microsoft Teams workspace.
Manage Microsoft Teams Integration
Microsoft Teams integration enables smooth communication between your platform and Teams channels. Users can easily modify connection settings, update authorization details, or disconnect the integration based on their requirements.
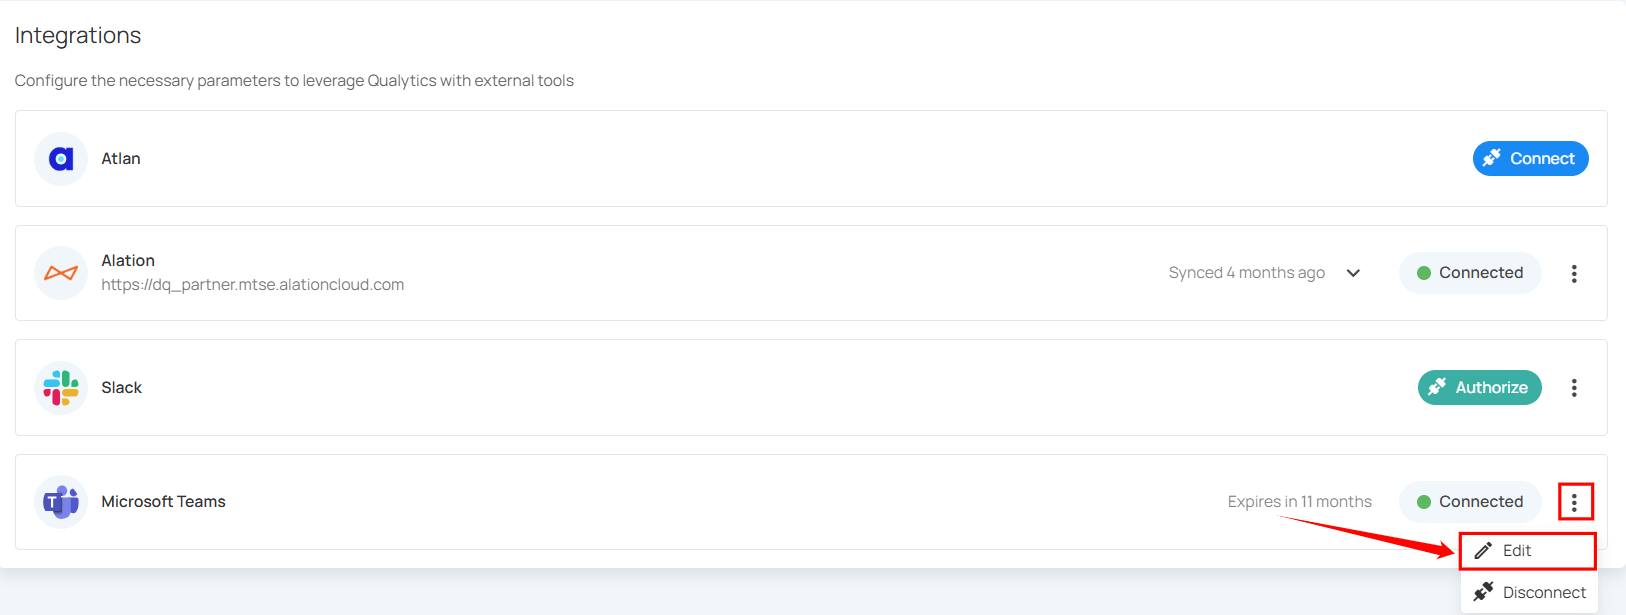
Edit Integration
Edit Integration feature allows users to modify Microsoft Teams connection settings directly from the integration panel. By selecting the Edit option from the menu, users can update configuration details and reauthorize the connection if needed .
Step 1: Click on the vertical ellipses(⋮) next to the Connected button and select the Edit option .
Step 2: A modal window Edit Microsoft Teams Integration will appear providing you with options to edit the connection properties.
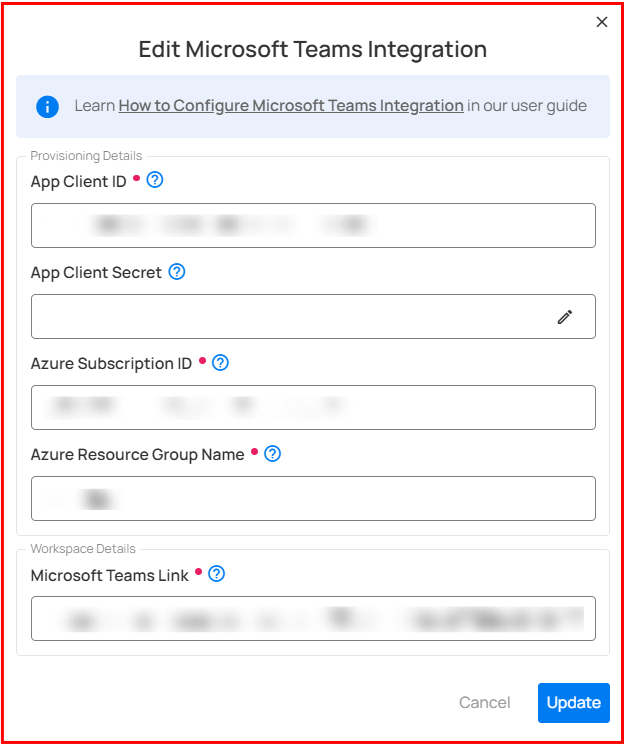
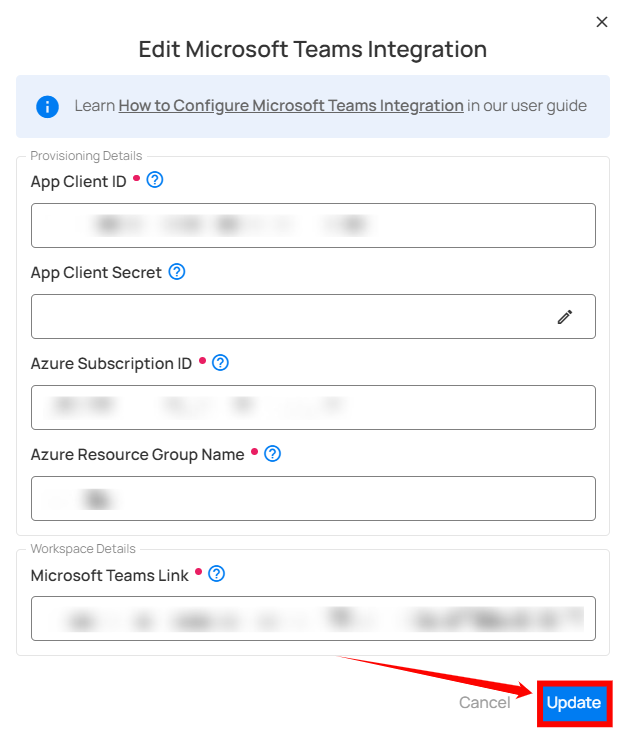
Step 3: After editing the connection properties, click on the Update button to apply the changes.
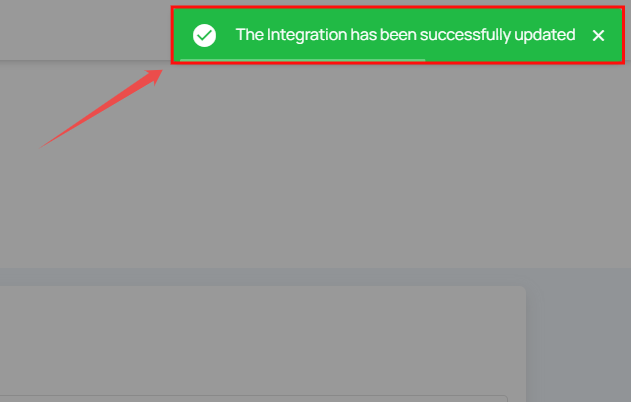
A confirmation message will appear on the screen displaying “The Integration has been successfully updated”.
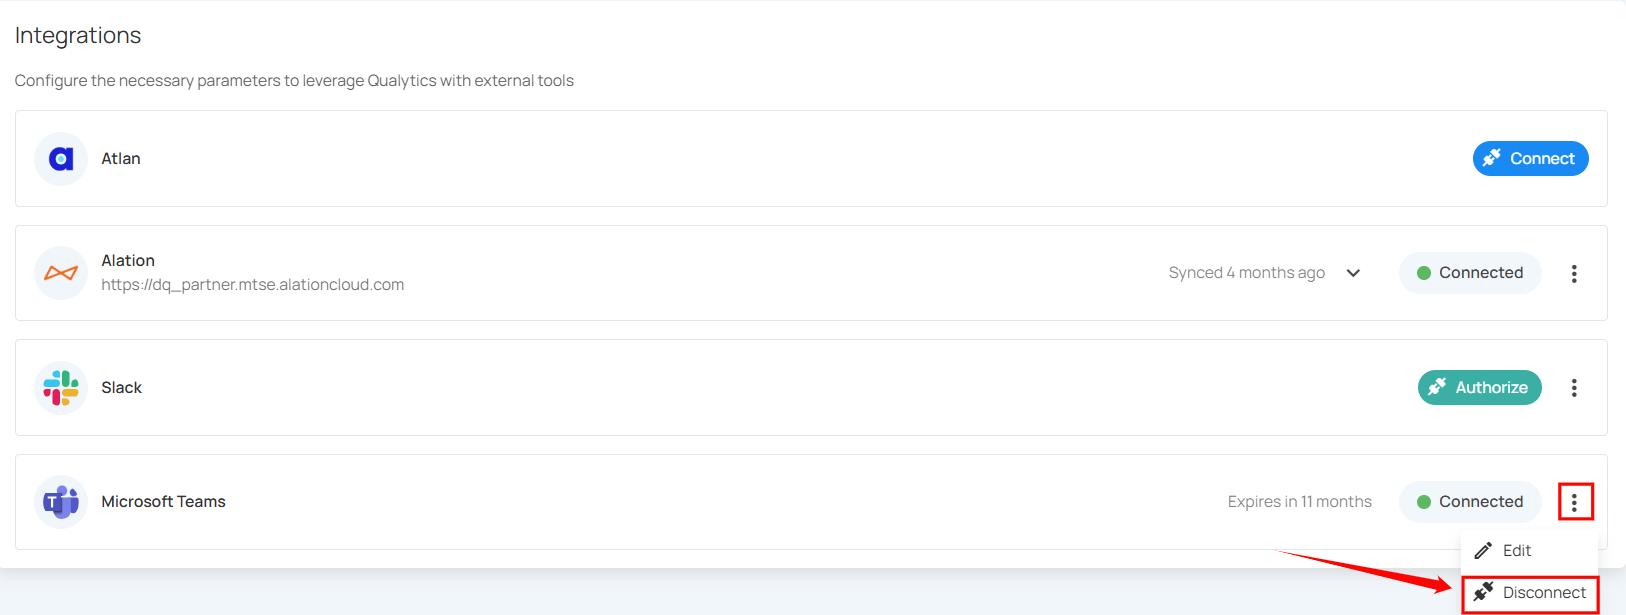
Disconnect Integration
Disconnecting the Microsoft Teams integration will remove its connection from your platform. This means any existing workflows, notifications, or actions relying on Microsoft Teams may stop working, though they won’t be deleted. Make sure to review any dependent flows before proceeding.
Step 1: Click on the vertical ellipses(⋮) next to the connected button and select the Disconnect option to disconnect the integration.
Step 2: A modal window Disconnect Integration will appear allowing you to disconnect the microsoft teams integration.
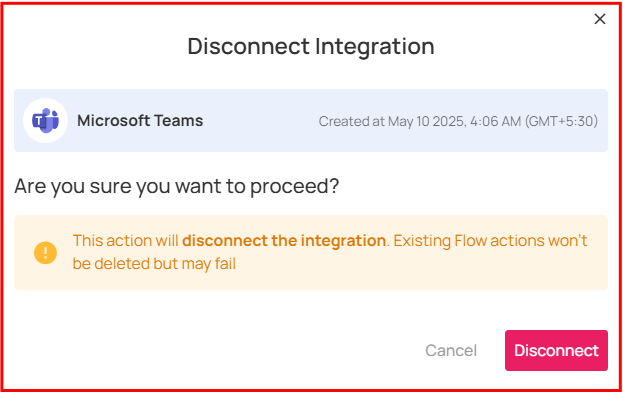
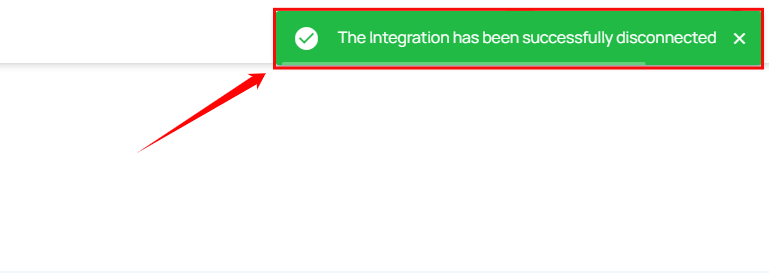
Step 3: Click on the Disconnect button to proceed.
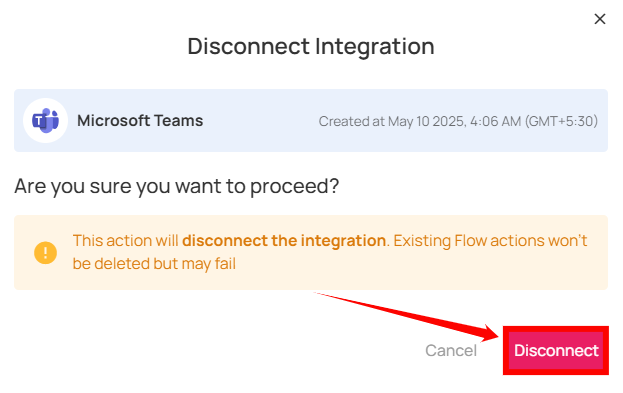
A confirmation message will appear on the screen displaying “The Integration has been successfully disconnected”.